Darkside501st's Iron Man Mk VII pepakura files - Password in First Post

Re: Darkside501st's Iron Man Mk VII pepakura files - New Pics pg 100!!

Ha-ha! Finally printed out the cardstock. Looking forward to building this!
 
Re: Darkside501st's Iron Man Mk VII pepakura files - New Pics pg 100!!

Thanks darkside it's fine now...

Another question to all experts from the newbie here. For now feet, shin and thigh are built. Everything is fine (I would've liked thigh a bit bigger though but I'll manage). Today I built COD. which is obviously too small.

1- Is there a way to change size without re-doing the whole thing
2- If I change my scale (mine is currently at 24.3) for a piece, will it still fit to other parts?

Other suggestions/advices here?

thanks

Lunaris76
 
Last edited:
Re: Darkside501st's Iron Man Mk VII pepakura files - New Pics pg 100!!

hey thanks for the help, i finally got the right scale helmet is stuff, there is 1 problem im running into and thats after i change the scaling of the model, i have to move all the unfolded parts manually around, is there an easier way of going around this?
 
Re: Darkside501st's Iron Man Mk VII pepakura files - New Pics pg 100!!

What are these back and shoulder supports you mention under your special notes section?
 
Re: Darkside501st's Iron Man Mk VII pepakura files - New Pics pg 100!!

another Mk VII helmet update post: finished with sculpting and shaping. Did the earpod concentric rings today and I am happy with them now.
Only thing remaining are the earpods themselves. for which I want to make a thins disc out of my bodyfiller and sand and sculpt to shape because I am not happy with the way I manage shape that pep piece. want it to be a perfect cirlcle, with even ridges all round.

Now to apply VERY thin layers of filler and sand down until it's smooth all over. and primer checking.

IMAG0328.jpg IMAG0327.jpg
IMAG0325.jpg IMAG0326.jpg

I'd love any feedback.
In particular if anyone has any suggestions for engraving screwhead indents into the sides/top of the faceplate, because I do not have that good a steady hand that I can just carve out some nice even looking ones.
Cheers :)
 
Re: Darkside501st's Iron Man Mk VII pepakura files - New Pics pg 100!!

Very nice!! But I would mark the cuts of the faceplate before the final smoothing :)
 
Re: Darkside501st's Iron Man Mk VII pepakura files - New Pics pg 100!!

I've basically lost the faceplate cut lines already, so I'ma have to re-find them with a ruler, a pen and a lot of patience, far as I know. I'd be glad for any help on that too as far as reference points and such.
Also, thanks :D your helmet is looking great too.
 
Re: Darkside501st's Iron Man Mk VII pepakura files - New Pics pg 100!!

I would cut again the pep files. That should give you a pretty good idea of were to cut
 
Re: Darkside501st's Iron Man Mk VII pepakura files - New Pics pg 100!!

BTW, what I'm applying to the helmet isn't "bondo" filler. In the store i bought the fiberglass the only thing they had was "gel coat" which I thought was the same as "bondo", it turns out that although I think is similar, it's much more fluid than a filler... I had to apply it with a brush and the thickness of each coat is about 1 mm at most. So this requires a lot of work to fill a big gap.

I have found now a couple of stores that sell real filler, not that I'm unhappy with this "gel coat" but it requires too much work, maybe for the next pieces I will use filler :unsure

Also, I'm not sure if I'm going to cast my helmet or not... it may depend on how well it turns out, but I would like to have 3 or 4 helmets to try different things and not to worry if I break one :)

Does it require much work to do a cast? I mean, compared to building another helmet does it require 50% of the time? 25%? :D

Is it better to cast the helmet before or after cutting the faceplate/back??

I have located a shop that sells any requested automotive paint in spray can, I think I'm going to do the popular choice of colors "Toreador Red Effect Clearcoat FL" and "Sunburst Gold Metallic Clearcoat BP/M6924" do you guys have any other color suggestion?

Lots of questions today!!! :D :D

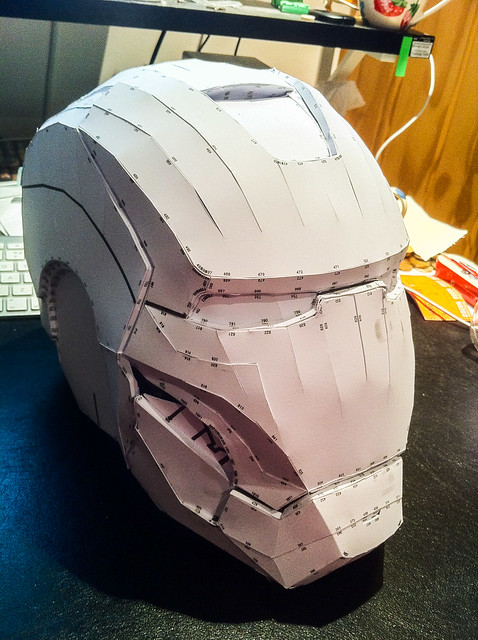
PD: not so much progress since las photo, but this is the state of the helmet right now :D

You should cut it apart before you make your molds. I know some guys that made a mold of the whole thing and then more molds of the separate parts after cutting it apart.

Thanks darkside it's fine now...

Another question to all experts from the newbie here. For now feet, shin and thigh are built. Everything is fine (I would've liked thigh a bit bigger though but I'll manage). Today I built COD. which is obviously too small.

1- Is there a way to change size without re-doing the whole thing
2- If I change my scale (mine is currently at 24.3) for a piece, will it still fit to other parts?

Other suggestions/advices here?

thanks

Lunaris76

You can split the model and add sections of cardstock to make it wider and deeper.

hey thanks for the help, i finally got the right scale helmet is stuff, there is 1 problem im running into and thats after i change the scaling of the model, i have to move all the unfolded parts manually around, is there an easier way of going around this?

There is no easier way to do this. That is one benefit that you all will have for the V2 files... I will be doing all that for you.

What are these back and shoulder supports you mention under your special notes section?

The supports are there to help keep the parts from warping when you cover them in resin. The first back file doesn't have them. So if you want to build that back file then you should use the supports from the 2nd back file.

another Mk VII helmet update post: finished with sculpting and shaping. Did the earpod concentric rings today and I am happy with them now.
Only thing remaining are the earpods themselves. for which I want to make a thins disc out of my bodyfiller and sand and sculpt to shape because I am not happy with the way I manage shape that pep piece. want it to be a perfect cirlcle, with even ridges all round.

Now to apply VERY thin layers of filler and sand down until it's smooth all over. and primer checking.

View attachment 192948 View attachment 192949
View attachment 192950 View attachment 192951

I'd love any feedback.
In particular if anyone has any suggestions for engraving screwhead indents into the sides/top of the faceplate, because I do not have that good a steady hand that I can just carve out some nice even looking ones.
Cheers :)

For some ideas on the screw heads check out the builds by ProjectEarth7 and Surreal Studios.

I've basically lost the faceplate cut lines already, so I'ma have to re-find them with a ruler, a pen and a lot of patience, far as I know. I'd be glad for any help on that too as far as reference points and such.
Also, thanks :D your helmet is looking great too.

I would cut again the pep files. That should give you a pretty good idea of were to cut

Yes, if you reprint the files and cut out along the black lines then you can use that part as a template to relocate the proper place for the panel groves.
 
Re: Darkside501st's Iron Man Mk VII pepakura files - New Pics pg 100!!

Hi Darkside501st, i am starting to build my first iron man suit and was wondering if you would please send me the password for the foam and v2 pepakura files? many thanks....
 
Re: Darkside501st's Iron Man Mk VII pepakura files - New Pics pg 100!!

Hi Darkside501st, i am starting to build my first iron man suit and was wondering if you would please send me the password for the foam and v2 pepakura files? many thanks....

:facepalm PM him for the password for the V1 files, and for the second part...

:facepalm:facepalm:facepalm He's not done the V2, and he's not giving the password for it. :facepalm
 
Re: Darkside501st's Iron Man Mk VII pepakura files - New Pics pg 100!!

Hi Aliwoz, it does say on the first page to send Darkside a PM if you are interested in the password, I think he is probably getting tired of repeating that ;) cheers
 
Re: Darkside501st's Iron Man Mk VII pepakura files - New Pics pg 100!!

another Mk VII helmet update post: finished with sculpting and shaping. Did the earpod concentric rings today and I am happy with them now.
Only thing remaining are the earpods themselves. for which I want to make a thins disc out of my bodyfiller and sand and sculpt to shape because I am not happy with the way I manage shape that pep piece. want it to be a perfect cirlcle, with even ridges all round.

Now to apply VERY thin layers of filler and sand down until it's smooth all over. and primer checking.

View attachment 192948 View attachment 192949
View attachment 192950 View attachment 192951

I'd love any feedback.
In particular if anyone has any suggestions for engraving screwhead indents into the sides/top of the faceplate, because I do not have that good a steady hand that I can just carve out some nice even looking ones.
Cheers :)
Anyway the only places that has screw in the mk vii helmet is the side pf the favplate and the back sides of the main helmet
 
Re: Darkside501st's Iron Man Mk VII pepakura files - New Pics pg 100!!

Top of the faceplate as well ;)

I have a question I'm hoping you guys could answer for me. I've made the tester helmet at 0.97 which fit me well, I put the slit in the back to get it on and there was just about enough room for my electronics and hinge etc so I printed out and made the 0.97 V2 helmet but it seems slightly smaller?! Is that because of the extra lip on the helmet base plus the extra dip in the back or have I ballsed something up? The "ears" seem closer as well... Thanks in advance peeps :)
 
Re: Darkside501st's Iron Man Mk VII pepakura files - New Pics pg 100!!

Just wanted to say a huge thanks Darkside as I've finally finished my pep build! Great file, only had one or two tricky bits, and that was mainly user error :p

Don't think I did too badly for my first attempt at pep in several years, although there are a few spots I wish I'd done cleaner.


More photos in my thread, link in my signature!

Also, I have a quick question regarding the sides of the helmet... just above the thick black line running around the side over the ears are several 'panels' which I didnt cut, and instead scored. As a result there is not much curvature to the sides of the helmet. I wondered if the side should be particularly curved, or if it is meant to be pretty much straight? I'm trying to find some references of this particular area to check myself, but thought you pros might be able to give me a clue!
 
Last edited:
Re: Darkside501st's Iron Man Mk VII pepakura files - New Pics pg 100!!

I didn't build the tester, so I really don't know. But it also seems to me that once all together the distance between ears is a bit short....
My head will fit for sure, but without any gap...
 
Re: Darkside501st's Iron Man Mk VII pepakura files - New Pics pg 100!!

I think I can offer a little insight to some of the newbies here regarding sizing and such. For me my problem area is my "Kim K booty" so every time I build I start with the cod, make sure it fits, and then scale everything the same. A lot of times we want to start with the cool pieces like the chest, which if you're a skinny guy, a small chest piece will fit anyway. So just my two cents.
 
Re: Darkside501st's Iron Man Mk VII pepakura files - New Pics pg 100!!

Just wanted to say a huge thanks Darkside as I've finally finished my pep build! Great file, only had one or two tricky bits, and that was mainly user error :p

Don't think I did too badly for my first attempt at pep in several years, although there are a few spots I wish I'd done cleaner.

More photos in my thread, link in my signature!

Also, I have a quick question regarding the sides of the helmet... just above the thick black line running around the side over the ears are several 'panels' which I didnt cut, and instead scored. As a result there is not much curvature to the sides of the helmet. I wondered if the side should be particularly curved, or if it is meant to be pretty much straight? I'm trying to find some references of this particular area to check myself, but thought you pros might be able to give me a clue!

Great job on putting it together. The sides do only have a slight curve to them. You can see in the 3D window what it is supposed to look like. If yours looks like the model then it was put together just fine.

Top of the faceplate as well ;)

I have a question I'm hoping you guys could answer for me. I've made the tester helmet at 0.97 which fit me well, I put the slit in the back to get it on and there was just about enough room for my electronics and hinge etc so I printed out and made the 0.97 V2 helmet but it seems slightly smaller?! Is that because of the extra lip on the helmet base plus the extra dip in the back or have I ballsed something up? The "ears" seem closer as well... Thanks in advance peeps :)

I didn't build the tester, so I really don't know. But it also seems to me that once all together the distance between ears is a bit short....
My head will fit for sure, but without any gap...

The Sharkmark tester is a guide to get the final scale. It is a simple model. The ears are not there so the final helmet does have a little depression that will bring it in closer to your head. If you cut holes in the side where the ear pods go then that will give you some room for your ears. Also, yes it is missing the lip on the bottom and the depression in the back. Maybe I will make a new tester to give a better impression if the size.

I think I can offer a little insight to some of the newbies here regarding sizing and such. For me my problem area is my "Kim K booty" so every time I build I start with the cod, make sure it fits, and then scale everything the same. A lot of times we want to start with the cool pieces like the chest, which if you're a skinny guy, a small chest piece will fit anyway. So just my two cents.

I agree, I have said before to start with the core. Midsection, Cod, Chest, and Back. Then if you get all that to fit you the rest is easy.


Hey guys, on another note check this out:


Look at the other threads I started... I am working on one for the headset.
 
Re: Darkside501st's Iron Man Mk VII pepakura files - New Pics pg 100!!

what kinda glue did you use to put your card stock together?
 
Back
Top