Dan's Gold Leader Y-Wing (WIP)

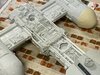
Also working the inner engine cores so that I can get on to mounting the engines to the fuselage/wings assembly. To do that I have to get all the lighting and wiring worked out, which means getting the cores pre-painted and so on.

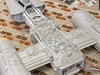
The heat sinks fit beautifully into the Plastruct TB-28 tubing - perfect fit.

IMG_5567_small.jpg

IMG_5568_small.jpg

IMG_5569_small.jpg

IMG_5570_small.jpg

IMG_5574_small.jpg


I had to go with the more pure deep red than I preferred for the engine light color - I was hoping to get a bit more of the magenta look as on screen by tinting the Tamiya transparent red with a little transparent blue, but the pigments mixed to a more dull brownish burgundy instead. So I went with the pure red.

The recessed areas of the engines are hard to get to painting-wise if you assemble the whole thing first. Plus, looking at the various reference photos of the actual Gold Leader model it's pretty obvious that they must have pre-painted at least a bit of those recessed areas before final assembly. So I'm following suit and trying to match the details as best I can. I'll touch up as I go, but at least for now I can proceed to get the nozzle assembly finished up...

IMG_5575_small.jpg

IMG_5576_small.jpg

IMG_5579_small.jpg

IMG_5585_small.jpg

IMG_5589_5590_comb_small.jpg


Dan
 
Well, I've been busy working away on this thing, but haven't kept up with updating the pics and progress reporting here, so here goes...

Greeblie additions:

IMG_5592_small.jpg

IMG_5593_small.jpg

IMG_5595_small.jpg


I built and installed the front cannons and sealed up the cockpit. I now have a canopy, thanks to the kindness of a member here:

IMG_5900_small.jpg

IMG_5901_small.jpg

IMG_5903_small.jpg


Final wiring attachment between cockpit and main fuselage and got the cockpit and engines bonded on:

IMG_5912_small.jpg

IMG_5967_small.jpg

IMG_5969_small.jpg

IMG_5970_small.jpg

IMG_5971_small.jpg


Dan
 
"Oh, Danny boy, the pipes, the pipes are calling..."

IMG_5975_small.jpg

IMG_5976_small.jpg

IMG_5980_small.jpg

IMG_5982_small.jpg

IMG_5991_small.jpg

IMG_5993_small.jpg

IMG_5996_small.jpg

IMG_5997_small.jpg

IMG_5998_small.jpg


Such piping. Much work. Wow!

The "oops" pile:

IMG_6003_small.jpg


I kinda like that I've been able to 'let go' and not worry so much about the little bits that don't fit quite right and miss just a bit looking exactly like the original filming model. I'm trying to match as close as reasonably possible, but not stressing too much if one or two things are a bit off.

A bit more piping left to do, a few more greeblies here and there, and then I'll get the engine cores installed...

Dan
 
Last edited:
Wow, the piping looks great! How are you bending the pipes into their proper shapes?

Thanks! The two smallest diameter pipes (3/64- and 1/16-inch, Plastruct TB-1 and TB-2) are wire cored, so they take a bend rather easily like bending a paperclip. The other tubing needs to be heated until soft enough to bend and I've just been using a candle and carefully twirling the tubing above the flame until it slowly becomes soft enough to yield. I'm new at that so more complex, 'multi' bends in close proximity to each other are a bit tricky. I'm open to any tips from the pros here!

Dan
 
Dan,

This looks really nice -- and I'm pretty sure that even the pros use the same candle-flame method for pipe bending. My discard pile was even bigger on my first build, and I briefly flirted with the idea of buying Plastruct "bends" of 45 and 90 degree angles in order to get things perfect looking, but then realized I'd have just as much work puttying all those seams all the way around and then sanding/painting it to look "seamless", so abandoned the idea and kept the imperfections. I also tried real copper pipe with the Dubro bender tool, but that was even harder for the complex bends.

The piping difficulty and resulting "orginality" is also one of the reasons they Y-Wing is so satisfying to build, in my mind, because no two are alike, so you can always hot-rod it your own way and get away with the rational narrative of Repairs after the Battle of ____________. Whereas the Tie Fighters and X-Wings all are duplicates of each other pretty much, with differences related mostly to paint schemes and smudge marks on the X-wings, so not nearly as much "give" in the creativity department when building those.
 
"The pipes - they've stopped."

I think I've gotten all the piping done finally (except for the two close-looped ones at the rear end of the fuselage) and the last of the few remaining small greeblies attached on top.

IMG_6017_small.jpg

IMG_6018_small.jpg

IMG_6029_small.jpg

IMG_6027_small.jpg

IMG_6028_small.jpg


For some reason the one running down the underside of the port side that takes a gentle double right-angle bend and then runs out along the wing and out to the engine seemed at the outset the most daunting to me. But by the time I got to it I guess I had gained a bit more experience on the heat and bend techniques and it turned out just fine I think. That's another reason I haven't tried to tackle the rear end loops yet. :)

Yeah, as Studio Kitbash says above (thanks!), this part was very satisfying and fun, even if it was a lot of trial and error work.

Dan
 

Attachments

  • IMG_6026_small.jpg
    IMG_6026_small.jpg
    692.5 KB · Views: 109
  • IMG_6029.jpg
    IMG_6029.jpg
    1.7 MB · Views: 112
  • IMG_6026_small.jpg
    IMG_6026_small.jpg
    692.5 KB · Views: 105
Last edited:
Engine cores installed:

IMG_6102_small.jpg

IMG_6103_small.jpg

IMG_6104_small.jpg

IMG_6105_small.jpg

IMG_6106_small.jpg


I decided that I needed to do a bit of 'pre-painting' on the cores before installing them, since there are some deep recesses there and my interpretation of the look of the actual filming model suggested that some bits might have been painted before the final install. So, there's a bit of painting and some first-stage weathering here. Lots of detail to paint in there still but I got the difficult recessed stuff taken care of.

So, it's come to that time - time to actually start painting this thing!

Dan
 
Lookin' good !!!

Save yourself the headache on the rear-end loops, and get DaveG's perfectly modeled versions at his Shapeways shop.

UNLESS you want that hand-made droopy/wonky ILM look -- to my eye, this is one of the "tells" of the handmade model that doesn't look good in static form, only screaming by at 24 frames per second.

Thanks! Oh, I'm going to give them a try and I am indeed trying to match some of the imperfections of the actual model. Maybe not quite so wonky as the original in this particular case, but there's surely a lot of randomness in the tube bending process for me still so I'm sure they will be 'uniquely wonky' for my model. :)

Dan
 
Looking fantastic! I keep wanting to build something like this, then I see one these amazing builds in action and I think, well, maybe someday but I am not there yet!

Also, Acetone on the kitchen counter, typical modelers house, my wife always complains when I leave paint and primer in the kitchen :)

Thanks! Oh gosh, if I can do this anyone can! Go for it and dig in! You’ll learn a bunch and have a ton of fun doing it. Jump in!

And, yeah, condo life limits my workspace. Changing soon, though, and I hope to have a real workshop area and dedicated display space for all my helmets/headgear, props, and models.

Dan
 
Just a few minor items before priming. I needed to get the rear end loops done and then work out the rear end cap mounting:

IMG_6131_small.jpg

IMG_6132_small.jpg

IMG_6133_small.jpg

They loop inboard just a bit too far, but oh well... 'imperfectly imperfect' I guess.

I knew that I was going to be using magnets to hold the rear end cap in place to hide the batteries for the cockpit and engine lights:

IMG_6134_small.jpg

Bonded down nice and tight with J-B Weld.

Dan
 
Last edited:
Ready for 'prime time'!

Last time I'll see her like this:
IMG_6139_small.jpg


Tape up the cockpit and engine cores:

IMG_6140_small.jpg

IMG_6141_small.jpg


On goes some Tamiya gray primer:

IMG_6142_small.jpg

IMG_6144_small.jpg

IMG_6145_small.jpg

IMG_6146_small.jpg

IMG_6147_small.jpg


I always love this stage - the way the primer coat 'unifies' the look and somehow make all the greeblies 'stand out' even more.

Dan
 
White coat on top of the primer, some blue and yellow striping, and the very beginnings of detail and weathering...

IMG_6163_small.jpg

IMG_6171_small.jpg

IMG_6172_small.jpg

IMG_6179_small.jpg

IMG_6197_small.jpg

IMG_6198_small.jpg

IMG_6199_small.jpg

IMG_6215_small.jpg

IMG_6217_small.jpg

IMG_6219_small.jpg


The blue is not as intense in person, it's actually pretty subtle. And the cockpit and engine domes aren't quite as bright as they appear here - they are closer in tone to the rest of the fueslage. I'm going for a compromise between the white of the actual filming model and the 'gray' as it kinda appears on screen - I'm trying to capture the on-screen feel while still maintaining as much of the actual model tones as I can. When it's all done I'll use my DSLR to take proper pics and take more care to get properly exposed and white-balanced images to capture it's true in-person appearance.

Layer by layer, wash by wash, learning as I go...

Dan
 
Last edited:

Your message may be considered spam for the following reasons:

If you wish to reply despite these issues, check the box below before replying.
Be aware that malicious compliance may result in more severe penalties.
Back
Top