Custom Saber Build

saphirekosmos

New Member
Hi there! So I was digging through the shop the other day and found a pipe with tom tooling in it that was perfect for a lightsaber casing. since then I have been mulling it over and have finally given up fighting it. =P I don't have any real definite plans yet, just kind of winging it as I go. XD

Here is a pic of the original pipe that started it all. IDK what it was originally for all I know is it is the perfect size and made of stainless steel. Note the second picture is after I cut one side off. I figure I could easily get 2 sabers out of it.

2014-04-28 20.00.10.jpg2014-04-28 20.00.16.jpg


Before and after wire brushing to clean it up.
2014-04-28 20.00.22.jpg2014-04-28 20.00.32.jpg


Here is the pipe I decided to use inside do add some depth and weight. I decided it would also be the "tip" where the blade cam out of so I cut it at and angle.
2014-04-28 20.00.46.jpg

After cutting the pipe down I sandblasted it to get the bulk of the paint off where it would show. I then wire brushed it to clean it up and "seal the pores" of the metal.
2014-04-28 20.06.05.jpg2014-04-28 20.07.37.jpg


Here is a pic of the inner pipe fitted into the first one.
2014-04-28 22.25.47.jpg2014-04-28 22.25.41.jpg


this is an alternate tip design I am playing with. Sadly now I have to start thinking about the final product rather than just winging it. XD
2014-04-28 22.26.06.jpg

Build time so far: 1ish hours

Would love to hear thoughts an comments. Also any suggestions on the design would be welcome. =)
 
Hi,

I like the design so far. The last three pics look very nice. I would say a nice discreet saber, not too much "blinbling" please.
 
Hi there,

Indeed ... excellent start ... keep it original trilogy ... use 'vintage' greeblies and add-ons :)

Chaim
 
Hi there,

Indeed ... excellent start ... keep it original trilogy ... use 'vintage' greeblies and add-ons :)

Chaim

Dunno exactly what you mean by "vintage". You talking about doing it more oldschool like the original sabers and doing more found item and less fabrication?

Hi,

I like the design so far. The last three pics look very nice. I would say a nice discreet saber, not too much "blinbling" please.

I agree.


Thanks for the feedback. =) I don't plan on having too many greebles. I plan on having some of these :

Metric%20Socket%20Head%20Cap%20Screw%20Alloy.jpg


for both visual appeal and to secure the inner sheath. I plan on making it so the blade is removable so I can get a nice light up blade made later on. For now I have a dowel that will work as a placeholder/whacking stick. =P Also plan on having a display sheath that shows the focusing lens and whatnot. Should let me play with it's usage more.

In addition I will be making a sort of radiatore pommel out of washers to break up the pommel of the saber. Hopefully in the end it will be a nice balance of simplicity and flash. Should have more pics tomorrow. If nothing else I can get the greeblies I picked up up. XD
 
Quick update:

I have the rough pommel done. I am thinking of drilling a couple holes in the brass nut to fit a D ring in there for hanging.

2014-04-30 13.59.35.jpg2014-04-30 14.00.21.jpg2014-04-30 14.01.42.jpg
 
Yeah ... nice pommel ... indeed 'vintage' is whatever greeblie had a previous life as a part of other equipment :) and don't forget some weathering ... lightsabers were used in a galaxy far far away and a long time ago ;)

Chaim
 
Yeah ... nice pommel ... indeed 'vintage' is whatever greeblie had a previous life as a part of other equipment :) and don't forget some weathering ... lightsabers were used in a galaxy far far away and a long time ago ;)

Chaim

Oh I will weather it. Personally that is my favorite part and in my opinion adds most of the wow factor of a good prop. Need to decide how to scar it. Maybe the pommel or another part took a glancing hit in the past. ;P

Looking good might steal the brass nut idea for my saber ;)

Please take as much "inspiration" as you want. =P

Another update :

I welded (horribly I know. >_>) a cap onto the bottom of the inner pipe of my outer sheath. I then cleaned it up so I could slide it back in and also weld a section of the all thread rod onto it to attach the pommel.

2014-04-30 16.32.10.jpg2014-04-30 16.36.25.jpg

Here I drilled two holes for the first of my greeblies. These will be a knurled nut and a cap nut, both brass btw.

2014-04-30 17.15.17.jpg2014-04-30 17.35.44.jpg

Here I fit the dowel in. The dowel mainly serves as a beater blade to play around with. It also lets me play with how I am fastening my removable blade modules into the handle. Current thought it a combo of the 2 greebles on the front and 4 of the bolts I posted earlier near the pommel. I think in combination it should be fairly sturdy. Hopefully sturdy enough for some combat/ >:)

2014-04-30 17.15.09.jpg2014-04-30 17.33.42.jpg

Totally didn't stat feeling like killing some younglings for the emperor. =P

2014-04-30 17.34.04.jpg
 
I really need to stop doing these updates when I should be sleeping. XD

Anyhoo today I drilled and tapped the bottom set of screws that A) holds the 2 outer sheaths together and B) will secure the blade inserts.

2014-05-01 16.31.40.jpg2014-05-01 16.34.54.jpg2014-05-01 16.34.45.jpg

I originally went with the bigger screws but didn't like how awkward they looked so I swapped them out for set screws instead. This let me keep the nice slick profile I have been working with so far.

2014-05-01 21.28.58.jpg2014-05-01 21.29.10.jpg

I also added in the brass knob. It is just a piece of cut allthread that is covered in high strength threadlock keeping the nut attached to it.

2014-05-01 21.29.15.jpg

Next step is painting and weathering! =D I will be painting the inside of the grooves and the tip a matte black before weathering.

Total build time: Around 3-4 hours I would guess.
 
I just love reading these updates while I should be sleeping ;) ... so any ideas about an activation box ... and perhaps 4 pieces of black T-track instead of the usual 7 or 6?

Chaim
 
I just love reading these updates while I should be sleeping ;) ... so any ideas about an activation box ... and perhaps 4 pieces of black T-track instead of the usual 7 or 6?

Chaim
Thanks. =) Honestly I don't think I will do an activation box. I have a small screw that is perfect for an activator button. as for the T-Track I won't be using those. I think they will stick out too much and I am liking the sleek minimalist look it has so far. That said if you have some examples I would love to see them. Maybe do some rings of grip tape or something similar.


Quick update:

Masked off the outer sheath.

2014-05-02 12.35.02.jpg2014-05-02 12.20.00.jpg2014-05-02 12.35.05.jpg

And then I painted it with a semigloss black spray paint.

2014-05-02 14.50.30.jpg

Any suggestions/examples of what you guys think will look good? At this point I am thinking of moving on to weathering. First I will take some better pics though. XD
 
In fact I do have some not screen accurate or custom sabers with T-track ... I'll shoot pictures for you tomorrow :)

Chaim
 
In fact I do have some not screen accurate or custom sabers with T-track ... I'll shoot pictures for you tomorrow :)

Chaim

Sweet, Thanks. =)

While I think this one will stay how it is the next one may need some t-tracks. ;P

I also plan on doing an "ancient" saber that uses mostly wood as the grip. Should be an interesting build. XD
 
Okay then as promised here are some pix first up a Heiland conversion with non accurate real red bubbles and only 4 rubber T-track (by Blast-tech I presume) and then a custom made OB3 lightsaber made from various pre-made parts (by The Custom Saber Shop I presume) onto which I added some wrong shaped plastic-like T-track that I otherwise was never going to use for any vintage saber ... one end is straight cut the other in an angle and I managed to make it flow with the activation box :)


See how indeed good use of some black T-track can add rather quickly to a nice looking lightsaber?

Chaim
 
Last edited:
Okay then as promised here are some pix first up a Heiland conversion with non accurate real red bubbles and only 4 rubber T-track (by Blast-tech I presume) and then a custom made OB3 lightsaber made from various pre-made parts (by The Custom Saber Shop I presume) onto which I added some wrong shaped plastic-like T-track that I otherwise was never going to use for any vintage saber ... one end is straight cut the other in an angle and I managed to make it flow with the activation box :)

http://i833.photobucket.com/albums/zz258/Sym-Cha/DVLightsaber4grips-01_zps8d4fd47d.jpg

http://i833.photobucket.com/albums/zz258/Sym-Cha/DVLightsaber4grips-02_zps9a5f64b8.jpg

http://i833.photobucket.com/albums/zz258/Sym-Cha/OB3Lightsaber-01_zpsc166c5c0.jpg

http://i833.photobucket.com/albums/zz258/Sym-Cha/OB3Lightsaber-02_zps2ad7e33d.jpg

http://i833.photobucket.com/albums/zz258/Sym-Cha/OB3Lightsaber-03_zps54367f2b.jpg

See how indeed good use of some black T-track can add rather quickly to a nice looking lightsaber?

Chaim
*whistle* Those are sweet man! Love the weathering on them. And yea it certainly does add. While I am still not set on the t-track for this one I will definitely have to play with it in the future. Any suggested retailer's to grab it at?
 
Thanks ... I purchased the OB3 weathered and all so can't take any credit for that ... I just added the pieces of T-track and to reduce blinding someone when wielding it without a blade attached I added a piece of black ducktape inside the emitter and attached a matt plastic 25 mm diameter ball from a Deodorant bottle and screwed it securely with the blade retention screw.

If you want some rather accurate black plastic T-track look for Gino's thread in the 'old' Junkyard section or try Saberfreak who used to sell a real vintage brown variation which can be painted black or try Marv, he's got a FS thread with real yet slighly not accurate T-track too in the junkyard ;)

Chaim
 
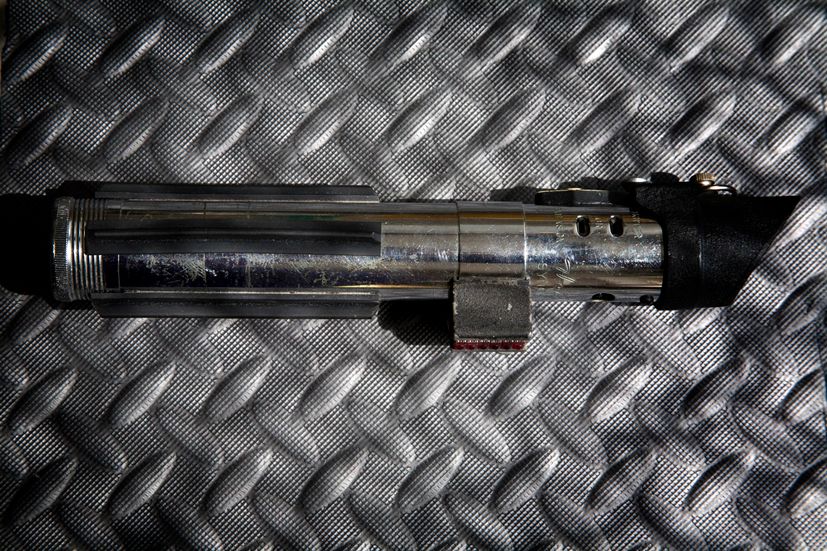
Update on the weathering: Used some acrylic paints and piles of metal to dirty up and scratch the saber. Thoughts/suggestions?

2014-05-07 13.21.59.jpg2014-05-07 13.22.02.jpg2014-05-07 13.21.53.jpg2014-05-07 13.22.10.jpg2014-05-07 13.22.16.jpg
 
Back
Top