Roswellianism
New Member
So things started innocently enough when CafePress offered a free S.H.I.E.L.D. ID card to promote Captain America: The Winter Soldier. I snapped one up as soon as I could (and one for my girlfriend) and thought they were one of the neatest damn things ever. I had a SHIELD ID with my face and stats on it. Next thing I know, I'm rolling out Sculpey to make custom badges to mimic the actual badge Coulson had in season one of "Agents of SHIELD."
Next thing I know, I'm scouring Amazon and other websites to put together a full-on SHIELD tactical uniform, akin to the ones from Marvel's kickass "Secret Avengers" comic:

My Amazon cart is full of stuff for that outfit. The blue jumpsuit, the shoulder holsters, the leg holsters, white boots... But due to my money situation the last few months (no direct deposit for online pay means jumping through hoops like crazy, plus low hours and the majority of the cash going to gas to GET to work) meant getting everything I needed for the full tac uniform in time for the Pittsburgh Comicon was a no-go. So, instead, I focused on firepower.
Initially, I wanted to get ahold of the Nerf Centurion (the giant-ass sniper rifle), but, again, cash was low, so I was looking elsewhere. In late July, I found a non-working Nerf Stampede at the Steel City Con for ten bucks. Sold.
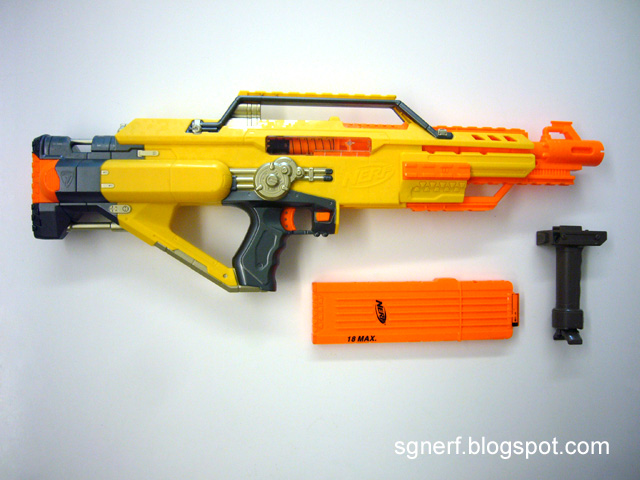
Once I got it home, I discovered the massive workload I gave myself. This blaster had seen a lot of action. Dirt and mud had clogged the screw holes, preventing any kind of disassembly, and cobwebs infested the interiors. No major deal, but it was a pain to clean. After that, the hard part was actually taking it apart. Screwdrivers seem to disappear in my folks' house, and I had to tear the house apart to find the right ones.
Finally, I got it taken apart, and the logos and text sanded off.


I grabbed my trusty old rattle-can of flat black spray, nickel metal color spray, and my Testor's aluminum, and took all the internals out before painting. I really liked the feel of the gun with the motor inside, but it was just too cumbersome and difficult to work with.
I decided to utilize the Stampede's "window" feature and add lights inside. Not being particularly skilled in electronics (circuit boards look awesome; no idea how to make one), I took the "For Dummies" route. I picked up a length of EL wire and a battery pack from Radio Shack and set about trying to figure out how to install them into the blaster.

I wanted to get a length of acrylic tube to replace the barrel, but that was a search that proved fruitless and way too expensive (especially for a very low-budget build). The idea was to swap out the blazing orange barrel with a frosted acrylic tube and run the EL wire along the length of it to make it glow. When tubes got to be too expensive, I looked for an acrylic rod, but it was still too pricey for the build. When I went to JoAnn fabrics during the build to look for fabric to make the uniform's belt, I found cake tiers that were the exact length and diameter to replace the barrel. They were perfect, AND they only cost me three bucks! Huge bonus points to JoAnn's!
Unfortunately, the plan to run the EL wire down the tube wasn't working as well as I wanted it to. It just wasn't bright enough, and it was a pain to try to thread it through the tier. A trip to Five Below on my lunch break yielded an awesome find in a "Laser Finger Light" for a buck. I trimmed a slot in the tier and glued it in place, and it worked perfectly, the light blazing bright enough to make the new barrel glow.


A shot of the right side with a few of the details worked out with the Testor's Aluminum against the flat black:

It took a while to figure out how to install the EL wire so it would glow through the window. I eventually wrapped the wire around a length of plastic taken from the internals of the blaster, and installed it in a clear plastic tube previously used as the end of my foamcore proton pack thrower. I glued the tube in place behind the window, which I sanded down a bit to give it a frosted look:

The battery pack took the place of the dart clip, and was glued into place with a black foamcore spacer to avoid bent and broken connections from the batteries to the EL wire.


I went to Michael's and snagged a few more Testor's paints (copper, rust, arctic blue, metal flake blue, and rubber) and after getting the internal lights set in place, I set about detailing the gun with the paints. I ended up not using the blue metal flake paint, because it was too dull for the look I wanted. This is what I ended up with:


I added a SHIELD logo keychain fob that broke off my keys (dammit), to break up the blank space where I sanded off the "NERF" logo:


I wanted to avoid adding too much in the way of the copper paint (this is SHIELD, after all, not steampunk), but the areas I painted copper influenced the name of the gun, and it became the COPPER-TOP, which became an acronym for:
Complex
Operational
Projectile
Propulsion
Electron
Regulator:
Tactical
Ordinance
Prototype
And the final COPPER-TOP:


Lit up at night!!

Instead of having to lug around a backpack or random bags, I found one of my old messenger bags and hot glued one of my SHIELD tac uniform patches to it. It came out great, a nice bit of understated addition to the costume. Functional as well, as it was perfect for carrying comics and other stuff I got signed at the convention.

Not having the full tac uniform, I opted to go the Coulson route and just wear a suit. Sitwell wore a suit, as did the other agents in "Agents of SHIELD," "The Consultant," "Item 47," and Captain America: The Winter Soldier, so why not? Best thing to roll with in the interim. I ordered the wallet from ebay antwayne told me about on my other thread, but it didn't arrive in time. I used a backup: my psychic paper wallet that came with my 10th Doctor sonic screwdriver.

The full outfit, kitted out with the COPPER-TOP:


I added a shoulder strap from my duffle bag to make the gun easier to carry around the convention. This thing was a life saver. The gun had a good heft to it when all was said and done, what with the layers of paint, added battery pack and keychain fob, and plenty of hot glue in the interior.
The outfit was a success, but it was kinda weird being sort of "ingocnitio." For the last ten years, I've gone to the convention in my Ghostbusters gear and folks want to snap pics with a Ghostbuster, but people seem to ignore a SHIELD agent. Ah, well. I still had fun anyways, as did my girlfriend. We met the guys who did the "My Little Pony" comic for IDW, hung out with artist friends of mine, met actress Gigi Edgely and professional costumer Holly Conrad. Gigi actually remembered me from way back in 2004, and was as awesome as ever, and Holly dug how the COPPER-TOP turned out. She asked if I had entered the costume contest, and I said that because all I did was repaint a Nerf gun and wear a suit, I didn't think I'd feel right entering with other people who went all-out with constructing their costumes from scratch. Holly recommended I do it anyways, just to have fun.
Come December and the next Steel City Con, I'll be ready with the full tactical SHIELD uniform, and I'll be toting this bad boy around...

Found that at Goodwill for eight bucks. Been trying to find one for ages!
Next thing I know, I'm scouring Amazon and other websites to put together a full-on SHIELD tactical uniform, akin to the ones from Marvel's kickass "Secret Avengers" comic:
My Amazon cart is full of stuff for that outfit. The blue jumpsuit, the shoulder holsters, the leg holsters, white boots... But due to my money situation the last few months (no direct deposit for online pay means jumping through hoops like crazy, plus low hours and the majority of the cash going to gas to GET to work) meant getting everything I needed for the full tac uniform in time for the Pittsburgh Comicon was a no-go. So, instead, I focused on firepower.
Initially, I wanted to get ahold of the Nerf Centurion (the giant-ass sniper rifle), but, again, cash was low, so I was looking elsewhere. In late July, I found a non-working Nerf Stampede at the Steel City Con for ten bucks. Sold.
Once I got it home, I discovered the massive workload I gave myself. This blaster had seen a lot of action. Dirt and mud had clogged the screw holes, preventing any kind of disassembly, and cobwebs infested the interiors. No major deal, but it was a pain to clean. After that, the hard part was actually taking it apart. Screwdrivers seem to disappear in my folks' house, and I had to tear the house apart to find the right ones.
Finally, I got it taken apart, and the logos and text sanded off.
I grabbed my trusty old rattle-can of flat black spray, nickel metal color spray, and my Testor's aluminum, and took all the internals out before painting. I really liked the feel of the gun with the motor inside, but it was just too cumbersome and difficult to work with.
I decided to utilize the Stampede's "window" feature and add lights inside. Not being particularly skilled in electronics (circuit boards look awesome; no idea how to make one), I took the "For Dummies" route. I picked up a length of EL wire and a battery pack from Radio Shack and set about trying to figure out how to install them into the blaster.
I wanted to get a length of acrylic tube to replace the barrel, but that was a search that proved fruitless and way too expensive (especially for a very low-budget build). The idea was to swap out the blazing orange barrel with a frosted acrylic tube and run the EL wire along the length of it to make it glow. When tubes got to be too expensive, I looked for an acrylic rod, but it was still too pricey for the build. When I went to JoAnn fabrics during the build to look for fabric to make the uniform's belt, I found cake tiers that were the exact length and diameter to replace the barrel. They were perfect, AND they only cost me three bucks! Huge bonus points to JoAnn's!
Unfortunately, the plan to run the EL wire down the tube wasn't working as well as I wanted it to. It just wasn't bright enough, and it was a pain to try to thread it through the tier. A trip to Five Below on my lunch break yielded an awesome find in a "Laser Finger Light" for a buck. I trimmed a slot in the tier and glued it in place, and it worked perfectly, the light blazing bright enough to make the new barrel glow.
A shot of the right side with a few of the details worked out with the Testor's Aluminum against the flat black:
It took a while to figure out how to install the EL wire so it would glow through the window. I eventually wrapped the wire around a length of plastic taken from the internals of the blaster, and installed it in a clear plastic tube previously used as the end of my foamcore proton pack thrower. I glued the tube in place behind the window, which I sanded down a bit to give it a frosted look:
The battery pack took the place of the dart clip, and was glued into place with a black foamcore spacer to avoid bent and broken connections from the batteries to the EL wire.
I went to Michael's and snagged a few more Testor's paints (copper, rust, arctic blue, metal flake blue, and rubber) and after getting the internal lights set in place, I set about detailing the gun with the paints. I ended up not using the blue metal flake paint, because it was too dull for the look I wanted. This is what I ended up with:
I added a SHIELD logo keychain fob that broke off my keys (dammit), to break up the blank space where I sanded off the "NERF" logo:
I wanted to avoid adding too much in the way of the copper paint (this is SHIELD, after all, not steampunk), but the areas I painted copper influenced the name of the gun, and it became the COPPER-TOP, which became an acronym for:
Complex
Operational
Projectile
Propulsion
Electron
Regulator:
Tactical
Ordinance
Prototype
And the final COPPER-TOP:
Lit up at night!!
Instead of having to lug around a backpack or random bags, I found one of my old messenger bags and hot glued one of my SHIELD tac uniform patches to it. It came out great, a nice bit of understated addition to the costume. Functional as well, as it was perfect for carrying comics and other stuff I got signed at the convention.
Not having the full tac uniform, I opted to go the Coulson route and just wear a suit. Sitwell wore a suit, as did the other agents in "Agents of SHIELD," "The Consultant," "Item 47," and Captain America: The Winter Soldier, so why not? Best thing to roll with in the interim. I ordered the wallet from ebay antwayne told me about on my other thread, but it didn't arrive in time. I used a backup: my psychic paper wallet that came with my 10th Doctor sonic screwdriver.
The full outfit, kitted out with the COPPER-TOP:
I added a shoulder strap from my duffle bag to make the gun easier to carry around the convention. This thing was a life saver. The gun had a good heft to it when all was said and done, what with the layers of paint, added battery pack and keychain fob, and plenty of hot glue in the interior.
The outfit was a success, but it was kinda weird being sort of "ingocnitio." For the last ten years, I've gone to the convention in my Ghostbusters gear and folks want to snap pics with a Ghostbuster, but people seem to ignore a SHIELD agent. Ah, well. I still had fun anyways, as did my girlfriend. We met the guys who did the "My Little Pony" comic for IDW, hung out with artist friends of mine, met actress Gigi Edgely and professional costumer Holly Conrad. Gigi actually remembered me from way back in 2004, and was as awesome as ever, and Holly dug how the COPPER-TOP turned out. She asked if I had entered the costume contest, and I said that because all I did was repaint a Nerf gun and wear a suit, I didn't think I'd feel right entering with other people who went all-out with constructing their costumes from scratch. Holly recommended I do it anyways, just to have fun.
Come December and the next Steel City Con, I'll be ready with the full tactical SHIELD uniform, and I'll be toting this bad boy around...
Found that at Goodwill for eight bucks. Been trying to find one for ages!
Last edited: