Slushycart52709
New Member
Hi there this is my first ever post and from what I've seen everyone is pretty helpful
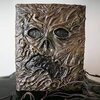
I was wondering if I could get some advice on what I could use to make a fairly accurate replica of the Necronomicon Ex-Mortis the one specifically with the face on it (hopefully I've attached the right photo)
I've seen loads of places saying to use epoxy putty some to use latex and some to use cardboard and others to use air-dry modeling clay
Could I have some beginners tips please as I need something to occupy my time right now as its not going so well
Thank you
Attachments
Last edited: