BZP-IRONMAN Build

I've been talking about doing a War Machine build for a while now. Well, a few weeks back, I decided to do so and as you might expect, I'm in full swing on it trying to get it done for Halloween. Below are some progress pics so far. More to come soon.

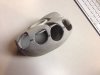
As you can see, in addition to the suit build, I'm also sculpting the gauntlets in order to set up molds and cast them in resin. Actually have already cast 4 copies of the finger sections and they're looking great. More pics later.


Sent from my iPad using Tapatalk HD
 

Attachments

  • ImageUploadedByTapatalkHD1413530435.676987.jpg
    ImageUploadedByTapatalkHD1413530435.676987.jpg
    729.1 KB · Views: 175
  • ImageUploadedByTapatalkHD1413530488.876529.jpg
    ImageUploadedByTapatalkHD1413530488.876529.jpg
    673.4 KB · Views: 167
  • ImageUploadedByTapatalkHD1413530546.644157.jpg
    ImageUploadedByTapatalkHD1413530546.644157.jpg
    847.9 KB · Views: 153
  • ImageUploadedByTapatalkHD1413530557.839450.jpg
    ImageUploadedByTapatalkHD1413530557.839450.jpg
    724.4 KB · Views: 152
  • ImageUploadedByTapatalkHD1413530570.089865.jpg
    ImageUploadedByTapatalkHD1413530570.089865.jpg
    811 KB · Views: 161
  • ImageUploadedByTapatalkHD1413530590.795287.jpg
    ImageUploadedByTapatalkHD1413530590.795287.jpg
    746.1 KB · Views: 157
  • ImageUploadedByTapatalkHD1413530673.884332.jpg
    ImageUploadedByTapatalkHD1413530673.884332.jpg
    660.6 KB · Views: 165
  • ImageUploadedByTapatalkHD1413530704.381712.jpg
    ImageUploadedByTapatalkHD1413530704.381712.jpg
    653.3 KB · Views: 175
  • ImageUploadedByTapatalkHD1413530723.099731.jpg
    ImageUploadedByTapatalkHD1413530723.099731.jpg
    563.5 KB · Views: 168
Thanks for the reply.

That War Machine is awesome! Such clean lines. :)

Thank you! I've applied everything I've learned from building a dozen MK IV's to get this clean of a build on the War Machine. More updates coming.


Sent from my iPad using Tapatalk HD
 
Ok. So. Been quite busy lately, but wanted to bring everyone up to speed. Did a War-Machine for Halloween as you know. Here are some pix of the finished product. He's missing some markings, but we'll get those done soon.


Sent from my iPad using Tapatalk HD
 

Attachments

  • ImageUploadedByTapatalkHD1417752413.524411.jpg
    ImageUploadedByTapatalkHD1417752413.524411.jpg
    720.2 KB · Views: 160
  • ImageUploadedByTapatalkHD1417752427.389413.jpg
    ImageUploadedByTapatalkHD1417752427.389413.jpg
    721.7 KB · Views: 173
  • ImageUploadedByTapatalkHD1417752441.929203.jpg
    ImageUploadedByTapatalkHD1417752441.929203.jpg
    959 KB · Views: 146
  • ImageUploadedByTapatalkHD1417752449.895903.jpg
    ImageUploadedByTapatalkHD1417752449.895903.jpg
    695.1 KB · Views: 148
  • ImageUploadedByTapatalkHD1417752483.039321.jpg
    ImageUploadedByTapatalkHD1417752483.039321.jpg
    500.4 KB · Views: 152
  • ImageUploadedByTapatalkHD1417752501.280301.jpg
    ImageUploadedByTapatalkHD1417752501.280301.jpg
    584.9 KB · Views: 153
  • ImageUploadedByTapatalkHD1417752509.877848.jpg
    ImageUploadedByTapatalkHD1417752509.877848.jpg
    629.8 KB · Views: 150
  • ImageUploadedByTapatalkHD1417752525.546280.jpg
    ImageUploadedByTapatalkHD1417752525.546280.jpg
    591.3 KB · Views: 159
Special thanks to WonderSquid for the gun models. Will be animating the next one that I start right after the holidays, so stand by for another order!

Also, as you see in my earlier post, I decided to move away from the foam gauntlets in favor of a custom sculpt and mold of my own design. These gauntlets provide much better articulation and comfort as well as being far more "movie accurate" in presentation. Here are some updates of the process to create them and the final product.


Sent from my iPad using Tapatalk HD
 

Attachments

  • ImageUploadedByTapatalkHD1417752857.869576.jpg
    ImageUploadedByTapatalkHD1417752857.869576.jpg
    492.2 KB · Views: 151
  • ImageUploadedByTapatalkHD1417752888.690159.jpg
    ImageUploadedByTapatalkHD1417752888.690159.jpg
    421.4 KB · Views: 148
  • ImageUploadedByTapatalkHD1417752903.642888.jpg
    ImageUploadedByTapatalkHD1417752903.642888.jpg
    544.8 KB · Views: 144
  • ImageUploadedByTapatalkHD1417752920.933141.jpg
    ImageUploadedByTapatalkHD1417752920.933141.jpg
    474.6 KB · Views: 143
  • ImageUploadedByTapatalkHD1417752941.610758.jpg
    ImageUploadedByTapatalkHD1417752941.610758.jpg
    529.5 KB · Views: 151
  • ImageUploadedByTapatalkHD1417752964.735873.jpg
    ImageUploadedByTapatalkHD1417752964.735873.jpg
    413.4 KB · Views: 131
  • ImageUploadedByTapatalkHD1417752979.299003.jpg
    ImageUploadedByTapatalkHD1417752979.299003.jpg
    399.9 KB · Views: 133
  • ImageUploadedByTapatalkHD1417752996.471571.jpg
    ImageUploadedByTapatalkHD1417752996.471571.jpg
    484.5 KB · Views: 140
  • ImageUploadedByTapatalkHD1417753007.562940.jpg
    ImageUploadedByTapatalkHD1417753007.562940.jpg
    409.6 KB · Views: 137
  • ImageUploadedByTapatalkHD1417753025.747307.jpg
    ImageUploadedByTapatalkHD1417753025.747307.jpg
    370.5 KB · Views: 150
  • ImageUploadedByTapatalkHD1417753038.311738.jpg
    ImageUploadedByTapatalkHD1417753038.311738.jpg
    422.6 KB · Views: 142
  • ImageUploadedByTapatalkHD1417753058.099325.jpg
    ImageUploadedByTapatalkHD1417753058.099325.jpg
    585.3 KB · Views: 151
  • ImageUploadedByTapatalkHD1417753073.843113.jpg
    ImageUploadedByTapatalkHD1417753073.843113.jpg
    627.8 KB · Views: 141
  • ImageUploadedByTapatalkHD1417753093.705337.jpg
    ImageUploadedByTapatalkHD1417753093.705337.jpg
    496.5 KB · Views: 140
  • ImageUploadedByTapatalkHD1417753106.044134.jpg
    ImageUploadedByTapatalkHD1417753106.044134.jpg
    404.1 KB · Views: 136
  • ImageUploadedByTapatalkHD1417753162.673224.jpg
    ImageUploadedByTapatalkHD1417753162.673224.jpg
    497.8 KB · Views: 156
  • ImageUploadedByTapatalkHD1417753171.593305.jpg
    ImageUploadedByTapatalkHD1417753171.593305.jpg
    503.6 KB · Views: 134
  • ImageUploadedByTapatalkHD1417753180.538634.jpg
    ImageUploadedByTapatalkHD1417753180.538634.jpg
    477 KB · Views: 148
Nice job!
How did you make the ribs for the finger gaps?

Special thanks to WonderSquid for the gun models. Will be animating the next one that I start right after the holidays, so stand by for another order!

Also, as you see in my earlier post, I decided to move away from the foam gauntlets in favor of a custom sculpt and mold of my own design. These gauntlets provide much better articulation and comfort as well as being far more "movie accurate" in presentation. Here are some updates of the process to create them and the final product.


Sent from my iPad using Tapatalk HD

I think your gloves are excellent. Would you be willing to give us a dot-point description of how you did them, what materials you used and what tooling? What did you use under the cast pieces? How did you stick them all together? How do you get your hand in?

Cheers.

SB.
 
Hey BaseZero, thanks for the shout out and you do some awesome work my friend, bug me about making you some "special pulls" for your next war machine. :)
 
Hey BaseZero, thanks for the shout out and you do some awesome work my friend, bug me about making you some "special pulls" for your next war machine. :)

Ok. Now I'm curious. Consider yourself "bugged" about the "special pulls". Planning to start the new suit after the New Year.


Sent from my iPad using Tapatalk HD
 
Nice job!
How did you make the ribs for the finger gaps?

See below!

I think your gloves are excellent. Would you be willing to give us a dot-point description of how you did them, what materials you used and what tooling? What did you use under the cast pieces? How did you stick them all together? How do you get your hand in?

Cheers.

SB.

JayC: Your answer about the finger ribbing is below!

Sandbagger: Just checked out your metal build. Awesome doesn't quite cover it.

As for the gauntlets: If you look at the pictures I've posted above and in this response, you can pretty much follow along with my method to create them.

Here's the steps in order and some more details on the closure and under-glove holding it all together.

• Life-cast of my hands using Smooth On Algisafe for the mold and then Plaster of Paris for the positive of my hands
• Smooth On Epoxy Putty sculpt of the gloves over the plaster life-casts
• Dig the plaster out of the sculpts after they harden
• Dremel to separate the sculpts into two pieces
• Smooth On Mold Star is used to create box molds to cast the gauntlet halves in Smooth On Black Onyx
• Finger sections were initially modeled in Sculpey, then I used Dixie cups to create molds with Mold Star to cast them also in resin
• All pieces are cast under pressure using pressure pots to eliminate bubbles from the final pieces
• Once pieces are cast in resin, some finish sanding once they are removed from the molds
• Prime, paint and gloss coat all pieces
• Electronics are from LED flashlights
• Repulsors are made from moldable plastic right in the gauntlet for custom fit with electronics embedded in the process
• Gauntlet halves are joined on one side with an elastic hinge and held shut on the other side of the palm with rare-earth magnets from Ebay (1/4" in size)
• Finger ribbing is created with a custom built mold for the ribbing from Sculpey. Dragon Skin 30 by Smooth On, colored with pigment and metallic powder poured very thinly to make the final product
• Ribbing, finger sections all glued using a "latex glue" from Smooth On to a very thin cloth glove
• To wear the gauntlet, you pull the glove on to your hand and close the hinged gauntlet halves over your hand. Plug it into your suit wiring harness and you're good to go!

Hope that is helpful to all interested. Any questions, feel free to ask. I am thinking of going premium on my membership and offering a run on these as well. We'll see how my schedule holds up.
 
Pieces all painted and ready for assembly.

IMG_0303.jpg

Ready for electronics

IMG_0305.jpg

Ribbing glued onto the foundation glove

IMG_0306.jpg

A couple of "display" gauntlets made as gifts.

IMG_0307.jpg IMG_0309.jpg
 
Back
Top