You are using an out of date browser. It may not display this or other websites correctly.
You should upgrade or use an alternative browser.
You should upgrade or use an alternative browser.
Building a 4ft foam AT-AT
- Thread starter familyman
- Start date


You never cease to amaze me. Good luck on an awesome build.


vintageslant
Active Member
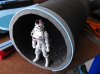
I did a quick grey scale to one of the pictures to see what it will look like once painted.
View attachment 454131[/QUOTE]
No leave it, urban camo AT-AT FTW!
View attachment 454131[/QUOTE]
No leave it, urban camo AT-AT FTW!
So glad you're back! Subscribed and eagerly awaiting your next post.
Luke the Belter
Well-Known Member
Wow. That looks really great.
The third picture made me laugh [emoji106]
The third picture made me laugh [emoji106]
So glad you're back! Subscribed and eagerly awaiting your next post.
Thanks. Good to be back posting. I have still been building non stop, but busy on my facebook page, with over 2550 followers I have had to keep them all interested. I have been building some transformers statues.


Prototypical
Active Member
How come every time I see this thread I think of this
Last edited by a moderator:
TazMan2000
Master Member
Very interesting. I never thought that foam could be used to create this. Everyone should call you the "Foam King" but I think that nickname is taken. :lol
TazMan2000
TazMan2000
Very interesting. I never thought that foam could be used to create this.
Agreed. Simply blown away by the skill and patience. Patience IS a skill isn't it?
Seriously though, incredible job. I can't wait to see more.
... Patience IS a skill isn't it?...
Is DEFINATELY is a skill...a skill I am missing
")
Great job so far, keep the pics coming!!!
Markus


Mr Danger
New Member
Wow, that's going to be great! I have to try foam too. I'm a graphic designer and metal- and wood work is not really my thing. I've made my stuff mostly from cardboard and Kapa board, but that foam seems like a fun material. I bet you can't wait till you get to paint it! I had a lot of ideas for my cardboard AT-AT before i settled for a more traditional style : ) This was a weekend build with my kids.


vintageslant
Active Member
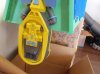
Is that a probe droid behind the AT-AT's? Oh no my bad its imperial bongos :lol
Impressive work.
I assume the 4ft size is an attempt to match the scale of the SW action figures?
Thank you, Actually I just started making the head with no intentions of it being scalable to the figures, just by luck it seems to be about right though. If I do another one I may add an interior.
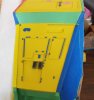
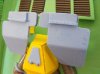
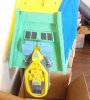
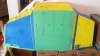
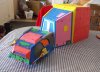
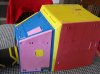
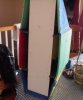
Been busy building, here are the latest lot of pictures. I have been really enjoying this build. To get the small raised details I am simply dropping a little bit of superglue on the foam and then using tweezers or the thin point of my knife I am placing the tiny pieces of foam in position and then gently pressing them down a little bit to. For the engraved details I am drawing the lines and then cutting them slightly once I have done that I then heat up the foam and this causes the cut lines to separate and widen. I did a video of this technique here, https://www.youtube.com/watch?v=3o70x9s5kpg . I will be putting a piece of wood underneath in order for me to screw the thin inner leg supports to, also I will be attaching another piece of wood to this board and that will go through the neck and support the head.
Attachments
-
 DSCF5513.JPG184.7 KB · Views: 192
 -
 DSCF5511.JPG266.4 KB · Views: 175
 -
 DSCF5510.JPG307.7 KB · Views: 239
 -
 DSCF5509.JPG204.7 KB · Views: 220
 -
 DSCF5508.JPG251.8 KB · Views: 163
 -
 DSCF5494.JPG431.7 KB · Views: 207
 -
 DSCF5492.JPG352.8 KB · Views: 182
 -
 DSCF5478.JPG307.3 KB · Views: 192
 -
 DSCF5470.JPG344.7 KB · Views: 204
 -
 DSCF5514.JPG171 KB · Views: 188
Similar threads
- Replies
- 24
- Views
- 1,592
- Replies
- 17
- Views
- 1,690
- Replies
- 2
- Views
- 990