So last month I was contacted by a Rebel Legion member to build up one of my resin Hero kits for Celebration coming up in August.
After cleaning up the parts, I hit all of them with primer and then applied some putty:

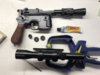
The Mauser was drilled and tapped for the two, threaded rods for the lower mount. The cradle mount was drilled and tapped for the thumbscrew. The upper part of the cradle was drilled and tapped for the two rings. About 1.5" was taken off the barrel to fit the flash hider with bull barrel.
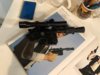
Today I sprayed every thing with some gun metal spray paint from Tamiya. It was a color I had been experimenting with for my SS TIE fighter. I thought it might look nice as an undercoat for the blaster:

I used some gold paint as an undercoat for the scope:

This is probably the most fun I have with this kind of a build...painting the grips.")
I used a combination of Rusty Primer, Flat Brown and a "sprinkle" of Satin Black. It's a little trick that Wakal taught me years ago.

More to come.
After cleaning up the parts, I hit all of them with primer and then applied some putty:
The Mauser was drilled and tapped for the two, threaded rods for the lower mount. The cradle mount was drilled and tapped for the thumbscrew. The upper part of the cradle was drilled and tapped for the two rings. About 1.5" was taken off the barrel to fit the flash hider with bull barrel.
Today I sprayed every thing with some gun metal spray paint from Tamiya. It was a color I had been experimenting with for my SS TIE fighter. I thought it might look nice as an undercoat for the blaster:
I used some gold paint as an undercoat for the scope:
This is probably the most fun I have with this kind of a build...painting the grips.
I used a combination of Rusty Primer, Flat Brown and a "sprinkle" of Satin Black. It's a little trick that Wakal taught me years ago.
More to come.