BTTF diamond select DeLorean 1/15 upgrades/mods

looks like i need to visit the future for a better camera lol

airbrushing all done ...the rest i will do with a paint brush

7UW4KkY.jpg


trUwHpF.jpg
 
Hi steveo3002,

I discovered you post just recently and since I bought a Diamond Select Delorean as well, you gave me a lot of inspiration. Your mods are amaing!!
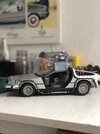
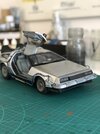
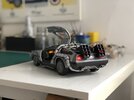
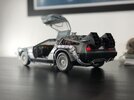
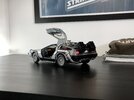
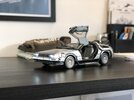
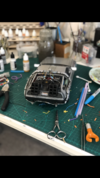
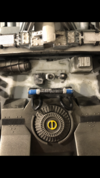
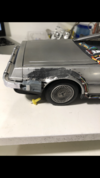
I am trying to come up with the courage to Dremel down the molded 'wires' on the chasis of my model and fill in the Flux Band groves on the back of the car. I already ended up taking the front stock, solid piece Flux band off and replaced it with my own created 3D printed version, complete with front indicator cutouts and pre made holes for the Flux band holders. I also printed new Flux boxes with Mole Richardson plugs for front, top and rear back. And... will have to see if it works as they are so small, but I created small 'C' clamps for the wiring to the body of the car. These all still need to be painted.

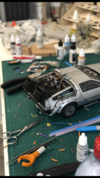
One of the things I did notice on what you are working on, on the front fenders, behind the flux band holders, is that you put the rub-strip back on. I watched the movie again several times and also the Restoration documentary, and there is no rub strip present underneath the boxes, only a small portion behind it. The whole thing was bolted directly to the fender with out indicator lights present.

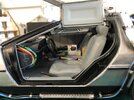
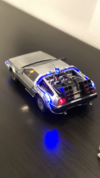
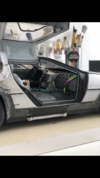
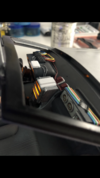
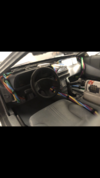
I am also thinking of putting in a small Arduino Nano board with a switch, to have it turn on running lights and interior lights, Dashboard, the Plutonium indicator, Time Circuits, overhead console and the flux capacitor lights when I want.

Anyhow, keep up the absolute and amazingly fantastic job!! You are an inspiration!
 

Attachments

  • DivXSnap-2019-03-07-00-01-27-558.jpg
    DivXSnap-2019-03-07-00-01-27-558.jpg
    1,014.4 KB · Views: 255
  • 20190327_223427_HDR[1].jpg
    20190327_223427_HDR[1].jpg
    2.6 MB · Views: 231
  • 20190327_224653_HDR[1].jpg
    20190327_224653_HDR[1].jpg
    3.3 MB · Views: 201
The 3D print idea was thanks to you. I needed an alternate solution to cutting the front premolded clear flux band since I did not have a way to cut it smoothly. My local Library has a 3D Printer so I thought to give it a try. It was the first time even designing and using one and, after 5 redesigns, I got the bumper the way I wanted and indicator light placement where it needed to be. Literally Millimeter work but I think it works.
 
Hi everyone!
I’m new to RPF, I just discovered this thread about modding the diamond select delorean, I thought I was the only one! I wanted to share some of my pics of my modification, this is a full year of work, I’m no good at electronics so I haven’t changed the lights or anything, and it still has the cheesy sound effects. Anyway I spent many an excruciating hour working on this thing, trial and error. I’ve used everything from plastic paper clip coating to plastic bendy straws. It’s been mental. I’m posting some pics here, anyone wanna ask questions gimme a shout
 

Attachments

  • CDBBEAEC-9F50-4798-BF60-CE8BF0F47C41.jpeg
    CDBBEAEC-9F50-4798-BF60-CE8BF0F47C41.jpeg
    559.9 KB · Views: 157
  • BA121ECA-7A8A-4B6B-9617-093482F0FF10.jpeg
    BA121ECA-7A8A-4B6B-9617-093482F0FF10.jpeg
    379 KB · Views: 171
  • 33D701B1-1301-4AFF-9851-A349E2F69963.jpeg
    33D701B1-1301-4AFF-9851-A349E2F69963.jpeg
    601.4 KB · Views: 161
  • 3C159A0B-6B28-483E-8138-125EDBEDC5DD.jpeg
    3C159A0B-6B28-483E-8138-125EDBEDC5DD.jpeg
    400.9 KB · Views: 157
  • CE84CB0D-2009-43CA-A8AE-E125C10104A2.jpeg
    CE84CB0D-2009-43CA-A8AE-E125C10104A2.jpeg
    724.4 KB · Views: 141
  • 88009FF1-51AF-4D80-90E1-C1F21B86A8F2.jpeg
    88009FF1-51AF-4D80-90E1-C1F21B86A8F2.jpeg
    445 KB · Views: 132
  • 9CDCB22C-BC68-4902-996D-051E03E21907.jpeg
    9CDCB22C-BC68-4902-996D-051E03E21907.jpeg
    633.9 KB · Views: 134
  • EA1977D9-E716-4AAC-A35A-5F867625ABE8.jpeg
    EA1977D9-E716-4AAC-A35A-5F867625ABE8.jpeg
    549.1 KB · Views: 188
Hi everyone!
I’m new to RPF, I just discovered this thread about modding the diamond select delorean, I thought I was the only one! I wanted to share some of my pics of my modification, this is a full year of work, I’m no good at electronics so I haven’t changed the lights or anything, and it still has the cheesy sound effects. Anyway I spent many an excruciating hour working on this thing, trial and error. I’ve used everything from plastic paper clip coating to plastic bendy straws. It’s been mental. I’m posting some pics here, anyone wanna ask questions gimme a shout
Some more progress shots..this is the first time I’ve done anything like this. So much trial and error. I started with a scalpel and two pots of paint. A year of working on it and I ended up with about thirty paints, full tool kit including dremmel, air brush, soldering iron, loads of those little SMD’s and wires (haven’t even used them yet) just had to figure it out as I went.
882F83B3-D7CB-46A9-9AD2-444881EFB7B1.png
 

Attachments

  • A37ED10D-460D-49DF-BB6F-280AAB9139B8.png
    A37ED10D-460D-49DF-BB6F-280AAB9139B8.png
    8.6 MB · Views: 105
  • B012211C-AEA4-4622-AC75-90FB9AD78F1F.png
    B012211C-AEA4-4622-AC75-90FB9AD78F1F.png
    6.2 MB · Views: 101
  • AC7B738A-471F-4050-87DD-C7CC8172332C.png
    AC7B738A-471F-4050-87DD-C7CC8172332C.png
    11.1 MB · Views: 104
  • E159E19D-3317-4F93-BD05-DD7A923479E2.png
    E159E19D-3317-4F93-BD05-DD7A923479E2.png
    5.4 MB · Views: 133
  • 43C997FF-369E-4ACD-B1B8-654837DFD19A.png
    43C997FF-369E-4ACD-B1B8-654837DFD19A.png
    5.2 MB · Views: 103
  • 37A84893-A47E-44C6-9A35-3505ED9C0ADA.png
    37A84893-A47E-44C6-9A35-3505ED9C0ADA.png
    4.5 MB · Views: 112
  • 179B214C-F139-47CA-8987-DA075ABF5FE7.png
    179B214C-F139-47CA-8987-DA075ABF5FE7.png
    5.9 MB · Views: 121
  • F1FAB229-E891-4416-8348-A94E2C7C38E0.png
    F1FAB229-E891-4416-8348-A94E2C7C38E0.png
    4.1 MB · Views: 135
  • D775AEFB-321A-44F8-9AAC-586E152D12CE.png
    D775AEFB-321A-44F8-9AAC-586E152D12CE.png
    4.7 MB · Views: 127
  • 6175C937-D2A2-49A4-8861-0A357429B34C.png
    6175C937-D2A2-49A4-8861-0A357429B34C.png
    3.1 MB · Views: 126
Re: steveo's diamond select delorean 1/15 upgrades

bit more progress on the dash , made a clock and radio and added some wires

View attachment 1396906

seperated the headlamps and thinned down its surround, and made new vents from thinner plastic
View attachment 1396907

epoxied over the headlamp opening so that only one lamp will light like in the movie
View attachment 1396908

made a new rear deck as the toys one has molded on stuff

View attachment 1396909

took a screen grab here ..so i can make the tow bar thats in the bumper

View attachment 1396910

View attachment 1396911

a few scratch built items im working on

View attachment 1396912

new hoses for the vents
View attachment 1396913
Hi, I know this was like ten years ago but where did you get those tiny little wires for the dashboard? I love the way you modified the car btw, i didn’t take mine apart, thinking I might buy a new one and take it apart like you have
 
hi , its phone cable , you can get like an extension cable from the the dollar store , i also took any thin wiring from old electrical items that were scrap

still not finished it lol
 

Your message may be considered spam for the following reasons:

If you wish to reply despite these issues, check the box below before replying.
Be aware that malicious compliance may result in more severe penalties.
Back
Top