Blakes 7 Federation Trooper Helmet - Scratch Built

Sterlacchini

Sr Member
RPF PREMIUM MEMBER
I've been trying to source a replica of Federation Trooper Helmet from Blakes 7 for a couple of years now - with no luck.

So I finally decided to commission an artist (Lionback) to sculpt and cast a couple for me.

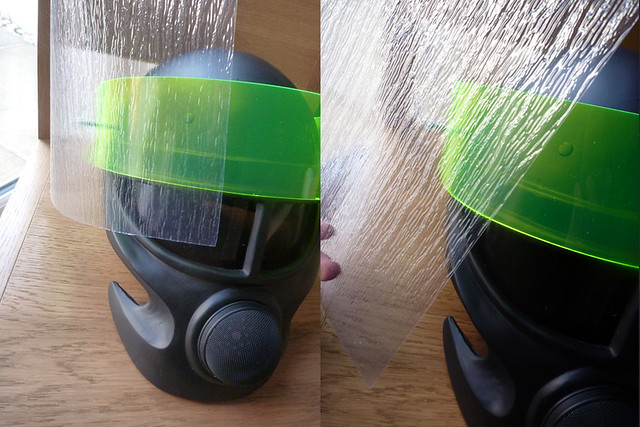
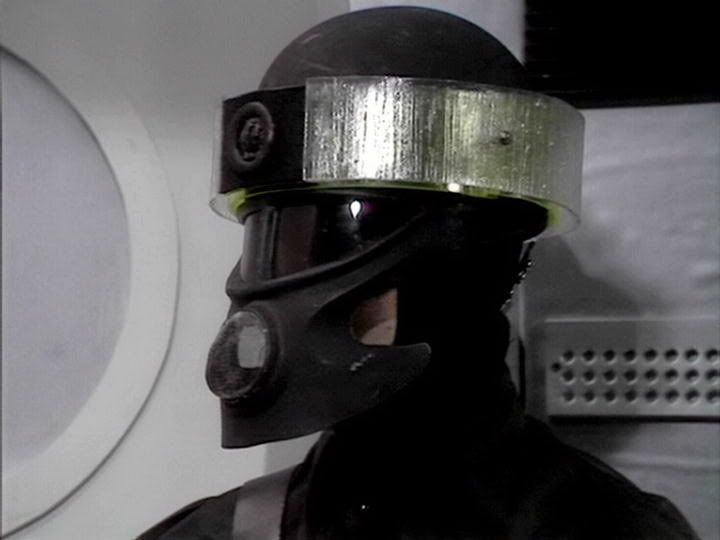
Here's a picture of an original.
avaln154.jpg


Here is the finished sculpt
75569_418358551592182_1133596588_n.jpg

263432_418359148258789_1704937651_n.jpg

535586_418359261592111_1452370464_n.jpg


First mould
533182_418932928201411_1524456818_n.jpg


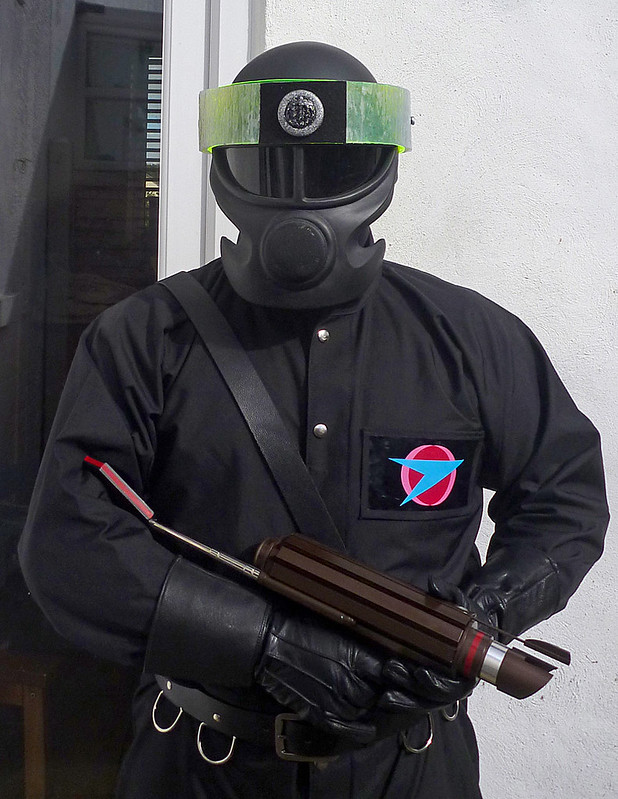
First cast, painted in gloss black to show the areas which will need smoothing. The finished ones will be matte black, which will look even smoother.
602084_422261874535183_1592379712_n.jpg


Lionback has included the old style climbing helmet I supplied him in the cast, which should make them easier to assemble.

Very happy with it.

Cheers
Steven
 
Very nice!

If these were to be available down the track, I'd certainly be interested...

(Looking for the sidearm as well, if anyone has them!)
 
I've made a little progress on this.

Sanded the helmet, primed then sanded again. I'm probably going to leave it at this level of smoothness. So I will be spraying the finished paint next.

I've cut the eye holes out and padded the inside, which just thinking about it now was a mistake as I need to drill through to attach the 'rings'.

I've moulded the first of the rings. In this instance one half of an inner fluorescent ring.

8602845137_243ddc1714_c.jpg

8603945850_ca4a003269_c.jpg


A quick try on to check the scale.

8602844959_2f9c50fe1a.jpg


Managed to do a few more bits today. Enough for a quick tack together.

8606067533_0a45ec6fc0_c.jpg


Still to do:
Add textured outer ring - hopefully the material I need is in the post.
Black felt panel for badge - I've got the badge.
New visor - I'd like to use a thinner material which I can push close against the eye holes.
Some mesh to cover the holes under the tea strainer.
 
Looks great so far.

It drives me nuts that they keep teasing a new Blake's 7 TV series, only for them to fall apart and descend into development Hell. I'd love to see the show get the same treatment Battlestar Galactica or Doctor Who got when they were relaunched.
 
Looks really good! Love your attention to detail Minty. The scaling seems bang on.
The BBC effects dept was at its height when they made Blake 7, nice to see they were still innovating with tea strainers!! Lol
 
Cheers everyone!

I've been trying to get hold of one of these for ages.

The sculptor of this is Lionback. He's done a great job with the subtle curves. I supplied an old style 'Joe Brown' climbing helmet for him to use for scale, which he has kindly included in the cast.

There is also a forum called eagletransporter.com and one of the threads has some amazingly detailed photos of screen used helmets. Someone also bought a screen used lid and posted a picture of some elements with a tape measure.
 
A partial success!

The sample of textured material I've bought is too small and too thin.

8614304996_d05c45289f_z.jpg


However the thinness may work out okay (if I can't get thicker) as I could just wrap it around a slightly thicker material, perhaps even on both sides.
 
I made a bit more progess today. Gluing the textured material to another piece of acrylic does look like a bit of a dogs dinner up close, but I think it might be okay? The problem is the 'clouding' the glue causes on the clear surface.

547465_10151429040883195_356021875_n.jpg


If I manage to source better material I'll upgrade it later.
 
Seeing your build it really makes me want to build one myself. I too have been looking around for a Federation Trooper helmet (even just the faceplate) with no luck, so I think I am just going to have to do what you did and build one. :D
Smiles, Izzy
 
Cheers.

Though I only commissioned it, as I don't have the skills myself.

Here's a couple more pictures. Nearly finished now.

9071980810_090abe3358_c.jpg

9057731945_c204bfb11f_b.jpg
 

Attachments

  • 9057731945_c204bfb11f_b.jpg
    9057731945_c204bfb11f_b.jpg
    126.3 KB · Views: 386
Simply for the sake of completing the thread. The costume is now finished :D

The more eagle eyed may notice that I have reduced the width of the head bands to be more accurate.

9877625406_f2e5d2e765_c.jpg


9740610011_a4a5acec12_c.jpg


9740611225_e3975dd022_c.jpg
 
Bit late in getting to this thread but absolutely love your troopers helmet, I have been looking for one of these for yonks! Do you know if sculpter Lionback would create another of your faceplates for another scratch build?. :D
 
In later seasons, you'll notice some of the troopers in outdoor scenes would sometimes have a multi-pocket black belt slung over 1 shoulder. I have identified this as the Swedish Bandolier. Used by the Swedish Army in WW1. These were sold back in the 1980's briefly by Banana Republic, but can still be found online. Star Wars fans love these because they resemble bandoliers worn by Jawas and Tusken Raiders. In fact, they later used the real ones on Tusken Raiders in SW ep1. Anyway, I first spotted the unaltered brown leather bandoliers in an earlier ep of Blakes 7 where a group on some planet were wearing them with their green tunics. Can't remember which ep. Then later I spotted that the BBC costume department had taken these same bandoliers, dyed them black, and then had some of the troopers wear them over their left shoulder. I own 2 of these awesome belts, and of course now am in process of dying one black.swedband.jpg
 
Now that masks casted from screen used examples seem to be available, I decided to make a second helmet.

My first helmet was made using a cast from a fan made sculpt, created by the artist ‘Lionback’ and is featured in the background of most of these photos.

It’s pretty amazing and in some ways has deeper definition than the replicas based on screen used. However, because the scale is based on the Joe Brown helmet I supplied, it looks a little wide in comparison.

Anyway as the masks are available and seeing as I still had a Joe Brown helmet, I thought I’d make another.

STAGE 1 - buy stuff.
27385268501_a7555ddcdb_c.jpg


STAGE 2 - buy more stuff, and also cut and fill stuff.
27667045152_cd4cd085be_c.jpg


STAGE 3 - dust over of matt black paint and quick mock up
27693258291_917d849f61_c.jpg


STAGE 4 - heat form stuff and accidentally melt stuff.
27733422116_87f2bab548_c.jpg


Due to the ripple effect acrylic being thinner and of inconsistent depth, oven ‘baking’ caused it to warp. I ‘solved’ this be using a heat gun to slowly form the plastic. Though it is a little wobbly.

STAGE 5 - final mock up before fixing
27733422486_19385e9255_c.jpg


STAGE 6 - finished
27157512914_f89e25bfaf_c.jpg


27491296940_ee1e586060_c.jpg


27669050172_a11d306500_c.jpg
 

Your message may be considered spam for the following reasons:

If you wish to reply despite these issues, check the box below before replying.
Be aware that malicious compliance may result in more severe penalties.
Back
Top