greenmachines

Sr Member
RPF PREMIUM MEMBER
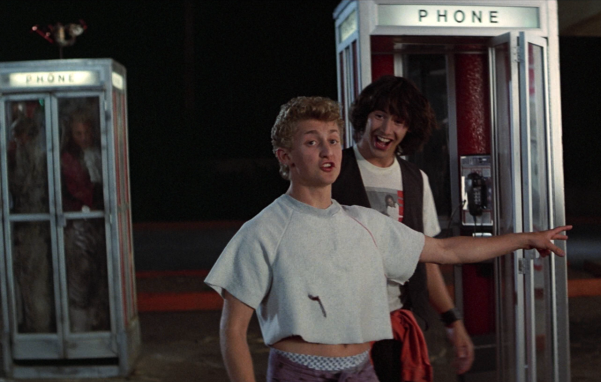
After much searching, I cannot find a thorough walk through for the antenna topper for Bill and Ted's phone booth. Needing it for a cosplay, I am dropping my antenna construction here. Add any links, comments or corrections you have. I have seen photos of finished full phone booths (only one that looked correct) but no how-to on the antenna. Seems simple enough but as it turns out, my sacrifice umbrella was upside down.....

First a garbage photo of the antenna from the film:

bill-ted-booth-1174744-640x320.jpeg.jpg


A close inspection shows the short connector bar is on the top, connecting to the midpoint of the longer bar underneath.

My umbrella does not do this but is, instead, upside down.

20230719_195149.jpg


All of the reproductions I have seen, with only one exception, has built the antenna differently, either with a naked but unaltered umbrella or just no where near the original. The one that got it right was:

Screenshot_20230719-203916_Samsung Internet.jpg


But the end tips seemed a bit short. This build can be found at:

I will try to put my deconstruction pics in an understandable order here:

20230713_201447.jpg


First, I clipped off the attached cloth.

20230719_195136.jpg


Then, I removed the little retainer pin, at the very top.

20230719_201443.jpg


Yes, I hit my thumb with a hammer.....thanks for noticing....

Then I trimmed off the last length of each leg, to match the movie prop. This requires two cuts.

20230719_201743.jpg
20230719_201903.jpg
20230719_201746.jpg
20230719_201937.jpg


And pulled out the extra length of wire.

20230719_201832.jpg
20230719_201840.jpg


Then, turning this newly trimmed beauty upside down, we get the beginnings of the correct antenna. I am sure that not all umbrellas are built the same but this is what I had to do to mine to get to this:

20230719_202340.jpg


To match this:

bill-ted-booth-1174744-640x320.jpeg.jpg


So, next is adding the red paint job to this part and then adding the new, unpainted, chrome center rod.

I intend to make two sets. One will be a daytime version and the second will be a, far more involved, nightime version (big hopes and dreams on this second one).

That is all I have for day one. But in the event that I get abducted by aliens, just paint, add center rod and a weighted base. This gives us a portable topper to temporarily place on any existing booths we come across. I will also make a separate hooked retriever handle to easily place and remove the topper on the go. We can all see the travel photo possibilities here.....
 
Last edited:
Oh, and P.S., if it really is this damn simple, I expect to see many many of these built and a slew of vacation photos posted here, if you please.
 
After reviewing several more antenna scenes, the last section of each arm looks to be about 3/5 as long as the distance from it's connection joint down to the midbar connection joint....

I will need to get a clearer picture for reference but here is my rough measurement:

20230720_074401.jpg


I can now see why the Retrocon.com version looks too short. It isn't really a length issue. Their end leg segment is approximately the right length but seems to be a wire instead of a leg segment. This thickness difference makes it look smaller. However, the movie also exaggerates the length of the last segment by always showing it covered in orange plasma that extends down to the booth. I will screencap a clear last leg without plasma, later today. I will also do a true screen measurement in photoshop before I cut any more length away.
 
I am going to throw in a guess here on why the retrocon end segment is a wire. I looked back at my umbrella, before I removed the original end segment, and realized it is the same wire. This leads me to believe that Retrocons.com's umbrella was manufactured with one less folding segment than mine. Possibly it had a smaller diameter or each segment is longer than the segments in mine. Likely the difference between a standard length umbrella and my compact travel version. If this be the case, I would recommend using the compact travel version in order to get a thicker and more easily visible last segment. We will, of course, only be certain when it is completed and can be compared with a similar background. It will certainly need to be tested on the booth itself. In my area, we have one booth and it is neither red nor the correct panels. My project is only for the, much easier to achieve, portable antenna, so the booth will not be a match.
 
After much slow mo rewatching and a detour through Adobe Illustrator, I can unofficially and with very little confidence say that the last arm sticks out past the joint 64% as long as the distance from that same joint back down to the next junction.... see ludicrous assumption graph below:

20230720_134431.jpg
 
Last edited:
I would like to vent about how photoshop has better ruler reference tools than illustrator. That is lame.

Does anyone want to hazard a guess on the original height and span of the antenna?

I am going down to the local booth in a bit to measure it and will then do the ruler in photoshop against the movie booth. No guarantees that my local booth is the same size but it is better than nothing. I still have some fears about large umbrella vs compact but if mine ends up too small, I will just thrift-store a larger version and start again. My night lighting won't be here for a few weeks, so we get to play with this day version until then.

First coat of red going on:

20230720_172208.jpg


When it is dry, I will follow through with trimming the ends to match screen length.
 
The little country store's booth is 7 feet tall, 33 1/2 inches wide and deep. Tonight I will do some guesstimation in photoshop for antenna size based on 7 feet tall booths.
 
Oh, did you hit your thumb with a hammer???

Cool little build here.
I wouldn't have even thought of an umbrella part.
Ya, that hammer bruise is weeks old now. Thumb bruises don't seem to fade, they just grow out with the nail.

The part that was always odd to me was that it folds upward when closed, making it seem more like a true folding antenna. Actually, it was nearly exactly the same build as my old apartment portable clothes line gadget. I had a few extra umbrellas so it was worth testing. When I saw it was upside down it just turns into craft time.

I got amazingly lucky and found a really nice weighted base at a garage sale today.

I finished the last coat of paint this afternoon. Now for trimming the ends and mounting it on the silver rod and weighted base.

I need to incorporate a loop in the stand for removing it with a reacher off the top of the booth.
 
I turned a drill bit by hand to enlarge the hole so the rod would pass through what was previously the top. It is now the bottom and must be able to slide while the new top (used to be the bottom sliding part) must be permanently mounted to the end of the rod (preferrably the actual umbrella staff but I was too worried to make the hole that large so added a skinny rod ). I am using rubber grommets as temp position holders before I fasten everything. Getting close to having version 1 ready to place on the booth.

20230724_210357.jpg


Note the awesome weighted base I picked up at a garage sale this week. It is from a large magnifying glass stand.


Because I am still using portions of the original umbrella staff, it is height adjustable. Tomorrow, I will add the fasteners, cut back the ends, and trial fit it on the booth. Just as a teaser, version 2 will be more likely to swing up and expand mechanically. Version one will be placed fully open for photos only. Version 3 will be for night use and will expand upon the original lightning theme. I need to get going on the fog delivery system for the base of the booth. I have recently seen some pretty amazing fire effects being done with fog and leds.
 
Finally, I cut my end splines. Was not easy to convince myself to do it....


20230725_180353.jpg


And, to further enforce my craft hoarding habit, I needed a red coated wire and, of course, it was in the coated wire storage bin.....

20230725_173608.jpg
 
Last edited:
I am waiting on paint to dry but also working on creating the lift catch tonight. With this, I will be able to use a retriever handle to lift it onto the booth without a ladder.
 
Last edited:
Because my weighted base has a threaded pipe with an end that already has a rod clamp (threaded knob that tightens on an inserted rod), I just cut it down to 2 inches and put it back together....


20230725_214340.jpg
20230725_214431.jpg
20230725_214421.jpg
20230725_214427.jpg
20230725_214440.jpg


I drilled a cross hole in it as the receiver for my intended retriever hook and pole.
 
I wanted to make all of this with easy to find parts. You can just use wood for the base but just keep in mind that a little weight would be nice if it is windy. Any lamp base weight would be easy to come by in thrift stores and they generally all use the same central rod tube with weighted base.

For the retriever, a trip to The Dollar Store can get you a paint roller handle and a threaded pole for it. They are not very strong so this will limit how heavy your base weight can be. I did a short demo of this but will likely upgrade my reacher bar to a collapsible pole of considerably more strength. I have several garden tools I can sacrifice because of how much I hate gardening anyway. Below is my handle (threaded paint or broom handle) and my straightening a paint roller.

20230725_215855.jpg
20230725_221901.jpg
20230725_221643.jpg
20230725_221650.jpg
20230725_221700.jpg


This base is far too heavy to do this without breaking something so I will likely lower the weight and make a stronger retriever.
 
And the compilation pics (will still do pics on the booth as well):

20230725_230339.jpg
20230725_230307.jpg
20230725_230451.jpg


and the comparison pic again:

bill-ted-booth-1174744-1280x0.jpeg.jpg


For version one, I call this complete. I will rework the retriever pole and likely remove some of the weight in the base to make it more mobile friendly but this gives me a collapsible antenna with a base that separates with the twist of the tension knob, deployable and retrievable without a ladder.
 
One last note on version one: My measurement of my local booth had 33.5 inch width. Going from that as a scale, compared to the comp picture from the movie, I came up with 15.1 inch wide from tip to opposite tip of the antenna. My current version, when expanded to match the movie version, is 15 inches. For my local booth, this compact umbrella version was perfect for scale. Larger booths will make it look smaller but it works for me in my neck of the woods. I view our local booth as a one person standard booth which would be significantly smaller than the movie version.
 
Well, there is something "a tree" at the Circle K. My local store (not a circle k), where my proposed first pic run would be, has a sapling locust tree growing over the booth. I talked with the owner yesterday and trimming will ensue soon. I offered to assist but it is the old country store and they like to do all the landscaping themselves. Mainly, so I am not hacking at their shrubs, is my guess. But since we do have version one completed, I will be scouring the state for available booths. If you have a local booth in Oregon that does not currently have stuff on top, post your booth pic and location.
 
Great news!!! The store owner trimmed back the big limb so I could get the antenna up top. I let them know that I would be lurking about after hours today, testing the drop hook. It was funny how nervous I was putting this up with cars pulling up. It is 2 feet from the intersection. So, my apologies for the horrible lighting but my test run was a success. The drop hook placed the antenna and retrieved it after I got some pictures. Keep in mind, these pics are for size and position reference, not meant as final pics, horrible lighting. (below is the movie scene and my today's trial, just for comparison)

20230808_212740.jpg


Big drop in height needed but overall size to booth ratio is pretty good. I will get some good sunny day pics soon and then we move to stage 2, with some attempted lightning effect.
 
Last edited:
Here is a preview of my intended lightning effect:

Screenshot_20230808-234651_Gallery.jpg

Not passable during the day as the lights are still orange when off but at night it may work.
 

Your message may be considered spam for the following reasons:

If you wish to reply despite these issues, check the box below before replying.
Be aware that malicious compliance may result in more severe penalties.
Back
Top