Baymax 1.0

Seraph77

Active Member
Hello RPF!

This is my first thread here and I admit to being a little intimidated. There are so many awesome builds on this site! I have been a lurker for quite a while but I finally joined so I could join in on the fun and get some feedback. For my first build here I am going to attempt an inflatable Baymax, the 1.0 version from the first half of the show. I have seen a couple of attempts at this (most people opt for the 2.0 version) and I have some ideas that I think will be fun.
I drew up an idea of how I think this might work.

WP_20160207_001.jpg

So I anticipate using some claws for hand operation. I really would like to be able to do the fist bump like Baymax does in the movie. I also want to have the eyes blink if possible. I saw one of the giant orc builds draw his plans on the wall and I really liked that idea. It gives me an idea of how big Baymax really is. I scaled him using images from the movie and the assumption that he is 6'2" tall. I counted pixels in paint and came up with this.

pixel baymax.png WP_20160319_006.jpg

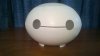
I came up with an idea to make his head using two salad bowls. I thought this was pretty original and clever but while searching I found that victorvulpine had already done this. Well, at least I knew that it would work. I actually went through 3 different types of bowls before I decided to do it right and measure things out. One of the problems with bowls is that they are flat on the bottom. Usually this is a nice feature but I want Baymax to have a round head. I tried to use a heat gun to round it out but the thin plastic didn’t really want to cooperate. It made a hole, and I wasn’t able to round off the edges very well while it was pliable either.

WP_20160311_007.jpg

I tried again with a bowl that was a better size especially since I decided that my head would be inside it and that I will wear stilts to make up the difference (I’m 5’9” and Baymax is 6’2”). If you look at a side view of the head you can see that his head tapers towards the back. It’s also not symmetrical from the top to the bottom. I’m not sure if I will do much about the symmetry part.

WP_20160306_002.jpg

I sanded off the ring on the top bowl and cut the tops of each bowl at an angle so that they will match up with a taper towards the back. I cut a hole in the bottom which turned out to be pretty big.

WP_20160428_003.jpgWP_20160428_004.jpg

I recently learned about a wonderful product called apoxie sculpt. I was going to use bondo, but this dries slower and allows you to mold it to almost finished quality. It also doesn’t smell as strongly so I can use it indoors.
I created a frame out of cardboard. I filled in the remaining space with expanding foam. I cut the foam down to the level of the cardboard and then covered that with the apoxie sculpt.

WP_20160428_001.jpgWP_20160428_002.jpgWP_20160503_001.jpg

I ended up burning out my Dremel while cutting out the hole in the bottom bowl so my drill has had to take up some of the slack. I found a disc attachment that worked really well for smoothing the apoxie sculpt. After that I cut out the eyes and the slot between them.

WP_20160503_005.jpgWP_20160612_003.jpgWP_20160612_002.jpg

It’s hard to see but I also cut out the lenses in clear plastic. I haven’t decided yet how I am going to tint them.

Well that's where I am currently. My goal is to finish this for Halloween this year and if that goes well I might take it to the Salt Lake Comic Con next year.
 

Attachments

  • WP_20160612_001.jpg
    WP_20160612_001.jpg
    1.5 MB · Views: 161
Updates!

I found that the joint where the two bowls meet peaked more than I liked, so I sanded down the plastic until the sharpness faded a bit.
After much more sanding I finally started painting! I used a paint that included primer and would bond to plastic. For now I just used a semi-gloss but I may try out the satin depending on how it looks with the material that I choose for his body.
WP_20160618_004.jpg

I did notice that painting the apoxie sculpt revealed some pin holes and a little unevenness in the top portion of the head. I am choosing to ignore the uneven part for now (unless my perfectionism gets the better of me and I wake up in the middle of the night to fix it). I found a tip for filling in pin holes using superglue and it worked pretty well. The glue dried quickly and I was able to sand it with the really fine grit sandpaper that I also used for wet sanding the imperfections and drips in the paint.
I also painted the fans that I will be using for inflating Baymax’s body. I ordered some white fans from China but when they showed up they were orange. I contacted the seller but they said that orange was all they had available and that they would refund me the money if I wanted to send them back. I decided to just paint them. I think they turned out pretty well. I did manage to chip some off when my nail gun fell on one of them in the closet though.

WP_20160618_003.jpgWP_20160618_008.jpg

The typical inflatable costumes that I have seen only use one of these fans. I want to use material that is a little thicker so I plan on using two of them.

My wife found some liner for tinting car windows at Walmart that I was able to use for the lenses. I cut it a little more to size than is shown in the photo. I also changed out the plastic for some that was more transparent that I salvaged from some toy packaging.

WP_20160621_003.jpg

I also managed to use an old helmet from my time working at a granary. I lined the top of the helmet and the inside of Baymax's head with Velcro. It wobbles a bit, but I’ll add some padding and maybe a bit more Velcro to steady it. An added bonus is that it gives me a little more height that I won’t have to put in the feet when it comes to making me 6’2”.

WP_20160618_009.jpgWP_20160627_002.jpg

While I was sanding I found that the plastic around the hole in the bottom had a few cracks that had formed. I put glue in the cracks and then lined the inside with some of the plastic I used for the lenses. If my head weren’t so large I could have gotten away with a smaller hole that was inside the ring on the bottom which would have been really strong. I will keep an eye on the cracks to make sure they don’t grow anymore, but this should be good enough to keep them in check.

That's it for now. I'm still brainstorming on the blinking mechanism and how to make a Baymax sized mannequin to make a pattern from.
 
So I have been working on the main body. I started by using a variation of the method described by Evil Ted on YouTube. I made a scale 3D model of the main potato shape of Baymax. Then I covered it in tinfoil and wrapped that in duct tape. I drew lines where the seams are located in the movie. After that I cut along those lines and flattened out the pieces on grid paper and traced them. The grid paper makes it easy to scale up the pattern. For my first try with the pattern I used black garbage bags.

WP_20160702_006.jpgWP_20160703_001.jpgWP_20160703_002.jpgWP_20160703_003.jpgWP_20160704_001.jpg

Baymax garbage bag 2.jpg

After validating the scale with my giant drawing of Baymax taped to the wall, I found some shower curtains that were pretty cheap but have the slightly shiny quality of the vinyl in the film. They have worked pretty well but they also tear fairly easily. It can be sewn but not resewn. I may change the material once I get all of the kinks worked out with the pattern. I installed an access in the bottom by sewing in some Velcro. The two fans are also near that hole, but not so close that they will be covered when I make the legs. But now I can stand inside! Behold potato Baymax!

Baymax potato.jpg

While thinking about the legs I cut out a box about the right size to see how that would affect the body. It made me think that I might have to shorten them a little. I won’t know until I make the supports that increase my height a little bit. That’s it for now!

ClayTheSpider13, Thanks for the encouragement!
 
The nephews and nieces visited the other week and they all wanted their picture taken with 'Potato Baymax'. Super fun that he is such a hit. They kept asking me to make him talk. I may have to incorporate an arduino or something similar in the future.
 
Last edited:
I have a few updates to report. I found some laundry baskets at Wal Mart after looking at giant garden pots and garbage bins that matched the leg profile I was looking for, and they were only 98 cents each! I cut off the rims and then duct taped the spokes together. I’m pretty pleased with the results.

WP_20160825_005.jpgWP_20160825_006.jpgfeet view.jpg


I created some basic stilts out of scrap wood that I had in order to increase my height by about 5 inches. After that I sewed the covers for the legs.
I noticed that the lines from the basket are very visible through the shower curtain material so I lined the inside with white paper. The paper really helped with the visibility issue, but it was also really noisy so I had to take it off. I might try doubling up the shower curtain, but I haven’t come up with any great ideas yet, so I am open to suggestions.


WP_20160924_003.jpgWP_20160924_001.jpg


I attached some old shoes on the stilts with duct tape for now. It was actually not too difficult to move around with them.

In other news I have also been working on the hands. I really liked the idea I saw that used linkages for finger movements on AlphaTech686’s Grommash build. I used an old pizza pan to cut out the shapes after I did a test run with some cardstock and hanger wire. I still need to build the hands and the arm extensions but I have all the finger linkages cut out (minus the thumbs).


WP_20160825_002.jpgWP_20160825_003.jpgWP_20160825_004.jpgWP_20160924_004.jpgWP_20160924_005.jpg


I ordered some electronics to add some sound clips. I’m pretty excited about this because it seems simple and will add a lot to the costume. This unit was suggested by Talaaya on another thread. I’m comfortable with soldering, but it’s hard to beat having everything set up for only 16 bucks. It has four different buttons that you can link to a total of 300 seconds of audio.

audio electronics.png


Well, that’s it for now. Hopefully next time I will have successfully attached the arms and hands. Also, if anyone has any suggestions for sound clips I’d like to hear them. I’m thinking of including some of the low battery clips, in addition to the “Hello, I am Baymax” and definitely the fistbump sound. What do you think would be funny?
 
G'day, wondeful build. I am loving your fine work and am subbed in anticipation :).
Wondering if you could link that audio device or link the original thread where it's mentioned. I'm doing some audio work atm via an android app and a phone accelerometer ... but that looks interesting for one of my side projects.
Cheers
 
That's very clever! I would never have thought to use something like that for the legs.

As for hiding the struts inside, what about lining it with fabric instead of paper? You can probably find white sheets or curtains cheaply at a thrift store, or broadcloth is pretty cheap too at a fabric store, but it can be very thin so you might need multiple layers to get the same effect.

You could also put a layer of cotton batting between the shower curtain and the baskets, which would have the added bonus of puffing the legs out a bit and making sure you don't see any sharp lines through the shower curtain.
 
Thanks! Here's the link.
http://www.electronics123.com/shop/...utes-usb-recording-module-with-4-buttons-5320

- - - Updated - - -

That's very clever! I would never have thought to use something like that for the legs.

As for hiding the struts inside, what about lining it with fabric instead of paper? You can probably find white sheets or curtains cheaply at a thrift store, or broadcloth is pretty cheap too at a fabric store, but it can be very thin so you might need multiple layers to get the same effect.

You could also put a layer of cotton batting between the shower curtain and the baskets, which would have the added bonus of puffing the legs out a bit and making sure you don't see any sharp lines through the shower curtain.


Wonderful ideas! I think I will try the batting, thanks!
 
Small update before the final sprint to finish by Halloween. The batting worked great! It added some needed fluff, but the thickness I got still allows for some visibility of the basket beneath. (I may add another layer of something.)

Baymax arm up.jpg

I got the electronics and they work pretty well. I ordered the line out adapter too so I can plug the standard size speaker jack into it because it needs more volume for this application. It sounds pretty good unless the sound clip has some music in the background, and then there’s a lot of static. It might just be the quality of the sound clip I recorded.

I attached the arm sleeves to the main body. The shoulders don’t quite line up like I was hoping but it’s exciting to see it coming together!

baymax arms 3.jpg

I have also been working on the arm extensions and hands. I am working on adding foam around the fingers and hands to prevent any sharp objects from cutting the hand covering material. The hands and fingers are from an old rusted pizza pan that I had saved. I am also using the handle from a garden tool that busted to attach them to. I saw someone use the metal from a cheap plumbers snake and thought that was a great idea for the rods to push and pull the fingers.

WP_20161021_003.jpg

Still to do:
1. Add the gray patches. (sides, feet, and elbows)
2. Finish the hands.
3. Make the disk cover for the chest.
4. Nip and tuck a few spots to fix the roundness on the belly and the shoulder to neck transition.
5. Finish the kids costumes too…
 
Whew! I made the Halloween deadline! I was able to add the patches and make the disk cover. The final details really added a lot.
The disk cover was a plastic pipe cover that I sanded down. I added the line with a sharpie marker. I tested hot glue on a scrap of the curtain material and found that it did not melt anything, so that’s what I used to fasten it to the main body.

WP_20161029_001.jpgWP_20161029_002.jpgWP_20161029_007.jpg


The hands gave me some trouble. The metal linkages ended up not giving me the range of motion that I was hoping for once the padding was added. I replaced them with some hangar wire that worked well for waving and to give the kids high-fives. I will modify/simplify them in the future, because I really think that giving fist bumps is vital for Baymax.

WP_20161029_003.jpgWP_20161029_004.jpg


Baymax was definitely a hit! At the local “Trunk or Treat” my wife had a hard time guarding me from all of the kids wanting to poke/climb/hug/high-five/open the disk drive and turn Baymax evil… it was quite the experience. I can see why it’s very important to have someone assisting in these situations. I was able to see and move around well, but it is pretty difficult to keep track of so many little kids running around. The sound system also worked nicely, but it could have been a bit louder.

Final_2.jpgFinal_1.jpg

I may make a few more tweaks in the future (adjusting the hand angle, thickening the leg liner, adding internal neck support to the head to prevent cracking), but I am pretty happy with how this turned out. Thanks for your comments and support!
 
Aww I'm so glad Baymax was a hit! What fun for you and the kids. :) This is a costume my husband wants to do at some point (it's been on his list since the movie came out, though, so I have no idea if it will ever actually happen or not!) so this thread is a huge inspiration.
 
Wow, I know this thread is old, but you are ACE at helmets! What a fab costume! Love how you did such detailed work with a small budget. I obsess on Big Hero 6, and am new to RPF in hopes of learning from you experts. Steer on Seraph77!
 
Wow, I know this thread is old, but you are ACE at helmets! What a fab costume! Love how you did such detailed work with a small budget. I obsess on Big Hero 6, and am new to RPF in hopes of learning from you experts. Steer on Seraph77!

Thank you very much! I was quite pleased with how the helmet turned out. Sadly the shower curtain experiment didn't quite work as well as I thought it would, but figuring stuff out is half the fun for me!
 
Thank you very much! I was quite pleased with how the helmet turned out. Sadly the shower curtain experiment didn't quite work as well as I thought it would, but figuring stuff out is half the fun for me!
I thought the end result was pretty stellar! :) And that the shower curtain looked great! Would you mind elaborating on the issues you ran into with the shower curtain? I was thinking of trying a Po costume sometime with a fan.
 
This thread is more than 4 years old.

Your message may be considered spam for the following reasons:

  1. This thread hasn't been active in some time. A new post in this thread might not contribute constructively to this discussion after so long.
If you wish to reply despite these issues, check the box below before replying.
Be aware that malicious compliance may result in more severe penalties.
Back
Top