INVAR
Sr Member
I have been a big fan of the Bandai Star Wars ship kits, with the only disappointment being the 1/5000 Star Destroyer that came with that bow warp, so when browsing online for availability of the Revell or Round 2 Razorcrest I happened to see the Bandai 1/72 Vader's TIE Advanced X-1 selling for $25, it was the only ship kit I did not have sitting and collecting dust on my shelf - so I nabbed it.
When it showed up in my mailbox, the paper envelope they packed the box in was so crushed from harsh handling and cramming it into my mailbox that I feared the kit itself might be damaged. So I opened it up and inspected all the sprues and was relieved nothing was damaged. So, since I had it open and I was inspecting things, I determined that the kit looked to be a pretty easy build - so I carved out a few weekends to work on it.
I wanted to try my hand at lighting this kit since I had planned and purchased lighting for the A-wing, B-wing, Y-wing, Falcon and TIE fighter that were sitting there waiting in build purgatory for me to get done with the damn Zvezda star destroyer already. The hard part was figuring out how in the world to get LEDs into the tiny areas that needed light such as the 4 rear ION, the cockpit and the lasers.
I had some extra red Pico LEDs from Model Train software, and a flashing green Nano I bought for the regular TIE - and since I opened this kit first, I just decided to put it in Vader's first and order another one later when I got around to it.
As always with Bandai kits, the attention to detail is astounding - but I did notice that in the cockpit - the silver tubes to the upper left and right of Vader in the film, are not visible in this kit as they needed to be. So I carved up some styrene rods, painted them and Vader and upgraded the cockpit a bit. I primed the entire model in sections with Stynlrez gray and then painted the interior with a light coat of Tamiya XF-16 Flat aluminum and then an overcoat of XF-19 Sky Gray mixed with some flat white as I decided to try mimicing the set colors because I was going to have red LEDs on the floor to illuminate the interior. The exterior was a mix of Tamiya XF25 Light sea gray mixed with white and a single drop of X-23 clear blue. I wanted more of the original film look which was more gray/white than blue - but wanted a hint of the blue without being overtly noticable.


Then the hard part began, which was to figure out where I could lay the wiring for the LEDs. I quickly learned that putting 4 red pico LEDs for the ION engines was going to be impossible. So scratch that idea and decided that the only way I was going to get red engines back there was via fiber. SO I decided to put a larger red chip LED into the back section out past the ball and into the back section and loop .5mm fiber back into the cockpit ball and out through the exhaust holes that I had drilled.
Being greedy I also decided I wanted blinking green LEDs for the front laser canons - and that also was going to need to be fiber. So I went with .25mm and put a flashing green LED with resistor in a separate styrene tube next to the red chip tube in the back section behind the cockpit ball and threaded the two strands of .25 fiber out back into the cockpit ball and under Vader's chair out through the front ends to the laser canons.
Sadly, I learned that hooking up solid LEDs with flashing LEDs to a single power coin cell 3volt battery caused all LEDS to flash. So - I learned that we would need to have a separate power source for the green lasers and a separate button to activate those. Bummer. More work. So I had a CR1225 mini coin cell holder that I would use for the lasers and a regular coin cell battery for the engines and cockpit leds. I decided that instead of building a base and using a copper tube as most master builders do, that I would see if I could not rig the base that comes with the kit to handle the wiring and batteries. Bandai kits are engineered precise and because they are snap kits, the fits are tight with little to no room for wiring or fiber. So, you have to carve or drill out spaces and voids to run wire and fiber which proved tedious but ultimately worked.


So while I was waiting for that order to come in from Model Train software, I focused on painting. The studio model did not have any washes or panel lines enhanced as the studio lighting would be enough to bring out those details. So I tried to lightly approximate that, with just a very light wash of more gray than black applied with a fine tip brush. I hosed down the lid and the interior cockpit with a generous spray of Pledge Floor Care to create the gloss needed to apply the decals. Once cured to the gloss finish, I dabbed some more Pledge on the areas I was applying the decals and once they were placed, added another dab atop to seal them in. Pledge works well to both soften the decals and set them.
Once I got the fiber and wiring in place with the help of major magnifiers and tweezers, I began to assemble the kit. Because the tolerances were so tight, I had to take it apart a few times to shave or trim or channel another avenue for wire and fiber in order for the parts to close up and fit seamlessly.


Then it was out with the soldering iron, joining the LED wiring to the battery leads and shrink tubing those. Then fishing the wire down into a section of the stand that I drilled out a hole and all the wire and the resistors fit within the channel of the original part. Then I hand-carved some thin styrene to glue to the outside of the stand to hide the wiring which ran down through the base and to the batteries.
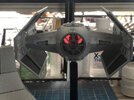
So with the model assembled, the wire run it was time for the moment of truth. Hit the push button on the Death Star Base and flipped the switch for the engines and here she is, all lit up.


Overall, another great kit from Bandai. Perfect engineering and details are unmatched and perfect to the studio model. The only frustrations were at my end in terms of trying to light this kit as these are not really engineered for lighting and requires some minor engineering feats to get it to work. But once you are able to do so, it just adds so much more to the perfection that these kits already have.
I think I am going to hit the A-wing next even though I have a regular TIE Fighter sitting in the box and the build is almost identical to this one. So I am going to space them apart a bit so I do not get bored.
When it showed up in my mailbox, the paper envelope they packed the box in was so crushed from harsh handling and cramming it into my mailbox that I feared the kit itself might be damaged. So I opened it up and inspected all the sprues and was relieved nothing was damaged. So, since I had it open and I was inspecting things, I determined that the kit looked to be a pretty easy build - so I carved out a few weekends to work on it.
I wanted to try my hand at lighting this kit since I had planned and purchased lighting for the A-wing, B-wing, Y-wing, Falcon and TIE fighter that were sitting there waiting in build purgatory for me to get done with the damn Zvezda star destroyer already. The hard part was figuring out how in the world to get LEDs into the tiny areas that needed light such as the 4 rear ION, the cockpit and the lasers.
I had some extra red Pico LEDs from Model Train software, and a flashing green Nano I bought for the regular TIE - and since I opened this kit first, I just decided to put it in Vader's first and order another one later when I got around to it.
As always with Bandai kits, the attention to detail is astounding - but I did notice that in the cockpit - the silver tubes to the upper left and right of Vader in the film, are not visible in this kit as they needed to be. So I carved up some styrene rods, painted them and Vader and upgraded the cockpit a bit. I primed the entire model in sections with Stynlrez gray and then painted the interior with a light coat of Tamiya XF-16 Flat aluminum and then an overcoat of XF-19 Sky Gray mixed with some flat white as I decided to try mimicing the set colors because I was going to have red LEDs on the floor to illuminate the interior. The exterior was a mix of Tamiya XF25 Light sea gray mixed with white and a single drop of X-23 clear blue. I wanted more of the original film look which was more gray/white than blue - but wanted a hint of the blue without being overtly noticable.
Then the hard part began, which was to figure out where I could lay the wiring for the LEDs. I quickly learned that putting 4 red pico LEDs for the ION engines was going to be impossible. So scratch that idea and decided that the only way I was going to get red engines back there was via fiber. SO I decided to put a larger red chip LED into the back section out past the ball and into the back section and loop .5mm fiber back into the cockpit ball and out through the exhaust holes that I had drilled.
Being greedy I also decided I wanted blinking green LEDs for the front laser canons - and that also was going to need to be fiber. So I went with .25mm and put a flashing green LED with resistor in a separate styrene tube next to the red chip tube in the back section behind the cockpit ball and threaded the two strands of .25 fiber out back into the cockpit ball and under Vader's chair out through the front ends to the laser canons.
Sadly, I learned that hooking up solid LEDs with flashing LEDs to a single power coin cell 3volt battery caused all LEDS to flash. So - I learned that we would need to have a separate power source for the green lasers and a separate button to activate those. Bummer. More work. So I had a CR1225 mini coin cell holder that I would use for the lasers and a regular coin cell battery for the engines and cockpit leds. I decided that instead of building a base and using a copper tube as most master builders do, that I would see if I could not rig the base that comes with the kit to handle the wiring and batteries. Bandai kits are engineered precise and because they are snap kits, the fits are tight with little to no room for wiring or fiber. So, you have to carve or drill out spaces and voids to run wire and fiber which proved tedious but ultimately worked.
So while I was waiting for that order to come in from Model Train software, I focused on painting. The studio model did not have any washes or panel lines enhanced as the studio lighting would be enough to bring out those details. So I tried to lightly approximate that, with just a very light wash of more gray than black applied with a fine tip brush. I hosed down the lid and the interior cockpit with a generous spray of Pledge Floor Care to create the gloss needed to apply the decals. Once cured to the gloss finish, I dabbed some more Pledge on the areas I was applying the decals and once they were placed, added another dab atop to seal them in. Pledge works well to both soften the decals and set them.
Once I got the fiber and wiring in place with the help of major magnifiers and tweezers, I began to assemble the kit. Because the tolerances were so tight, I had to take it apart a few times to shave or trim or channel another avenue for wire and fiber in order for the parts to close up and fit seamlessly.
Then it was out with the soldering iron, joining the LED wiring to the battery leads and shrink tubing those. Then fishing the wire down into a section of the stand that I drilled out a hole and all the wire and the resistors fit within the channel of the original part. Then I hand-carved some thin styrene to glue to the outside of the stand to hide the wiring which ran down through the base and to the batteries.
So with the model assembled, the wire run it was time for the moment of truth. Hit the push button on the Death Star Base and flipped the switch for the engines and here she is, all lit up.
Overall, another great kit from Bandai. Perfect engineering and details are unmatched and perfect to the studio model. The only frustrations were at my end in terms of trying to light this kit as these are not really engineered for lighting and requires some minor engineering feats to get it to work. But once you are able to do so, it just adds so much more to the perfection that these kits already have.
I think I am going to hit the A-wing next even though I have a regular TIE Fighter sitting in the box and the build is almost identical to this one. So I am going to space them apart a bit so I do not get bored.