You are using an out of date browser. It may not display this or other websites correctly.
You should upgrade or use an alternative browser.
You should upgrade or use an alternative browser.
Bandai 1/12 R2-D2 with lighting
- Thread starter korben44
- Start date

Pixelworks
Well-Known Member
Wow... that is looking very convincing.
is it just the lighting or does the white have a touch of pearl or satin to it?
is it just the lighting or does the white have a touch of pearl or satin to it?
Jimmer
Well-Known Member
Thanks! I do use an airbrush for most of the painting... I use tamiya acrylics primarily... Here I used flat white and flat blue on top of Mr surfacer 1500 black. I also used rub n buff antique white on top of the white applied with a terry cloth.
Thanks for the info, I really need to make the jump to airbrush.
Excellent ideas and work on your base as well.
My 9 year old nephew and I had a lot of fun assembling an ep II R2.
My main contribution other than cheerleading was drilling a hole in the dome and adding a flashing 3mm LED. A lucky bit of happenstance was that the glue I used had some bubbles, leading a nice texture to the light, much like the actual PSIs.
I used a CR2032 button cell, which was thin enough to fit neatly inside a holder in the supplied base.
Great work, you and your nephew should certainly be proud.
Beautiful lighting, and you have to love when unintended occurrences actually help the model rather than negatively affect it.


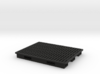
Need a 3D-printed base like the floor of the Millennium Falcon?")
That would be awesome...lol
Awesome!
Maybe I missed it, but what color LEDs did you use? i.e. is that a cool white, or a blue?
I used two cool white smd leds for two 'display' things in the front and back, a red smd led for the front red light, and a green 1.8mm led for the green light on the back. So a total of 4 leds in this 1/12 R2...lol
I designed a floor pallet model a couple years ago. It ended up being quite expensive to print! My plan was to make a stand for my R2-D2 model at some point...
That does look rather expensive to print... especially on shapeways! I may try to scratch build one, though, if you don't mind me using that picture as a reference?
What makes it particularly expensive is that it’s actually fairly thick if you want it to be accurate to the original pallet design. It’s much cheaper if you just model the top layer.
Feel free to do what you like with any preview picture - it’s just a model of an old shipping pallet.
Feel free to do what you like with any preview picture - it’s just a model of an old shipping pallet.
Hunk a Junk
Sr Member
Korben, you're a machine! Were those the pico-size SMDs or larger? It's really amazing how just a little bit of lighting can bring a model to life.
What makes it particularly expensive is that it’s actually fairly thick if you want it to be accurate to the original pallet design. It’s much cheaper if you just model the top layer.
Feel free to do what you like with any preview picture - it’s just a model of an old shipping pallet.
Would you be able to make the top part available on your shapeways page? I can give you the dimensions I would need when I get home.
Korben, you're a machine! Were those the pico-size SMDs or larger? It's really amazing how just a little bit of lighting can bring a model to life.
Thanks, Hunk a Junk! I used some rather large smd's. Definitely not any pico or nano sized... I'm waiting on some finer soldering wire to wire up my nano smd leds I have.
Lighting makes all the difference! Especially when done right and not over saturating the model.
Similar threads
- Replies
- 3
- Views
- 670
- Replies
- 0
- Views
- 789
- Replies
- 6
- Views
- 710