You are using an out of date browser. It may not display this or other websites correctly.
You should upgrade or use an alternative browser.
You should upgrade or use an alternative browser.
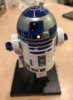
Bandai 1/12 R2-D2 with lighting
- Thread starter korben44
- Start date


PeteVenkman
Well-Known Member
Looking good! I like the subtle weathering. Definitely looking forward to seeing what you do with the lighting. I've got one, along with a Threepio and BB8, mostly built as well. I'm going to finish them up in the New Year once the Falcon is out of the way.
Hunk a Junk
Sr Member
Look forward to your lighting solutions. I've build one of these, but have a second from the BB-8 2-pack that I'm planning to light. I only steal from the best, so do a good job! 
Look forward to your lighting solutions. I've build one of these, but have a second from the BB-8 2-pack that I'm planning to light. I only steal from the best, so do a good job!
I will do my best! lol
Analyzer
Master Member
Painting looks perfect! Things look like real metals and those copper wires look so much better
I really wish Bandai would have figured out a better way to engineer the casting to mold the silver dome in one piece though. That's the only bad part of the kit. That seam is so hard to fix/hide
I really wish Bandai would have figured out a better way to engineer the casting to mold the silver dome in one piece though. That's the only bad part of the kit. That seam is so hard to fix/hide
Hunk a Junk
Sr Member
What did you use for the steel/aluminum/chrome look?
Painting looks perfect! Things look like real metals and those copper wires look so much better
I really wish Bandai would have figured out a better way to engineer the casting to mold the silver dome in one piece though. That's the only bad part of the kit. That seam is so hard to fix/hide
Agreed... I'm still going to try and hide it. Bandai could have easily engineered it as one piece. Oh well...lol
What did you use for the steel/aluminum/chrome look?
I used a base paint of Mr Surfacer 1500 black followed by silver Rub 'n Buff applied with a terry cloth. As for the copper wires, I just picked up some necklace wire from a local art supply store that was a copper color. Cheap stuff, pliable, and just adds a more realistic look.
Hunk a Junk
Sr Member
Ah. I used the Rub n' Buff over black on mine too, but I think you got a more consistent (and authentic) look. Just proves it's not always the tools, but the tool (me).
Ah. I used the Rub n' Buff over black on mine too, but I think you got a more consistent (and authentic) look. Just proves it's not always the tools, but the tool (me).
I think it depends on how you apply it, too. Although Mr Surfacer provides a super smooth, primed surface. So it could be a combination of both. That, and the terry cloth fiber may help apply it in a more even and realistic way.
Fett_Ish
Sr Member
Looking very nice. I built one of these and a 3PO that have lights. Running the wires up through their legs was a challenge (R2 is in 2 legged mode). I did modify R2's dome so I could fill the seem. I had a fiber optic lamp that has very tiny fibers which is what I used in his front and rear logics. A single LED in the center of the dome lights it all up. I'll try to post a pic. Good luck on the lighting.
Analyzer
Master Member
Ah. I used the Rub n' Buff over black on mine too, but I think you got a more consistent (and authentic) look. Just proves it's not always the tools, but the tool (me).
I think it depends on how you apply it, too. Although Mr Surfacer provides a super smooth, primed surface. So it could be a combination of both. That, and the terry cloth fiber may help apply it in a more even and realistic way.
I know things like Alclad and Spaz Stix mirror chrome etc.. recommend using a gloss black paint before applying. The smoother you can get your surface the more metallic shine it will have.
I haven't tried it yet, but from everything I have heard about Mr Surfacer, it is quite smooth for a matte surface
Hunk a Junk
Sr Member
If I remember my thinking, I filled in the dome seam lines, but didn't go nuts getting the dome super smooth since I wanted a beat up and scratched R2 when all was said and done. Maybe the next one I'll make a throne room fresh appearance.
Jimmer
Well-Known Member
I used a base paint of Mr Surfacer 1500 black followed by silver Rub 'n Buff applied with a terry cloth. As for the copper wires, I just picked up some necklace wire from a local art supply store that was a copper color. Cheap stuff, pliable, and just adds a more realistic look.
I recently knocked over my last R5 build while dusting (not off the shelf, he literally just did a face-plant) and snapped one hose off completely, one hose snapped on one connector and nearly snapped on other connector. Gonna have to look into your solution, but it seems like all the hoses were far more brittle than when I assembled him. I keep my models out of direct sunlight, makes me wonder if the paint or clearcoat (or wash) that I used may have adversely affected the plastic.
I think it depends on how you apply it, too. Although Mr Surfacer provides a super smooth, primed surface. So it could be a combination of both. That, and the terry cloth fiber may help apply it in a more even and realistic way.
Beautiful R2. I'm getting ready to start my R2 ver.2 and had settled on trying Testors Aluminum Metalizer Buff, but now I'm rethinking that..lol.
I also started a thread a few days ago about the merits of cheap primer (Rust-oleum 2x due to geographical issues), now really glad I waited. Gonna have to give Mr Surfacer a look.
Hate to "copycat", but would you share what white and blue paints you used? Trying to make this R2 my final definitive build, and researching options. (I still use a brush, and yours looks so good I would assume you airbrushed - I mean that as a compliment).
Great work.


My 9 year old nephew and I had a lot of fun assembling an ep II R2.
My main contribution other than cheerleading was drilling a hole in the dome and adding a flashing 3mm LED. A lucky bit of happenstance was that the glue I used had some bubbles, leading a nice texture to the light, much like the actual PSIs.
I used a CR2032 button cell, which was thin enough to fit neatly inside a holder in the supplied base.
Attachments


Similar threads
- Replies
- 8
- Views
- 1,070
- Replies
- 2
- Views
- 511
- Replies
- 14
- Views
- 470