Fetts.Sobriquet
Well-Known Member
I recently put together an Avengers Black Widow costume for the wife. I 3d printed some of the accessories and I wanted to make them available to the RPF.
Here are the 3D files.
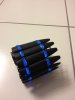
I simply added some blue LEDs to the Bites, once printed.


Gloves - (not pictured) Alpinestars Stella Tyla Women's Leather On-Road Motorcycle Gloves. I think they stopped making black but you can dye the white gloves black easily.
Guns - P.698 Spring Airsoft Handgun which is a cheap airsoft Glock 26 clone. It fits perfectly into the serpa holsters for the Glock 26. From amazon
Drop Holsters were Blackhawk Glock 26 SERPA holsters. One Right, one left.
Gun Belt and drop were custom made from nylon strapping.
Main gun belt buckle was an actual Austrialpin Cobra Buckle. I 3d printed the additional drop holster buckles since the Austrialpin Cobra Buckles are so expensive.
Catsuit was from the - Disguise Marvel's Avengers Movie Black Widow Avengers Theatrical Adult Costume, bought from Amazon.
Stingers, Bites, Gun belt buckels, and Black Widow emblem buckle was 3d Printed. Bites are upsized to hold the AAA batteries.
Boot were from her existing ,seemingly infinite, inventory of shoes.
Here are the 3D files.
I simply added some blue LEDs to the Bites, once printed.
Gloves - (not pictured) Alpinestars Stella Tyla Women's Leather On-Road Motorcycle Gloves. I think they stopped making black but you can dye the white gloves black easily.
Guns - P.698 Spring Airsoft Handgun which is a cheap airsoft Glock 26 clone. It fits perfectly into the serpa holsters for the Glock 26. From amazon
Drop Holsters were Blackhawk Glock 26 SERPA holsters. One Right, one left.
Gun Belt and drop were custom made from nylon strapping.
Main gun belt buckle was an actual Austrialpin Cobra Buckle. I 3d printed the additional drop holster buckles since the Austrialpin Cobra Buckles are so expensive.
Catsuit was from the - Disguise Marvel's Avengers Movie Black Widow Avengers Theatrical Adult Costume, bought from Amazon.
Stingers, Bites, Gun belt buckels, and Black Widow emblem buckle was 3d Printed. Bites are upsized to hold the AAA batteries.
Boot were from her existing ,seemingly infinite, inventory of shoes.
Last edited: