Arvey Models 1/350th scale EDF (Space Battleship Yamato) warships

mrchester

Well-Known Member
RPF PREMIUM MEMBER
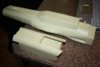
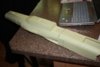
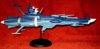
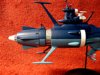
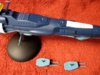
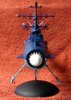
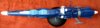
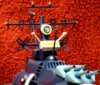
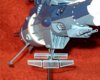
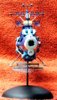
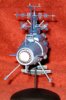
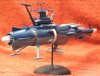
Arvey Models is one third of a three sided company that also consists of Commander models (tanks and armor) and Iron Shipwrights (Naval Vessels). Resin is the medium that they work in and there is a lot of product. Arvey has the distinction of being the only company that produces Space Battleship Yamato kits in the USA. Here' some pictures of their Space Patrol Cruiser Koenigsberg.
 

Attachments

  • edfred.jpg
    edfred.jpg
    562.1 KB · Views: 286
  • edfred2.JPG
    edfred2.JPG
    1 MB · Views: 309
  • edfred3.JPG
    edfred3.JPG
    830.5 KB · Views: 203
  • edfred4.jpg
    edfred4.jpg
    463.6 KB · Views: 242
  • edfred5.jpg
    edfred5.jpg
    244.7 KB · Views: 167
  • edfred6.jpg
    edfred6.jpg
    622.7 KB · Views: 189
  • edfred7.jpg
    edfred7.jpg
    499 KB · Views: 197
  • edfred8.jpg
    edfred8.jpg
    434.5 KB · Views: 193
  • edfred9.jpg
    edfred9.jpg
    373.1 KB · Views: 204
  • edfred10.jpg
    edfred10.jpg
    801.9 KB · Views: 205
Alright...time to clarify, go to: ARVEY Model Products - Ther Standard of Excellence to see the kit listings. Click on Koenigsberg to see the kit in bare form. When I get some time, I explain the modifications I made to the kit. This will be tricky because the construction photos were safely held in the family camera. Then someone, who will remain nameless (wife) decided it was time to erase some photos...all of them. Then I'll get to Lexington.
 
Okay, I'm gonna change gears...I can show what I did to build the Koenigsberg when I get around to building Arvey's EDF Hood model. It has the same issues, only slightly bigger. So. since I've started it I'll move on to EDF Lexington.battlecarrier_lexington.jpg
This is a big model...29" long and weighing in at about 15LBS this is an impressive model. Don't let the price on the website fool you, for if you contact them there are several types of discount (I opted for the multi-kit discount). The thing about this model is that it is made when ordered and there has to be three certain people that are not on vacation ( I had to wait a couple of weeks for them to return before they would take my money...how 'bout that). When this did arrive I did a parts inventory and found that there were a few parts missing including the aft section that is the hangar bay. After several back and forths over E-mail the parts issue was solved...now to start curing the casting issues.
 
The main body comes in two section...the front half is taken from the Borodino warship and the rear is a box like hangar bay.
The issue with the front was two fold, (1). the body had a slight, but noticeable curve and slight twist to it and (2). the large intake grills on the sides had major casting crud in the grills. The thing about these kits is that a lot of the detail items are cast on however, the grills have a tendency to require attention.
lexp08sma.jpglexp12sma.jpg
Being a machinist and having a shop at my disposal, I carefully hatched out a radical to cure the problem. Since this thing is solid resin (NOTE: SOLID!) and I do not have a cauldron to boil this thing for days, I had only one option...put it in the band saw.

View attachment 211286lex1a.jpg
This made a large piece into two more manageable pieces to work on separately (mind you, the thoughts of "Have I just ruined a $500.00 resin kit?" ran through my mind a few times) and also made things easier to cure. Next time, flattening out a rolling upper deck and straightening out a twisted landing bay (HINT: Add one Bridgeport milling machine).
 

Attachments

  • lexp08sm.jpg
    lexp08sm.jpg
    25.9 KB · Views: 144
  • lexp12sm.jpg
    lexp12sm.jpg
    26.5 KB · Views: 144
Last edited:
Let me try to regroup (awkward start).View attachment 213973
Cutting off the forward section made it easier to work with and to rework these large intakes. A new backing plate will be installed upon reassembly.
lex1.jpg
 
The hangar bay is mostly square, with rounded tops. The one I got had a twist in it, however, I had a plan. Using the back of the hangar bay floor as a frame of reference, I planned to mill the sides and bottom square. Then, skin them with sheet plastic. But first, I have to remove the scoop details on the bottom.lex4.JPG
I marked the sections with how much I took off.
 
After all of the chopping, I attached the hangar to the center section. I could clamp the hangar in a vise and do the necessary mill work. The top deck and gun platform had a wave to them, so I used the same mill and skin method to straighten them out. I also balanced out the transition on the bottom between the hangar and the center section. NOTE: Arvey does say that if there are any problems with their parts please let them know. Considering what it took to get this thing produced (and my skill set as a machinist) I weren't gonna complain to much.lex2.JPGlex3.jpg
 
Very nice builds. Your Koenigsberg is particularly nicely done. :thumbsup

I've built several of the AMP kits in the past. They're all pretty nicely done. No complaints.
 
Thanks for the kind words Griffworks... I have a personal flaw that everything that I look at must be straight or square or round. They hate me at car shows (I look down the fenders of show cars...wave are not good.
Thank you too, cosmic-x, This is why I love resin kits... I can use my milling machine to do delicate work. More to come.
 
I have found that Arvey casts their main bodies upside down... since most people do not use mirror for displaying, this makes sense. The problem, however, is both air bubbles and mold halves not lining up. This is compounded by the surface details that have to be worked around. For both the Lexington and Borodino models the problem runs through the lower missile tube arrays. I simply filed and smoothed out the area and finished the corrective body work. Then I reset it in the mill and drilled holes to later take brass replacements.
lexbot.jpg lex5.JPG
 
mrchester, what did the Koenigsberg kit cost you? I have a 1/350 SBY that I plan on building after some other projects and I have considered getting some of the Arvey kits to compliment it.

BTW, nice work on the Koenigsberg.
 
OOH, OOH, me too, 11B30B4 (plate #?). I about had a coronary when that big Yamato kit arrived at my shop. Nicely thought out kit by Bandai, though.
I purchased the Koenigsberg, Hood, and Borodino together and I think I got 20 percent discount (it might have been 25). I emailed Jon at Arvey and told him what I wanted and asked for a total including shipping ( this avoided confusion on my part...the discount they had at the time was a little strange ). There is an automatic discount when purchasing direct (e-mail or over the phone.). It does pay to buy in multiples... I went back a month later for the Lexington and he gave me a four kit discount because of the three kits I bought earlier. So, to answer your question, I think $120.00. Oh, the 'K' and the Hood have photo-etched radar parts. Here's Jon's E-mail: ironship@vic.com <ironship@vic.com> Or give them a call ( the numbers on their site).
 
Another modification I made was the intake grooves that the intake turbines set in. I used the Bandai kit as a guide and made properly shaped (for my taste) skin panels fron.020" plastic. I filled the excess with CA and wads of tissue paper, then finish shaped the groove with body putty. Afraid there's only before and after pics.lex3.jpglexscoop2.jpg
 
Oh yeah, that's a bottle of Blue Rhino propane in the back of the before picture...the plant (In Tavares) that was in the news this week is (was) about five miles from my house. It was an interesting night.
 
For the tricky task of re-attaching the nose section to the main body, I wanted to make sure that there was an internal brace to make sure that this thing doesn't fall apart in a couple of decades. I mounted a 1/2" aluminum rod in the main body (this stuck out about 4"). I free handed a 5/8" hole in the nose which I would fill with slow epoxy when I got ready to do the re-attachment. After compensating for the lost resin from the cutting operation (and re-aligning the nose using sheet plastic) I did several dry runs for the rejoining. Then I got diverted for a couple of weeks. This gave me a chance to re-think what I was about to do. Then it hit me to finish out (as much as was practical) both pieces. They were more manageable and I would just have to concentrate on working the join area later.lex2.JPG lex10.JPG lex11.JPG
 
Its kind of hard to keep this in order because I was also reworking the deck cannons ( there will be separate pictures for that) and the command tower during the main body work.
Here's a picture of the nose (with the tachyon scoop attached) the side scoop back plate, finished deck guns and turned aluminum inserts for the rear of the tachyon scoop.

lex8.JPG
 
Last edited:
Let's continue the deck cannon thought... I have a total of six of these (I also have the Borodino model and ended up with one extra turret) and wanted to clean them up. I milled out the three grooves for the barrel mounts and drilled out the range finders in the sides. I drilled the holes all the way through (this made sure that the replacement pieces would line up upon re-assembly) and trued up the recess holes with an endmill.
lexguns4.jpg lexguns5.JPG
I made the barrel bases from aluminum and the rest of the cannons from telescoping brass tubing.
 
The kit design was to glue the gun turrets into place. I mounted brass tubing into the bottom of the turrets and drilled holes in the main body so that the guns will swivel. I did this with my Koenigsberg, too. After some priming and sanding, I painted the turrets Krylon Pewter Grey. I painted the side insert holes orange and the gun barrels Gunship Grey. I replaced the range finders with 5/16" steel dowel pins.
lexguns2.jpg lexguns3.jpg lexguns6.jpg
 

Your message may be considered spam for the following reasons:

If you wish to reply despite these issues, check the box below before replying.
Be aware that malicious compliance may result in more severe penalties.
Back
Top