Art Asylum Star Trek TOS Phaser Modification

Felgacarb

Sr Member
Another Phaser thread!


Once again, my goal here is to upgrade a toy (a pretty nice toy) into a costume piece. We've seen the threads where this item has been upgraded with metal parts and repainted in more accurate colors- and I am in no way suggesting that those are not fantastic projects- Instead, for this build I'm focusing on making an improved 'con-banger'.


So, the number one issue with nearly any pre-TNG phaser prop- how do you wear it?

In the show, they bonded velcro to one side of the prop (often covering the entire side of the P1) and used a vecro free prop for closeups. For costuming, we'd rather use one prop for both.


So, the challenge I set myself was to retrofit a pocket clip into the AA Phaser.


Taking it apart was not too bad- you have to yank off the fins and the emitter nozzle, as well as the cap at the end of the handle.


Those Art Asylum guys really used up the space in the main body- I'm still impressed by how many cool features they fit into this relatively cheap toy.


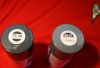
As long as it was apart, I decided to change the LED color, add a new switch and extra batteries, and spray a better silver color on some of the details.


I also took some material off the side knob and added a ring, hoping to make it slightly more accurate.


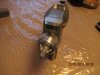
Now the real stuff: I made a clip from 1/8" aluminum. I would have liked to go bigger, but there just isn't room for much else.


Then the scary part- I cut a slot in the side of the P2 to install the clip.


Here you can see the rod the clip will pivot on:


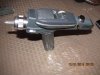
A smaller rod will proturde from the bottom of the P2 so that you can pop the clip open:


A spring is used to make the clip close itself when you draw the phaser.


Finally, some paint, so that it doesn't visually stand out too much:


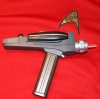
Here is how it turned out:


So, is it better than velcro? I may need to spend more time in costume to give a real answer, but it should be. Now, perhaps someone will combine this with the all-metal parts kit and an awesome paint job, to make the ultimate costume & display prop-


Thanks for reading!
 
That's a pretty neat mod. The clip certainly is way more unobtrusive than the old velcro patch. Only question I have is how well does the clip hold? On a TOS uniform you aren't going to have pockets, so what are you going to clip it to?
 
Nice job, and good idea for a costume

- - - Updated - - -

I went all out, and completely reworked my Art asylum phaser, metal parts, paint and all..alot of work, but it looks great for me.
 

Attachments

  • Ph02.JPG
    Ph02.JPG
    108.4 KB · Views: 282
  • PH01.JPG
    PH01.JPG
    139.4 KB · Views: 363
Only question I have is how well does the clip hold? On a TOS uniform you aren't going to have pockets, so what are you going to clip it to?

Excellent questions!

I've used similar retracting clip on both ST:III and ST:V style phaser props, and spent days wearing them at conventions. so far they are pretty good- no dropped props. (With previous methods, I have dropped and had to repair things from time to time...)

I plan to sew a very small pen pocket into my TOS pants, where the velcro patch on the right hip would have gone. I think I can make it subtle enough that it will show less than the velcro would. (I'll still use velcro on the back waistband for the Com & P1.)

I went all out, and completely reworked my Art asylum phaser, metal parts, paint and all..alot of work, but it looks great for me.

Nice! That looks very good- I'm tempted to do the same, eventually...
 
Another great job as usual, Felgacarb, you always come up with neat little ideas like this. I really liked your clips on the other props you made, I never thought of integrating one into this toy. If only the original phaser design had those ribs under the P1 extending further back. They would have made a great place to hide the pop out clip, but of course they are too far forward the way it was designed.
 
Nice job. I have puzzled over this exact same issue. Although I have never attempted it, my first thought would be to place strong magnet(s) in handle or on side of pistol (on inside) and then sew magnets to inside of crew pants.
 
Thanks, Ruddigger!

Nice job. I have puzzled over this exact same issue. Although I have never attempted it, my first thought would be to place strong magnet(s) in handle or on side of pistol (on inside) and then sew magnets to inside of crew pants.

That is exactly how I wear my ST:III com- it works well. I don't think it would be as good on a phaser, though. The com is small with a nice flat bottom, and doesn't stick out. If you try it, I would love to hear how it goes!
 
That's a great looking Phaser nice paint job too...
I was also thinking about using magnets...

Thanks, James!

I don't think I'd trust magnets entirely, but I'd love to hear how it works out if you try it!

I touched up the paint a tiny bit and put on the correct shirt for some final photos:


Nice job and timely post. After I put on my rank stripes I had intended to go back and spruce up my Art Asylum phaser. The Velcro on the side doesn't bother me (out of sight for 95% of the time) but a good paint job to make it look less plastic is desired. I was afraid of dismantling it until I saw your progress pics.

Again Mr Felgacarb, you inspire. I want to be just like you when I grow up (aside from the hairline).

One question. Did you paint the main body? Mine has the same annoying gray color yours has in the early photos, then seems to get a more correct bluish shade at the end. What paint/color did you use.
 
Last edited:
Nice job and timely post.
Did you paint the main body? Mine has the same annoying gray color yours has in the early photos, then seems to get a more correct bluish shade at the end. What paint/color did you use.

Thanks!

I actually have not painted the main body, only the clip and the screw hole I filled. I suspect it is just a trick of the light that makes it look different in the photos.
 
Very nice work! Clever design too. :)

Thanks! But it is because of great builds like yours, I decided to go ahead and do the repaint, too- so this is totally your fault.


(Still not yet doing the full metal-awesome, as I need this to remain a lightweight costume piece...)

So, I took it apart again, and picked up two of the colors recommended in various thread on the RPF, such as asalaw's, for example-


Rustolem for the handle:


Tamaiya for the body:


My local hobby store didn't have Tamaiya's Gunship Gray 2, but worst case, I can order that, and do the P1 repaint later...

Filling and masking occured-


After the handle, next masking for the body-


Looking like this:


Here is where we end up, after re-assembly:


Once I track down a can of the third color, I can redo the P1 and post more photos!
 
Last edited:
Thanks! But it is because of great builds like yours, I decided to go ahead and do the repaint, too- so this is totally your fault.


(Still not yet doing the full metal-awesome, as I need this to remain a lightweight costume piece...)

So, I took it apart again, and picked up two of the colors recommended in various thread on the RPF, such as asalaw's, for example-

http://i919.photobucket.com/albums/ad31/Felgacarb/TOS Phaser AA Modify/AA-Modify-033_zpsd2173831.jpg

Rustolem for the handle:

http://i919.photobucket.com/albums/ad31/Felgacarb/TOS Phaser AA Modify/AA-Modify-034_zps1b4f7409.jpg

Tamaiya for the body:

http://i919.photobucket.com/albums/ad31/Felgacarb/TOS Phaser AA Modify/AA-Modify-039_zps1b53a106.jpg

My local hobby store didn't have Tamaiya's Gunship Gray 2, but worst case, I can order that, and do the P1 repaint later...

Filling and masking ocured-

http://i919.photobucket.com/albums/ad31/Felgacarb/TOS Phaser AA Modify/AA-Modify-035_zpsccf75f89.jpg

After the handle, next masking for the body-

http://i919.photobucket.com/albums/...aser AA Modify/AA-Modify-0311_zps7bc00509.jpg

Looking like this:

http://i919.photobucket.com/albums/...aser AA Modify/AA-Modify-0313_zpscde90956.jpg

Here is where we end up, after re-assembly:

http://i919.photobucket.com/albums/...aser AA Modify/AA-Modify-0315_zpsbb9b6c05.jpg

http://i919.photobucket.com/albums/...aser AA Modify/AA-Modify-0316_zpsb6dbda63.jpg

Once I track down a can of the third color, I can redo the P1 and post more photos!
I take full responsibility. :p Looking really gorgeous!
 
Hey Mr. Fegacarb, thanks for the inspiration. I tore my P2 apart and painted using the same Gunship Grey and Metallic Dark Bronze you suggested and it turned out very nice. I also hit the silver sections with Krylon Premium Chrome.

A comment on the Gunship Grey 2 (which my hobby shop does carry). I think previous posts got the colors reversed. The Gunship Grey is much darker than the Gunship Grey 2.
If you are going to use both colors, I think it should be:
Phaser 1 - Gunship Grey
Phaser 2 body - Gunship Grey 2

I liked the darker color better, and since I was going to leave the Phaser 1 a black color anyway I decided to use the dark Gunship Grey for my phaser body.
Interestingly it still doesn't look the blue-grey that the props looked on screen, but when I photographed it with the flash on the color came out more bluish.

Up until now I have been using the toy unpainted as my "con banger", I think the new version is going to look a lot better.
 

Attachments

  • gunshippaint.JPG
    gunshippaint.JPG
    85.4 KB · Views: 218
  • Ph2repaint.JPG
    Ph2repaint.JPG
    94.6 KB · Views: 260
Last edited:
A comment on the Gunship Grey 2 (which my hobby shop does carry). I think previous posts got the colors reversed. The Gunship Grey is much darker than the Gunship Grey 2.
If you are going to use both colors, I think it should be:
Phaser 1 - Gunship Grey
Phaser 2 body - Gunship Grey 2
.

Dang it, I wish I had stopped back in here earlier!

Josh trek, I think you are right. I read the colors here on the RPF, with screen names I trust attached, and took it as gospel... So when th Gunship Gray 2, AS-27 (from Amazon) showed up, I sparyed it right onto my P1. I should have been more cautious.

I do like the darker gray on the P2, and it is a very good match with what is on the Wand phaser (I got to compare them side by side thanks to Ruddigger) so I think I will have to te repaint my P1 darker....

Stand by...
 
Right.

So, I screwed up.

But not to worry, I documented everything!

In my enthusiasm, Once I got the Gunship Gray 2, I went straight to painting up my P1 with it, without, you know, comparing the color of the cap to the Gunship Gray, or the P2, like intelligent people such as Johntrek would do! So, here is what that looks like:


With the new paint on:


Here is when I noticed something was distinctly caddywumpus. I was expecting the P1 to be darker than the P2 body. I suspect Johntrek is correct, and those two Tamaiya colors were reversed.

However, I really do like the Gunship Gray on the P2, and it was a very good match with the Wand Phaser, (for whatever that means) so I decided to keep it.

This means repainting the P1. The good news is, it's never too late for a repaint!

This time, I selected Tamaiya's German Gray. This is what it looks like:


So, where are we now? Well, at least much closer.

Here is a photo in dim daylight:


Indoors, no flash:


Indoors, with flash:


So, better. Am I done? Not entirely convinced yet. Part of me is just very used to seeing black Phaser 1's. The gray-gray Phasers I will have to get used to, perhaps....
 
Back
Top