Jackalgirl
New Member
Very nice!Thanks for the really solid screen cap. I think this should spend just fine:
Very nice!Thanks for the really solid screen cap. I think this should spend just fine:
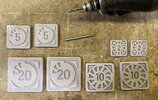
And now that I've been comparing these to one another (I'm using Inkscape to compare measurements) and to the shot of the chits in Adam Savage's hand (as well as trying to think like a person who's modeling these to 3D print them and cast them in pewter, as they did in the show), I'm thinking that the size of these is more like: 40mm square for 20CR, 32mm (but maybe actually 30mm, for "round numbers" reasons) for the 10CR, 25mm for the 5CR, and 20mm for the 2CR, and they look to be 4mm thick (at the edges; for the 20CR and 5CR chits, the raised sections add a little, which I'm going to need to account for).Also working on credit tokens, so thank you so much for this really excellent photo!
I've been using screenshots I captured from Adam Savage's visit to the set (season 2) on Youtube. This gives me some sense of scale; I've been working on the assumption of 32/23mm square for the 20/5 credit pieces, but I'm thinking to bump it up to an even 35/25 respectively.
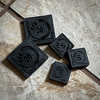
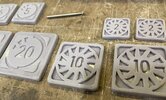
Progress. These are 40 and 25mm square, and I used a simple cube .stl file in my slicer (ChituBox) to ensure that the height of the main part of the token (not the raised parts) was 4mm high. Even in ABS-like resin, they have a pleasant heft and almost make a metallic clinking noise. These ones I will probably clearcoat and then finish -- I'd like to see if I can get the clearcoat to even out the print lines in the recessed parts of the tokens I can't reach with sanding sticks. I discovered that you can very easily over-sand before the resin is cured. At any rate, the next batch will be what I'll use to make my pewter molds, and I still have to model and print the 10 / 2 CR chits.
")
LOL super slowly. I've acquired the mold material, but otherwise still need to get the rest of the stuff done (modeling, printing, preparing the molds, casting). Good thing I'm not getting paid for this. ; )Just bumping this up to see how the pewter casting is going. Love to see pics!
Oh, awesome! They look fantastic -- I'm looking forward to seeing pics of them fully weathered & finished. I'm also looking forward to seeing the pics of the pistol!Keep the progress pics coming, JG! I was inspired to revisit my chits this morning. I took the sandpaper and dremel tool to them. Trying to recreate that pitted and worn edges look of the originals. I'm happy with the weathering so I'll paint these with my Jubal Early pistol parts next week.
Oh, awesome! They look fantastic -- I'm looking forward to seeing pics of them fully weathered & finished. I'm also looking forward to seeing the pics of the pistol!
My plan, for now, is to cast the "mostly perfect" tokens in pewter, then put them in a rock tumbler to simulate them being jangled around in someone's pockets / in a pouch. But I'll probably "pre-wear" the edges like you're doing just a bit, because yours look great. : )
I have to admit that I don't have one yet. But I thought exactly the same thing!Great plan. Gives them all the opportunity to create their own, unique weathering. Love the rock tumbler idea. I saw Adam Savage weathering his lighter in a tumbler and immediately thought "I need that tool in my life"