thatdecade
Active Member
Getting around to finishing my Pip-Boy project, these are my plans and research so far.
Last fall, I purchased a Pip-Boy cast from Skruffy. The cast I received from him needed very little sanding to get it to fit together and look right.
I was inspired to go beyond this by another member named pudding who posted a video of a functional Pip-Boy he made using one of Skruffy's casts with an android app and an arduino for the serial interface to the phone.
I think I can go beyond this. Smaller, more functions, and more accuracy. I asked a my buddy to code up a universal pipboy webapp that will function very close to the pipboy in fallout 3, calling it the Pip-Boy emulator. He is very excited to see this prop in action!
I've seen a few demos of his progress, looks good so far. He assures me that the sound effects / animations I want won't be a problem.
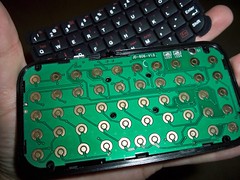
Then on my side is the hardware. I figure the interface between the controls and the ipod touch will be a mini bluetooth keyboard (slightly smaller than an ipod touch). The app will support keyboard input so keypresses can be used to navigate the Pip-Boy in addition to touch screen input.
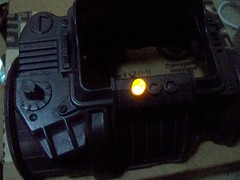
The last piece of the puzzle is the controls on the face of the Pip-Boy that will be wired into the bluetooth keyboard. There are three input sets on the face controls; the Wheel which moves up-down through the menus, the Knob which moves left-right through the menus, and the front Lights which switches menu areas (STATS, INFO, DATA).
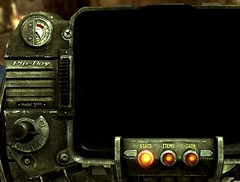
falloutCrop by thatdecade, on Flickr
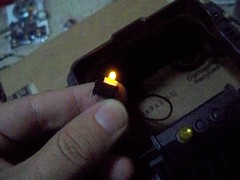
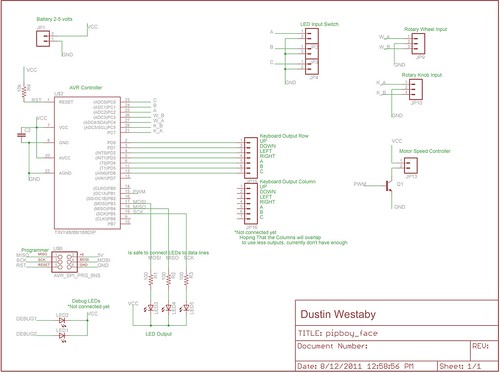
Each of the three front LEDs will be an illuminated yellow LED switch wired into the keyboard's A, B, C keys. In order to get each LED to light up when it is selected an Attiny chip will be used.
Six I/O pins on the Attiny will be used for the front LEDs. Three of the pins will be an input, connected in parallel with the keyboard wiring. Then three of the pins will be an output, turning the LEDs on and off.
- Link to illuminated pushbutton part
The Wheel and Knob will be incremental rotary encoders. The rotary encoder will be connected to the Attiny chip which will interpret the encoder output and decide if the Wheel / Knob is being turned clockwise or counter-clock wise. Turning the Wheel in an upward motion will press the UP key repeatedly, turning in the downward direction will press the DOWN key repeatedly. The Knob will be connected similar, but for LEFT and RIGHT.
- Link to rotary encoder part
Here is a demo of a rotary encoder being used as a keyboard up/down.
YouTube - HID-Knob, USB HID keyboard rotary encoder
Final thoughts
The best part about this build is the mini bluetooth keyboard and it's tiny rechargeable battery. The plan is to power the whole sha-bang off that battery which will fit in the cavity behind the ipod screen (which has been pushed flush to the front of the pipboy display).
The only thing I am leaving out is the speaker & amplifier. Is a requirement of convention floors... I know... I just can't spare the room, at least for a dedicated 2W amp circuit / speaker.
Last fall, I purchased a Pip-Boy cast from Skruffy. The cast I received from him needed very little sanding to get it to fit together and look right.
I was inspired to go beyond this by another member named pudding who posted a video of a functional Pip-Boy he made using one of Skruffy's casts with an android app and an arduino for the serial interface to the phone.
I think I can go beyond this. Smaller, more functions, and more accuracy. I asked a my buddy to code up a universal pipboy webapp that will function very close to the pipboy in fallout 3, calling it the Pip-Boy emulator. He is very excited to see this prop in action!
I've seen a few demos of his progress, looks good so far. He assures me that the sound effects / animations I want won't be a problem.
Then on my side is the hardware. I figure the interface between the controls and the ipod touch will be a mini bluetooth keyboard (slightly smaller than an ipod touch). The app will support keyboard input so keypresses can be used to navigate the Pip-Boy in addition to touch screen input.
The last piece of the puzzle is the controls on the face of the Pip-Boy that will be wired into the bluetooth keyboard. There are three input sets on the face controls; the Wheel which moves up-down through the menus, the Knob which moves left-right through the menus, and the front Lights which switches menu areas (STATS, INFO, DATA).
falloutCrop by thatdecade, on Flickr
Each of the three front LEDs will be an illuminated yellow LED switch wired into the keyboard's A, B, C keys. In order to get each LED to light up when it is selected an Attiny chip will be used.
Six I/O pins on the Attiny will be used for the front LEDs. Three of the pins will be an input, connected in parallel with the keyboard wiring. Then three of the pins will be an output, turning the LEDs on and off.
- Link to illuminated pushbutton part
The Wheel and Knob will be incremental rotary encoders. The rotary encoder will be connected to the Attiny chip which will interpret the encoder output and decide if the Wheel / Knob is being turned clockwise or counter-clock wise. Turning the Wheel in an upward motion will press the UP key repeatedly, turning in the downward direction will press the DOWN key repeatedly. The Knob will be connected similar, but for LEFT and RIGHT.
- Link to rotary encoder part
Here is a demo of a rotary encoder being used as a keyboard up/down.
YouTube - HID-Knob, USB HID keyboard rotary encoder
Final thoughts
The best part about this build is the mini bluetooth keyboard and it's tiny rechargeable battery. The plan is to power the whole sha-bang off that battery which will fit in the cavity behind the ipod screen (which has been pushed flush to the front of the pipboy display).
The only thing I am leaving out is the speaker & amplifier. Is a requirement of convention floors... I know... I just can't spare the room, at least for a dedicated 2W amp circuit / speaker.
")