You are using an out of date browser. It may not display this or other websites correctly.
You should upgrade or use an alternative browser.
You should upgrade or use an alternative browser.
ANH Pyro X-Wing References - Mainly: Red 6 Search
- Thread starter Too Much Garlic
- Start date
ILMwannabe
Active Member
The cans were Airfix part numbers 43 (without the bar) and 44 (with the disinguishing bar and other small details). This can be used to tell apart some heroes. For example, Red Five (hero) had 44 on the upper left, 43 on the upper right, Red Three was the opposite. It looks like ILM tried to match that feature at least once, since the "nice" Red Three Pyro appears to have had the same upper can arrangement as the hero version. It may have been arbitrary, but so far I haven't seen any two heroes with the same can arrangement.You could be correct, . . . If that's the case, it's incorrect for Red 4 which has the 4 same kind of can, without this bar.
I know I have large copies of those pics somewhere, I'll check the cans !
As seen in ILM pictures, only PN 43 was cast for pyros, yet a few of the "nice" pyros also had PN 44.
The pyro in the B&W picture shown has the can pattern used on the Red Five Hero, but of course that pattern could have been used elsewhere also. The "bite" (chip) taken out of the left upper wing of the unpainted ship seems to match a photo posted by Rocketbob of a Red Three Pyro (apparently not the same wing that belonged to the Red Three photographed on the ILM wooden table).
The few pictures I've seen of Red Four (including Monsieur Tox's) show a black scorch mark in that area, but I can't confirm a chip.
Is it possible that JediMaster's pictures show a later, pyro Red Three before it was painted?
Vince, given how different the paint job was on pyro Red 3, I suspect it was arbitrary. I mean there are four possible upper can arrangements, so a 25% chance it'd be the same, if random.
Good catch on the chip! Presumably a later model, it isn't the 'nice' Red 3 pyro wing for sure, but sure looks like the same chip. Julien? Lee?
Good catch on the chip! Presumably a later model, it isn't the 'nice' Red 3 pyro wing for sure, but sure looks like the same chip. Julien? Lee?
Well somebody hit me lol, TBH, no, id not seen that before (wing) and it does match, great eye ILM wannabe.
At the same time, trust me, Red 4 has a chip in the very same area, im looking at it now, there is some weather pattern over it, but, a definite chip.........CRAZY notion, but, when Red 4, went bye bye.....would they have reused the parts not badly damaged?
This wing thing, makes me kinda wonder, but then, why would they repaint the whole wing if they could just redo the markings for another bird.
lee
Colin Droidmilk
Sr Member
Wing alignment. Front view. On the pics above, and in others from the same set, the port lower wing is out of line. The angle's too shallow. Measuring my screen on that front view above, I'm getting 33mm from lower to upper wing tip on the port side, and 37mm on the starboard. Pretty serious difference given that the port side is closest to camera.
Our pyro kit also has an out-of-line lower port wing - yet more evidence of ILM ancestry - but seems even more shallow than ILM; the tip doesn't even clear the belly! Martyn disagrees but honestly, mine feels barely out of horizontal! The wing block mounting slab is also clearly well out of parallel with the fuselage wall, unlike the others, which are dead parallel. Anyone seeing this the same as me? If so, how we gonna fix it? Or, do folk think the error is no worse than on the ILM?
Our pyro kit also has an out-of-line lower port wing - yet more evidence of ILM ancestry - but seems even more shallow than ILM; the tip doesn't even clear the belly! Martyn disagrees but honestly, mine feels barely out of horizontal! The wing block mounting slab is also clearly well out of parallel with the fuselage wall, unlike the others, which are dead parallel. Anyone seeing this the same as me? If so, how we gonna fix it? Or, do folk think the error is no worse than on the ILM?
Last edited:

Colin Droidmilk
Sr Member
(To Martyn) Ohforchristsake, I TOLD you it was the port wing! Lol.
Not LOUD enough...I'm hard of hearing, sonny!! 
I fitted up my wings temporarily. Starboard, fine, 15cm at the wingtips. Port, 13.6cm. For the final fit you'll need to sand a different angle onto that lower port wing block and probably the wing too. I don't think it will need shimming, but we'll see.
Jason, thanks for the pic. Looks like it might have been the port lower wing for the model in the Johnston/Viskocil pic, doesn't it?
ILMwannabe
Active Member
Had the same thought when I saw it. Definitely a later pyro when things started to get a little more sloppy. And yes, thank you Moffeaton for the ongoing supply of rare and unique photos - very much appreciated.Jason, thanks for the pic. Looks like it might have been the port lower wing for the model in the Johnston/Viskocil pic, doesn't it?
In spite of that arbitrary red paint dab in a strategic place, that is considered a "Red Four" right? (Not Red Five?)
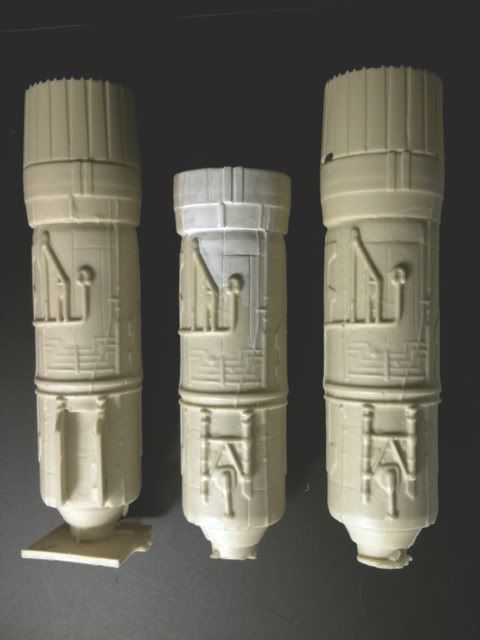
I think I ID'd the other nice pyro in those pictures posted earlier (at least the top cans anyway - hey you gotta start somewhere). Those pyros were really nicely built (except for the slight misalignment of some parts as mentioned by Colin Droidmilk). Can't see the seamlines anywhere on the fuselage . . .
Colin Droidmilk
Sr Member
Not LOUD enough...I'm hard of hearing, sonny!!
I fitted up my wings temporarily. Starboard, fine, 15cm at the wingtips. Port, 13.6cm. For the final fit you'll need to sand a different angle onto that lower port wing block and probably the wing too. I don't think it will need shimming, but we'll see.
Oh no... I hate changing the angle of a flat plane through sanding. I'll just end up with a useless mating, I know it. Think I'd rather shim it, as I ended up having to do on my V3. I've been spoiled on this pyro by the perfect mating of the other three wings. What a joy those joins are compared to the V3!
Last edited:
MonsieurTox
Master Member
Yeah but it is worth it !!! :love
Wow you guys are really on a roll. Cheers.:thumbsup
Gotta agree with you there Colin, what we have looks dimensionally closer to the Red 4 Pyro with the gap. Looking closely at our fuselage... would have to guess if there was damage it was the starboard half. The scribing right in front of the canopy looks the least symmetrical at this location and continuing on that side there are gaps in the scribed panel lines. Port side the entire think looks very clean and even... matching the Edlund master.
Already fitting the wings guys? Wow. I'm barely done deciding how I'm going to handle the individual parts. Looking at the engines, there are a few things missing I'm used to seeing. If I had to guess I'd say the end near the turkey feathers has been replaced, and there is still damage near the scribing only on the topside. Unfortunately this means there are a few details missing, all you have to do is compare with the bottom side with mount to tell. Restoring these details doesn't go quick but is worth it imo. Just dabbed a bit of reefer white over the repairs.
Cheers to micdavis for that diagram!:cheers
AND thanks for all the IDs in those primed X photos as well as moffeaton for always having something new to share.
He has, yes. Some more pics. Some canopies: the Frank, the rushed-paintjob Red4 which is a good match for it taper-wise, and the Red 3 pyro which is far more tapered than both ( sorry, Martyn, but it is, lol.) And finally, a near-as-damnit ortho profile of the Frank with a load of blu-tac shoved on the nose.
So, yeah, Nighteyes, it's not just the noses, what about all these canopies?
Gotta agree with you there Colin, what we have looks dimensionally closer to the Red 4 Pyro with the gap. Looking closely at our fuselage... would have to guess if there was damage it was the starboard half. The scribing right in front of the canopy looks the least symmetrical at this location and continuing on that side there are gaps in the scribed panel lines. Port side the entire think looks very clean and even... matching the Edlund master.
Already fitting the wings guys? Wow. I'm barely done deciding how I'm going to handle the individual parts. Looking at the engines, there are a few things missing I'm used to seeing. If I had to guess I'd say the end near the turkey feathers has been replaced, and there is still damage near the scribing only on the topside. Unfortunately this means there are a few details missing, all you have to do is compare with the bottom side with mount to tell. Restoring these details doesn't go quick but is worth it imo. Just dabbed a bit of reefer white over the repairs.
Cheers to micdavis for that diagram!:cheers
AND thanks for all the IDs in those primed X photos as well as moffeaton for always having something new to share.
Colin Droidmilk
Sr Member
Nice job Nighteyes. Wow, you have an eye for detail there; I'd've never noticed that damage. But then my obsession is gross form, and here's an update thereon.
The canopy scratch is going better than I expected. I actually managed to get a greater taper than the kit canopy, and get it flush with the fuselage. I cut the side panes a bit low, though, so they'll have to be done again, but I think it's gonna work in the end - if I don't get hellishly stuck on the rear part.... Basically all I did was draw round the side frames of the kit part onto some styrene, cut them out, arrange them where I wanted them, then cut a top pane to fit. All the pieces are just tacked together with blu-tac, so I can keep juggling them about and that.... a bit too asymmetrical at the moment, probably, so I'm gonna have to look into that. Interesting, because the top pane I cut is actually symmetrical, and the fuse walls sort of pull it over to port a bit too much. Nevertheless, for me, these pics are really beginning to nail the elusive 'face' of the X-wing....
The canopy scratch is going better than I expected. I actually managed to get a greater taper than the kit canopy, and get it flush with the fuselage. I cut the side panes a bit low, though, so they'll have to be done again, but I think it's gonna work in the end - if I don't get hellishly stuck on the rear part.... Basically all I did was draw round the side frames of the kit part onto some styrene, cut them out, arrange them where I wanted them, then cut a top pane to fit. All the pieces are just tacked together with blu-tac, so I can keep juggling them about and that.... a bit too asymmetrical at the moment, probably, so I'm gonna have to look into that. Interesting, because the top pane I cut is actually symmetrical, and the fuse walls sort of pull it over to port a bit too much. Nevertheless, for me, these pics are really beginning to nail the elusive 'face' of the X-wing....
Last edited:
Too Much Garlic
Master Member
Man, with all these cool pictures I'm almost ashamed to not have much to show with this pilot sculpt update. It really isn't much. Closed the hole in his stomach and started refining the face and the helmet - the top of the helmet front may be too tall... just doesn't look that way when I'm handling it.
Still a long way to go. Have ordered something called kneadatite that I was recommended for small scale detailing as it is better than super sculpey because it's a two part self-hardening product and less sticky to the tools than apoxie sculpt.
Anyway... he looks really squat, but this is still just the basic shape and not any of the detailing that should help make him look more right.
Ole' Porkins is coming along nicely.
Similar threads
- Replies
- 13
- Views
- 1,496
- Replies
- 13
- Views
- 2,007
- Replies
- 5
- Views
- 854