Amazing collections and display ideas

I still love my BILLY bookshelves. They are quite sturdy, and I made several mods:


View attachment 1818268
You know… I think this is the route I’m going to go. You made this look wicked wicked clean… the case in the middle is a Billy as well?

Do you happen to have the ikea part numbers handy?

I can fit you’re same exact setup in the corner of my living room..

Really really like this setup…
 
You know… I think this is the route I’m going to go. You made this look wicked wicked clean… the case in the middle is a Billy as well?

Do you happen to have the ikea part numbers handy?

I can fit you’re same exact setup in the corner of my living room..

Really really like this setup…
Thanks for the kind words! I got all your info right here, and a couple words of warning.

Yes, all three bookcases are BILLY, and the doors are OXBERG. These are the numbers:
  • Standard Bookcase: 002.638.50
  • Narrow Bookcase: 502.638.38
  • Door: 902.756.17
  • Standard Bookcase/Door Combo: 690.178.28
  • Narrow Bookcase/Door Combo: 392.873.98
(They have taller versions of these as well if you want to go all the way to the ceiling.)

Notes:
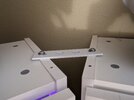
  • In order to use IKEA's brackets to attach all three together, the middle bookcase MUST NOT have a door on it. The doors interfere with each other because the IKEA brackets attach the units so close together. For me, having the central door was crucial, so I picked up my own brackets and spaced them out just enough so as to be able to open all 3 doors.


    I put my own holes in the top to hold them together. It will take a little finesse to get them just right, and it was necessary for me to use floor shims to get them angled perfectly in parallel!

    PXL_20240524_131628859.jpg

  • The two bookcases that are flat to the wall get anchored to studs, so everything is rock-solid secure!

  • Be sure to level things repeatedly as you go. The footing shims are a godsend.

  • Do all the lighting and power connections BEFORE anchoring and securing everything!

  • Be patient adjusting the doors. It takes awhile to get them aligned just right.

  • The doors make the cabinets very front-heavy, so watch for inadvertent tipping!
Happy to answer any further questions. Good luck!

Bill
 
Thanks for the kind words! I got all your info right here, and a couple words of warning.

Yes, all three bookcases are BILLY, and the doors are OXBERG. These are the numbers:
  • Standard Bookcase: 002.638.50
  • Narrow Bookcase: 502.638.38
  • Door: 902.756.17
  • Standard Bookcase/Door Combo: 690.178.28
  • Narrow Bookcase/Door Combo: 392.873.98
(They have taller versions of these as well if you want to go all the way to the ceiling.)

Notes:
  • In order to use IKEA's brackets to attach all three together, the middle bookcase MUST NOT have a door on it. The doors interfere with each other because the IKEA brackets attach the units so close together. For me, having the central door was crucial, so I picked up my own brackets and spaced them out just enough so as to be able to open all 3 doors.


    I put my own holes in the top to hold them together. It will take a little finesse to get them just right, and it was necessary for me to use floor shims to get them angled perfectly in parallel!

    View attachment 1823484

  • The two bookcases that are flat to the wall get anchored to studs, so everything is rock-solid secure!

  • Be sure to level things repeatedly as you go. The footing shims are a godsend.

  • Do all the lighting and power connections BEFORE anchoring and securing everything!

  • Be patient adjusting the doors. It takes awhile to get them aligned just right.

  • The doors make the cabinets very front-heavy, so watch for inadvertent tipping!
Happy to answer any further questions. Good luck!

Bill
Wicked appreciate you taking the time and sharing all this info!
 
I was going to go through the process of burning them to disc and stuff but just opted to put them on a USB stick and shive them on my 4k Player lol
 
So we got this display cabinet today from Amazon, and I spent way too long putting it together. Especially cos its pretty cheap. Look decent though, especially once I installed a lighting kit. I wanna repaint it black come spring.
20241227_141001.jpg


So as said, I then spent an even longer time installing the lighting, which is the same brand I used in my Diaclone display/play setup.
20241227_170048.jpg


And once that was done have been slowly filling it with figures and models, all robots. I wanna let it sit for a while to decide if we want to buy a couple more. If not, we definitely want something nicer.
20241227_175744.jpg


20241227_175758.jpg
20241227_175823.jpg
20241227_210744.jpg

20241227_222820.jpg
 
Last edited:
I do travelling displays at conventions. I've been curating my stuff because of space limitations, but last year at Marscon we had enough space to show it all. My main challenge has been having enough room in my truck to haul everything. I put everything on 2x6 gridwall panels. Big project I have in progress is making plastic labels for everything (I got an XTool S1 for Xmas).
 

Attachments

  • 429573605_10161293079932480_6245939941635228664_n.jpg
    429573605_10161293079932480_6245939941635228664_n.jpg
    315.2 KB · Views: 104
  • 20240309_110718.jpg
    20240309_110718.jpg
    1.7 MB · Views: 99
  • 20240309_110527.jpg
    20240309_110527.jpg
    951.7 KB · Views: 93
  • 20240309_110446.jpg
    20240309_110446.jpg
    2.1 MB · Views: 82
  • 20240309_110431.jpg
    20240309_110431.jpg
    1.8 MB · Views: 84
  • 20240309_110415.jpg
    20240309_110415.jpg
    1.2 MB · Views: 83
  • 20240309_110402.jpg
    20240309_110402.jpg
    1.1 MB · Views: 83
  • 20240309_110331.jpg
    20240309_110331.jpg
    1.8 MB · Views: 81
  • 20240309_110235.jpg
    20240309_110235.jpg
    1.6 MB · Views: 89
Back
Top