Aluminum cast Clone Trooper Helmet

Re: Aluminium cast Clone Trooper Helmet

Thanks.... Yep negative parts or the mold making and he's about 130 kg, built it on and off over the last 4 years 1000+ hours though
 
Re: Aluminium cast Clone Trooper Helmet

have been a little bit lazy this weekend… just made the mouth part.
IMG_0017 Kopie.JPG


IMG_0018 Kopie.JPG


IMG_0019 Kopie.JPG


IMG_0020 Kopie.JPG
 
Last edited:
Re: Aluminium cast Clone Trooper Helmet

Looking very good...yeah, the cleaning afterward can be tedious, but it's worth it;)
 
Re: Aluminium cast Clone Trooper Helmet

progress of today:finished these gray stripe around the dome, most of the back and the neckring, also the interior one. these round thing at the back was not so easy, because the 2 holes and the little slit were almost gone after the cast. bit i think its pretty good now. i should finish the outside sanding until wednesday and than have to do the interior parts.
IMG_0022.JPG


IMG_0023.JPG


IMG_0024.JPG


IMG_0025.JPG


IMG_0028.JPG


IMG_0030.JPG


IMG_0031.JPG


just had to put it on again. with the smooth neckring its nice fitting. and already feels good without the padding, just some paper in the dome. the weight is now 3.5 kg though. the helmet i m sanding had some rests of the core behind the neckring, so it lost weight while removing that today.

IMG_0032 Kopie.JPG


IMG_0033.JPG
 
Last edited:
Re: Aluminium cast Clone Trooper Helmet

:) was just before going home by bicycle. always do that so my trouser won't get dirty by the chain…
 
Re: Aluminium cast Clone Trooper Helmet

well well, first helmet is finished now on the outside. just the metal work though. but i ve started the interior today and should be completely finish the metalwork on friday, because i can't work tomorrow. i still have to sand and reshape the interior parts but they are able to be screw in already. for me it looks really good when i imagine all the petting around it too.
here are just some pictures made with my mobile phone because i didn t had the camera today…
Foto-0020.jpg


Foto-0021.jpg


well, exempt the gree these helmets won't look much different to others later… of course much more stabile and more cold than plastic helmets, but the interior will make them so unique.

i think i won't sell them. just made these for myself and don't think to do this much work again very soon…:)
weight is still around 9 pounds. ca 4kg with interior…
 
Last edited:
Re: Aluminium cast Clone Trooper Helmet

hallo again,

so, the first helmet is finished now with the metal works and I think I'm satisfied with the result. there are still some small, little holes on some places, but i ll fill these with aluminum filler later on, right after sandblasting. if you would weld these, normally you ll have more after than before. so its not worth it, and also not necessary because it ll be painted.

but well, whats the update. just as i said i finished the interior today, what was a little bit more work than expected, because wit everything inside the helmet didn't fit anymore. so i had to resculpt a little bit so it was fitting again. unfortunately i can't take the helmet on my head in a normal way, but must do as most people do with the stormtrooper helmets: take the helmet on the head sidewards and than screw it down. thats a little bit sad, because i just wanted it of flop on and of my head, but maybe i can't have anything. now it just fits on my head and have a cool interior. so here are better pictures of the helmet and the interior.

IMG_9390.JPG


notice the white placeholder for the visor. that turned out very well. the visor holder in the inside holds it tight with the screws and the visor sits perfectly in its frame without any space between.
IMG_9391.JPG


IMG_9392.JPG


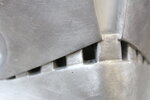
the ventilation area works also good for me. i dont wanter to have a mesh behind it, but just a dark space, maybe some tunnels or something were the air is sucked in. so the backside of the interior mouthpart is also the cover behind the holes. for me it looks great.

IMG_9397.JPG


IMG_9400.JPG


IMG_9402.JPG


IMG_9403.JPG


and now the interior with both of the little monitors. you can also see the white visor placeholder the openings in the mouthpart for the air to come in and right in the middle between the 2 white tubes will be the tie microphone.

IMG_9405 Kopie.JPG


IMG_9406 Kopie.JPG


IMG_9408 Kopie.JPG


IMG_9409 Kopie.JPG


IMG_9410 Kopie.JPG


IMG_9415 Kopie.JPG


IMG_9416 Kopie.JPG


IMG_9417 Kopie.JPG


so, the next 1 and a half week i lll have to do the same with the second helmet and i think it won't make sense to make pictures there too, cause its almost the same. maybe the next pictures will show the paintwork than.

best greets, hinrich
 

Attachments

  • IMG_9394.JPG
    IMG_9394.JPG
    6.9 MB · Views: 39
Last edited:
Re: Aluminium cast Clone Trooper Helmet

Tell me you are doing a paintup like commander gree... Soo some metal will show...

All white would be like using White House paint to turn the Mona Lisa into a blank canvas... You coulda just bought a blank canvas!

Sorry, this is just too beautiful to cover it fully!
 
Re: Aluminium cast Clone Trooper Helmet

well, i know what u mean, and there will be a free style helmet. but it will be the 3rd one Ive had cast. this will be a shock trooper helmet.
 
Re: Aluminium cast Clone Trooper Helmet

Hallo again,

after a wee of pain and lots of sanding the 2nd helmet is almost done now. just have to do all the interior parts tomorrow and than i ll start filling tomorrow evening. than all the preparations for the painting: primer, filler sanding again and so on. next weekend a friend of mine, who is a varnisher, will do the paint job for me and for a good price.
the 2nd helmet looks a little bit better than the first i guess, i was welding a lot more than before. the results should look similar though. another little different are, as I said before the "ears". for the other 2 helmets, there will be holes in it for a microphone. this one won't get any electrical stuff in it, so i filled the holes up with black epoxy to create the black dots there. normally these are painter, but I wanted to do inlets so I won't have any material on it, bit a smooth surface. works pretty well in my opinion and after sandblasting it should look even better. all the grey parts will not be painted on these 2 helmets, but just stay the sandblasted aluminum. here some pictures:

IMG_9428 Kopie.JPG


IMG_9429 Kopie.JPG


IMG_9431 Kopie.JPG


IMG_9436 Kopie.JPG


IMG_9437 Kopie.JPG


IMG_9438 Kopie.JPG


IMG_9439 Kopie.JPG


IMG_9440 Kopie.JPG


IMG_9446 Kopie.JPG
 
Last edited:
This thread is more than 6 years old.

Your message may be considered spam for the following reasons:

  1. This thread hasn't been active in some time. A new post in this thread might not contribute constructively to this discussion after so long.
If you wish to reply despite these issues, check the box below before replying.
Be aware that malicious compliance may result in more severe penalties.
Back
Top