Gigatron
Sr Member
Hey guys,
Years ago, there was a board run for casts of the MiM Pulse Rifle. I was lucky enough to get in on the run, at the time. Now, back then, I had never built a multi-part resin kit. I had no idea how much resin could warp, what the best glues to to use were, or much else, regarding resin. Making things even more complicated, I had never seen a close-up of an actual pulse rifle, so my only guide, was my memory of the movie.
So, I built it as best I could, as-is, with a lot of 5-minute, 2-part epoxy. And, for a while, it held together, just fine and looked pretty cool on the shelf. Then a few years went buy and the epoxy started to give and pieces colapsed or fell off. The grenade launcher seperated from the thompson (there were 3/4" gaps between the shroud and the GL, on either side). I tried patching it with bits of strene and more epoxy. It would hold a few weeks and fall off again.
And for a year or two, I just let it sit like that, never really knowing how to fix it, resigned to have a busted pulse rifle.
Well, a few months ago, I got the itch to repair it. What an undertaking. First, pulling it all apart, scraping off all the old glue and looking at pictures of other folks' builds. I was in for one heck of a project. Turns out, the shrouds were really bowed, outwards. I spent nights heating the shrouds with a heat gun, while resting weights on top, hoping to even them out. Then I had to sculpt new contours so that they would line up with the thompson body.
Once I was relatively happy with the shroud shape, I had to figure out how I was going to keep the GL from falling off again. Strolling around the local hardware store, I found some aluminum bar stock (1" x 3'), with pre-drilled holes. So, I drilled the stock to the thompsonand then to the top of the GL. Nice solid connection and dang near invisible.
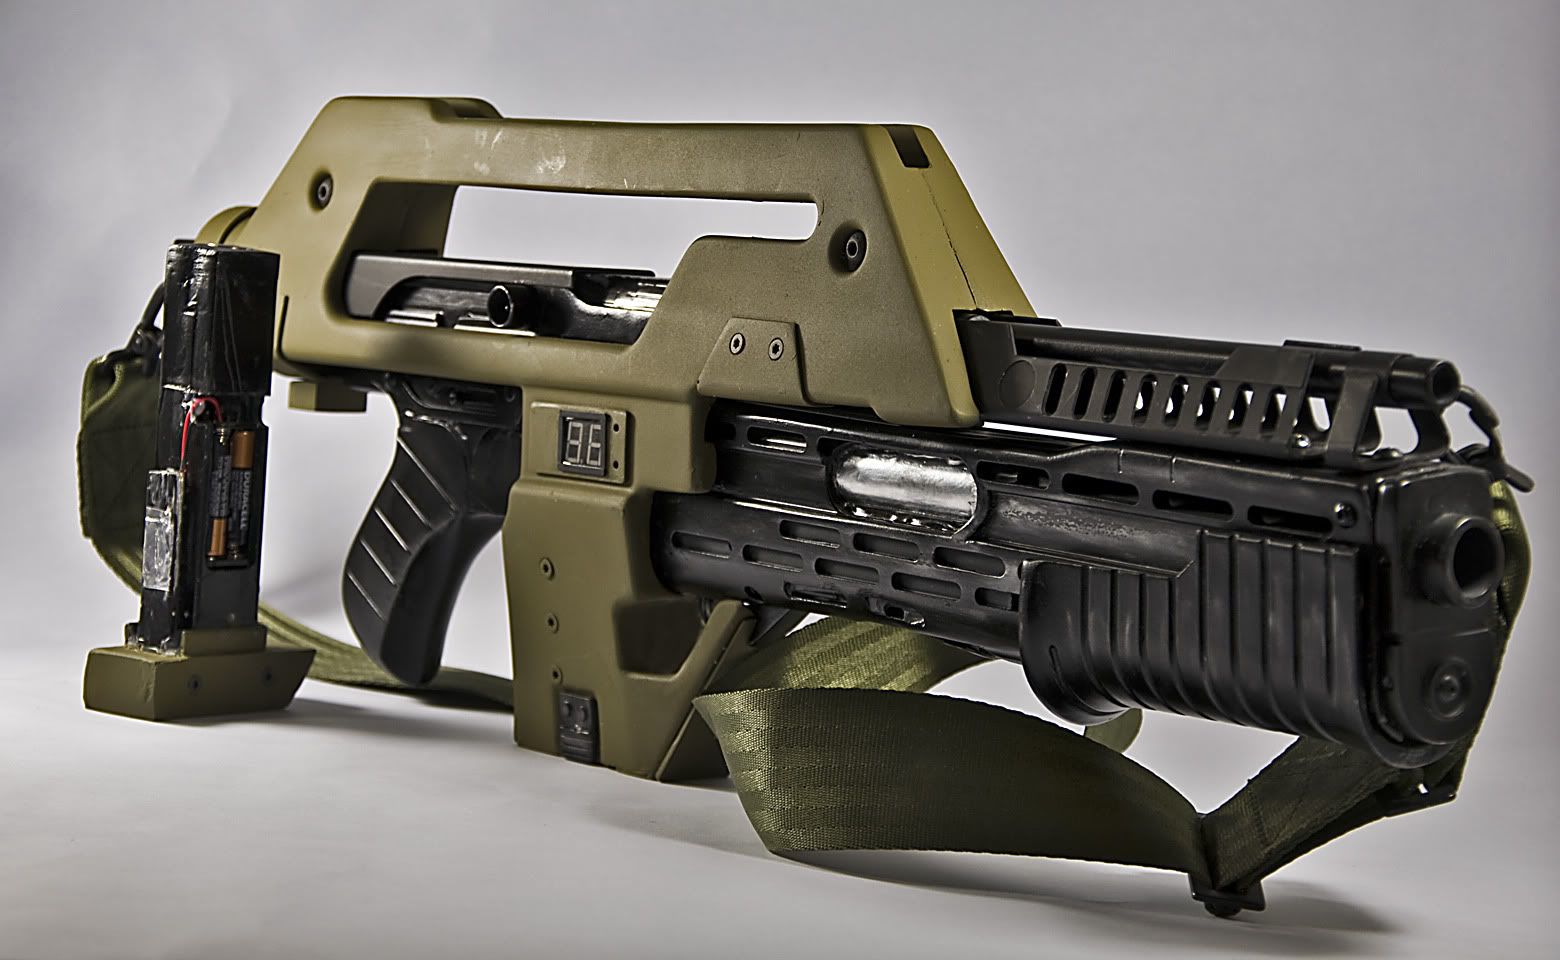
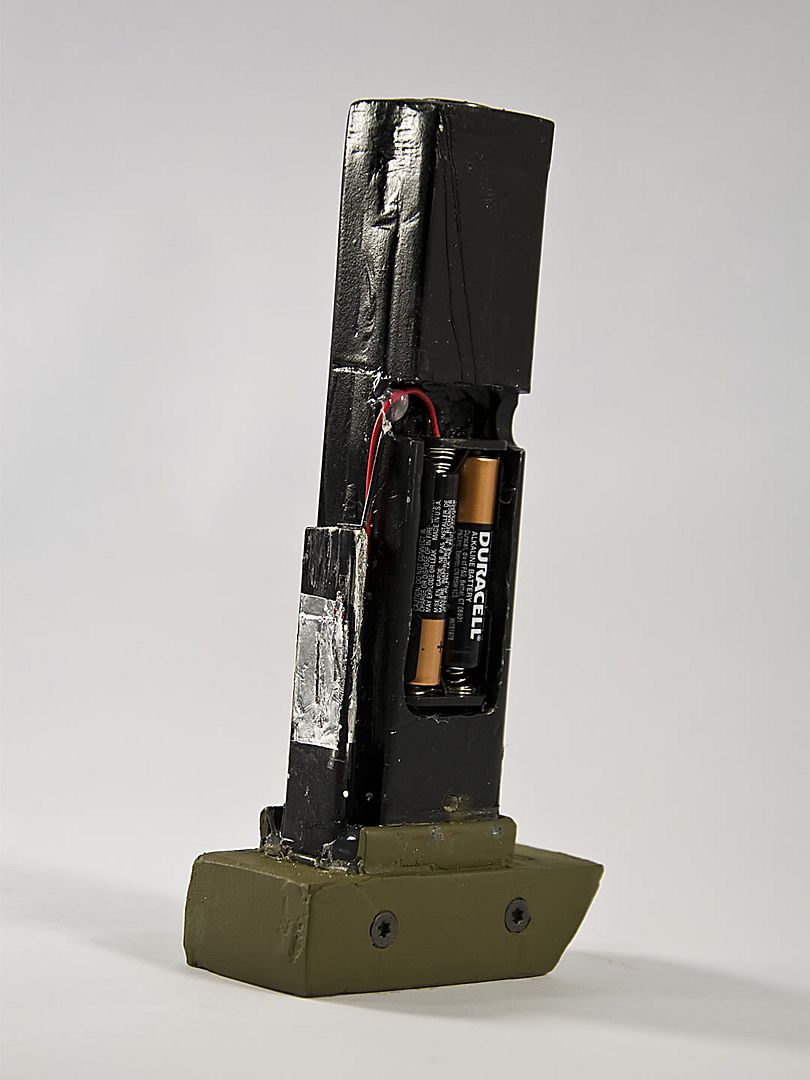
Then I had an idea to add electronics - a static ammo counter display. I found a 2-digit, 7 segment display on amazon (2 displays for $6), then picked up 2 micro switches ($3) and an AA battery holder ($1.20) from Radio Shack. Wiring the display was easy. Planning the pins and soldering took less than 10 minutes. The hard part was figuring out how I was going to wire this setup. After dry fitting all the parts, I realized that using a hardwired system was never going to work. It was easy, but the wires would get tangled and crushed with every change. So, I devised a wireless/contact system. Using 3M 9703 electrically conductive adhesive tape and aluminum foil, I created contact points on inside of the shroud and on the magazine, which had been fitted with the battery holder. A microswitch is located under the main trigger, between the two scews, on the back plate. So I can turn the switch on, slap in the magaine and it will automatically light up with a nice "95" on the counter.
One of my concerns when considering the rebuild was holding the shroud together with nothing more than cyanoacrylate (CA, or crazy glue, if you will). Thankfully, I had several lengths of small-diameter brass tubing from other projects. I drilled a series of holes around the shroud and used lengths of tubing, as pins. So now, everything is held together with glue and pins - it should never, ever fall apart, again.
Now a little more info on the odds and ends on the PR. The stock, barrel vent and front triangle are steel, from a run on the RPF, soon after the kit run was offered. The sling is an MNoble, from a run on the Aliens Legacy forum, from years back. The paint is Aervoe camoflauge FS595, milspec Olive Drab. The black is Krylon Satin Black. The ejector ports are finished with Talon Aluminum buffing powder. The GL pump does slide and technically, the shoulder stock extends, but I bolted it in place.
If you've read all that, good for you :cool
Now on to the pictures

Weathering may come at a later time, I haven't decided.
Enjoy,
Fred
Years ago, there was a board run for casts of the MiM Pulse Rifle. I was lucky enough to get in on the run, at the time. Now, back then, I had never built a multi-part resin kit. I had no idea how much resin could warp, what the best glues to to use were, or much else, regarding resin. Making things even more complicated, I had never seen a close-up of an actual pulse rifle, so my only guide, was my memory of the movie.
So, I built it as best I could, as-is, with a lot of 5-minute, 2-part epoxy. And, for a while, it held together, just fine and looked pretty cool on the shelf. Then a few years went buy and the epoxy started to give and pieces colapsed or fell off. The grenade launcher seperated from the thompson (there were 3/4" gaps between the shroud and the GL, on either side). I tried patching it with bits of strene and more epoxy. It would hold a few weeks and fall off again.
And for a year or two, I just let it sit like that, never really knowing how to fix it, resigned to have a busted pulse rifle.
Well, a few months ago, I got the itch to repair it. What an undertaking. First, pulling it all apart, scraping off all the old glue and looking at pictures of other folks' builds. I was in for one heck of a project. Turns out, the shrouds were really bowed, outwards. I spent nights heating the shrouds with a heat gun, while resting weights on top, hoping to even them out. Then I had to sculpt new contours so that they would line up with the thompson body.
Once I was relatively happy with the shroud shape, I had to figure out how I was going to keep the GL from falling off again. Strolling around the local hardware store, I found some aluminum bar stock (1" x 3'), with pre-drilled holes. So, I drilled the stock to the thompsonand then to the top of the GL. Nice solid connection and dang near invisible.
Then I had an idea to add electronics - a static ammo counter display. I found a 2-digit, 7 segment display on amazon (2 displays for $6), then picked up 2 micro switches ($3) and an AA battery holder ($1.20) from Radio Shack. Wiring the display was easy. Planning the pins and soldering took less than 10 minutes. The hard part was figuring out how I was going to wire this setup. After dry fitting all the parts, I realized that using a hardwired system was never going to work. It was easy, but the wires would get tangled and crushed with every change. So, I devised a wireless/contact system. Using 3M 9703 electrically conductive adhesive tape and aluminum foil, I created contact points on inside of the shroud and on the magazine, which had been fitted with the battery holder. A microswitch is located under the main trigger, between the two scews, on the back plate. So I can turn the switch on, slap in the magaine and it will automatically light up with a nice "95" on the counter.
One of my concerns when considering the rebuild was holding the shroud together with nothing more than cyanoacrylate (CA, or crazy glue, if you will). Thankfully, I had several lengths of small-diameter brass tubing from other projects. I drilled a series of holes around the shroud and used lengths of tubing, as pins. So now, everything is held together with glue and pins - it should never, ever fall apart, again.
Now a little more info on the odds and ends on the PR. The stock, barrel vent and front triangle are steel, from a run on the RPF, soon after the kit run was offered. The sling is an MNoble, from a run on the Aliens Legacy forum, from years back. The paint is Aervoe camoflauge FS595, milspec Olive Drab. The black is Krylon Satin Black. The ejector ports are finished with Talon Aluminum buffing powder. The GL pump does slide and technically, the shoulder stock extends, but I bolted it in place.
If you've read all that, good for you :cool
Now on to the pictures
Weathering may come at a later time, I haven't decided.
Enjoy,
Fred