After 8+ years, finally starting in on Budd's sword!

jblakey

Well-Known Member
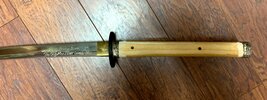
So, after a number of years of hunting down parts and FINALLY getting a set of the handle fittings (fuchi/kashira), I can finally start on Budd's sword from Kill Bill! It didn't get a lot of screen time, but I guess I needed to make all the Hanzo katana:) ProTip - if you watch closely in Volume 2, there's a scene where the Bride shows up at Bill's door wearing Budd's sword when she should be wearing her own:)

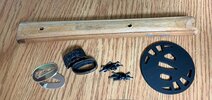
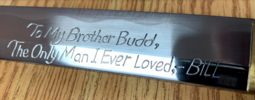
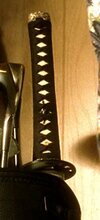
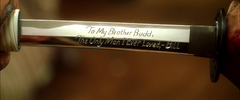
I picked up a used Budd replica off eBay years ago - the engraving on the blade is strangely accurate to the film. And I've had the skull menuki and seppa for years now, just waiting for the missing bits to show up. The tsuba is 3D printed (if anyone wants one, I shared the design here: Kill Bill Bride's Hanzo Katana Tsuba by jblakey).

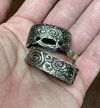
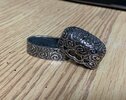
I finally found the Fuchi/Kashira recently at swordstore.com (Your Sensei reccommends Swordstore iaito. Our great reputation for quality in service can be found in dojo all over the world. We've been on the web longer than any other company. Custom Design Your Japanese Sword) - I'll need to strip them and nickel-plate them, but that should be no sweat.

Thanks,
jason
 

Attachments

  • IMG_0613.jpg
    IMG_0613.jpg
    1.2 MB · Views: 144
  • BuddEngraving.PNG
    BuddEngraving.PNG
    2.5 MB · Views: 148
  • Budds-sword-2.jpg
    Budds-sword-2.jpg
    24.8 KB · Views: 131
  • vlcsnap-2011-04-22-13h39m39s183 (1).png
    vlcsnap-2011-04-22-13h39m39s183 (1).png
    2.1 MB · Views: 125
  • vlcsnap-2011-04-22-13h40m59s223.png
    vlcsnap-2011-04-22-13h40m59s223.png
    1.5 MB · Views: 122
  • BrideWearingBuddsSword2.PNG
    BrideWearingBuddsSword2.PNG
    801.6 KB · Views: 147
Last edited:
Polished up the fittings, and I’m thinking of sticking with this finish. Maybe some silver rub and buff, but I’m liking this look.

cleaning that black paint off the fittings was no fun. Acetone didn’t work, paint remover didn’t work much, Mothers Mag and Aluminium polish worked the best.
 

Attachments

  • E52784D6-BB69-4C7B-BE69-68FF40E7FE66.jpeg
    E52784D6-BB69-4C7B-BE69-68FF40E7FE66.jpeg
    999.5 KB · Views: 101
  • 5085E1ED-4A6A-44D0-A31F-B4337600B241.jpeg
    5085E1ED-4A6A-44D0-A31F-B4337600B241.jpeg
    1 MB · Views: 105
Had a chance on a beautiful spring day last weekend to sit outside for an hour or so and get the fittings on the tsuka. It's always surprising how chunky the Chinese-made tsuka are when I try to put Japanese-made fittings on them. Lots of wood needs to be removed to get them on. Just go slowly, and don't take much off between fit tries. You don't want to have to put wood back on!

Tried a test fit on the blade - turns out I'll have to add about a 1 - 1.5mm spacer to the end of the tsuka that goes in the fuchi to get the pre-drilled holes to line up correctly. You don't want a 'rattle-y' katana when everything is stacked and pinned. Different fittings have difference thicknesses to the floor of the fuchi, and this always needs adjustment to get things right. I used to make spacers from wood - now that I have a nice 3D printer, I can just say "give me a 1.5mm thick bit of plastic", and I get one!:)

Next up, more wood removal, gotta get those sweet, sweet lines right:)

Thanks,
jason
 

Attachments

  • IMG_0624.jpg
    IMG_0624.jpg
    1.8 MB · Views: 122
  • IMG_0622.jpg
    IMG_0622.jpg
    1.3 MB · Views: 103
  • IMG_0631.jpg
    IMG_0631.jpg
    876.9 KB · Views: 97
Last edited:
Had a chance on a beautiful spring day last weekend to sit outside for an hour or so and get the fittings on the tsuka. It's always surprising how chunky the Chinese-made tsuka are when I try to put Japanese-made fittings on them. Lots of wood needs to be removed to get them on. Just go slowly, and don't take much off between fit tries. You don't want to have to put wood back on!

Tried a test fit on the blade - turns out I'll have to add about a 1 - 1.5mm spacer to the end of the tsuka that goes in the fuchi to get the pre-drilled holes to line up correctly. You don't want a 'rattle-y' katana when everything is stacked and pinned. Different fittings have difference thicknesses to the floor of the fuchi, and this always needs adjustment to get things right. I used to make spacers from wood - now that I have a nice 3D printer, I can just say "give me a 1.5mm thick bit of plastic", and I get one!:)

Next up, more wood removal, gotta get those sweet, sweet lines right:)

Thanks,
jason
Well, 19C in Ottawa will permit you to work outside for sure...looking good so far and eager to see your next update!
 
Hey Jason, I am a big fan of your work with the Bride Sword. I was going through your newer threads right now. I am excited to see that you are active in the community. I can't wait to see how this project will turn out as well. I appreciate your attention to detail.
I am currently working on making my Bride Sword more accurate. I was hoping to ask you if you are able to produce a maple leaf kojiri and the ring that goes around the saya for me? I would be forever grateful and very appreciative if you are able to. Thank you for your time and being so badass.

Best of luck on your next projects!
Marc
 
Back
Top