That's a cool airbush stand! Did you design it yourself?
You are using an out of date browser. It may not display this or other websites correctly.
You should upgrade or use an alternative browser.
You should upgrade or use an alternative browser.
Adventures in 3D printing (Large scale IG-11 with lights, tips and tricks)
- Thread starter skahtul
- Start date
What CFM fan did you go with? I'm in the process of rebuilding my hobby room and looking at putting in a permanent exhaust system.
The ducted fan I used is rated at 265 CFM's which, to be honest, is not working as well as I had hoped. Initially, with zero resistance it moved a lot of air, however, I think the way I necked it down from 6" to 4" negatively impacted the flow. My primary goal was to have the fan clear out fumes from the 3D printer, and for that it's great.
But as a fan to get rid of the paint fumes, not so much. I also think just with the ribbed tubing, filter, etc. I need a lot more power to really make this work. I am already working on a few different ideas to get the paint booth aspect of this build working.
Last edited:
That's a cool airbush stand! Did you design it yourself?
No, but it is great. Fits the brush and holds it at the perfect angle. It's also a single print with no supports:
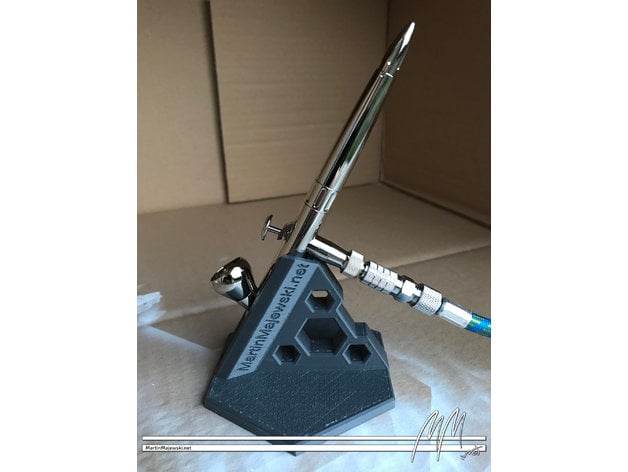
Airbrush Stand - Hex Design - Mark 01 by MartinMajewski
Following my design style and passion for hexagonal shapes, I designed this airbrush stand to fit into my workspace.As I have a Harder & Steenbeck Evolution Silverline airbrush, this stand is designed to match the shape and fit of this airbrush. However, it should also fit all other similarly...
 www.thingiverse.com

Double Airbrush Stand - Hex design by guigro
This is a remix from https://www.thingiverse.com/thing:3140374I made it to get a double stand.Never printed it, not sure I'm going to use it, but as I made the model (ultra fast with Tinkercad) I'm sharing it !Enjoy printing, enjoy painting !
www.thingiverse.com
What CFM fan did you go with? I'm in the process of rebuilding my hobby room and looking at putting in a permanent exhaust system.
I am going to order one of these as it puts out 425 CFM. They are made by the same company as my initial blower (AC Infinity, they seem to have a lot of good airflow products like these). I am going to mount it right under the hood and see if that will get me what I am looking for.
Last edited:
star-art
Sr Member
I work with strong solvent glues a lot so, years ago, I designed and built a custom industrial-grade fume booth. I also wanted it to double as a spray booth.
If you're exhausting any sort of flammable vapors you need a spark-proof fan. When I built my booth these were not easy to come by and they often cost a small fortune. It's my understanding regular fans have exposed motor components that can ignite vapors in the exhaust.
Also, keep in mind fans are designed to push air rather than pull it. Thus, your fan needs to be mounted where the air is collected and not at the other end of a long exhaust hose. Otherwise, you'll lose a great deal of efficiency.
I ended up choosing a marine bilge blower for my booth. It's powerful but I still doubled up and used two of them. (IIRC, they move 450 cubic feet per minute each.) They're loud though and run only on 12 Volts DC. They also draw 6 Amps each so that requires a heavy-duty power supply.
I even added special circuitry that prevents sparks when the fans are turned on and off. When a motor shuts OFF it creates a large reverse voltage spike. This can cause arcing inside your relays. Thus, spark-suppression is also needed in your control wiring.
I work with strong solvent glues a lot so, years ago, I designed and built a custom industrial-grade fume booth. I also wanted it to double as a spray booth.
If you're exhausting any sort of flammable vapors you need a spark-proof fan. When I built my booth these were not easy to come by and they often cost a small fortune. It's my understanding regular fans have exposed motor components that can ignite vapors in the exhaust.
Also, keep in mind fans are designed to push air rather than pull it. Thus, your fan needs to be mounted where the air is collected and not at the other end of a long exhaust hose. Otherwise, you'll lose a great deal of efficiency.
I ended up choosing a marine bilge blower for my booth. It's powerful but I still doubled up and used two of them. (IIRC, they move 450 cubic feet per minute each.) They're loud though and run only on 12 Volts DC. They also draw 6 Amps each so that requires a heavy-duty power supply.
I even added special circuitry that prevents sparks when the fans are turned on and off. When a motor shuts OFF it creates a large reverse voltage spike. This can cause arcing inside your relays. Thus, spark-suppression is also needed in your control wiring.
Working off this great advice I have ordered a bilge blower (which funny enough is what one of my co-workers had originally said would probably work great...). Yes, worth pointing out the spark issue, so many people build these with bathroom exhaust fans and I am not sure if those are spark-proof or not.
For now, I have re-routed everything and it's not perfect but it does work much better for sure:
star-art
Sr Member
Looking good! The last piece of the puzzle for me was a special venting outlet on the side of the house. This closes when not in use to keep bugs, birds, and vermin from entering the exhaust hose. I special ordered a heavy-duty product like this one:
PS Like just about everything else these days, these have more than doubled in price! Ouch!
PS Like just about everything else these days, these have more than doubled in price! Ouch!
I like to use squirrel cage fans for ducting fumes. The motor is outside the air stream, so it won't be an ignition risk for flammable fumes or get caked with particles. Be aware that all vent fan blades will eventually collect dust/paint particles over time, which will need to be cleaned.

Whenever I am printing large complex parts I always hallow out the model. The part below already took almost a full bottle of resin, if it was not hollow it would take even more. However to do that you always want to drill holes into the model via the slicer for a few reasons; one is to reduce the amount of suction on the FEP sheet, second is to drain out the resin that almost always gets trapped, third is so that you can wash out the inside because it has uncured resin on the inside just like the outside. And lastly, I like to have at least one 5mm hole so I can put in my UV curing bulb and ensure the entire print is cured.
The issue with all of the above, at least for me, is that once hollowed it can be hard to get the inside really cleaned. Also, with complex prints such as this, it's hard to really get all the leftover resin cleaned from the nooks and crannies. A brush works okay but I have broken several parts off being a bit too aggressive.
You can see the holes on the side of the engines, I also have several smaller ones inside the cone and at the bottom. I find that being able to 'flush' these using multiple holes works best. You also want to put them in a spot where it will either be hidden or easy to fill.
To help with cleaning out the inside and to speed up my process, l I have come up with the following which is helping to get the parts cleaner than I thought possible (inside and out).
I start with 15 minutes in the ultrasonic cleaner heated to 40c with the Mean Green.
Then I use this airtight container filled with IPA and drop it into the ultrasonic cleaner. You would never, ever want to fill up the ultrasonic with alcohol, that is just asking for an explosion. I also let the Mean Green cool down before I set this container in. This really helps to get the inside of the print clean.


Then I finish it off with 2 minutes in the wash and cure.

And before you know it, you have burned through 4 bottles of resin to print a 25" Corvette that you know full well you do not have time to even think about let alone work on...

I start with 15 minutes in the ultrasonic cleaner heated to 40c with the Mean Green.
Then I use this airtight container filled with IPA and drop it into the ultrasonic cleaner. You would never, ever want to fill up the ultrasonic with alcohol, that is just asking for an explosion. I also let the Mean Green cool down before I set this container in. This really helps to get the inside of the print clean.
Then I finish it off with 2 minutes in the wash and cure.
And before you know it, you have burned through 4 bottles of resin to print a 25" Corvette that you know full well you do not have time to even think about let alone work on...
Last edited:
star-art
Sr Member
Interesting! I'm just getting my resin printing equipment set up. I understand many people use something like Simple Green, etc. to save on alcohol. But, I prefer an all-IPA setup to help deal with recycling the used liquid. This is one area that greatly complicates the whole affair. So far, some of the best guides I've seen for managing IPA (and the cleaning process) have been these videos:
Last edited:
Similar threads
- Replies
- 16
- Views
- 394