Adventures in 3D printing (Large scale IG-11 with lights, tips and tricks)

skahtul

Sr Member
RPF PREMIUM MEMBER
Okay, well it's well past the holiday season but I am sure there are a lot of people out there with shiny new 3D printers. This will be a short thread on the build-out of my newly re-designed 3D lab (storage closet..) and my first large-scale print on my new Saturn which is an IG-11 from Gambody. Pretty much all my builds are related to The Mandalorian and The Book of Fett right now :)

I have had a Mars Pro for exactly a year as it was a Christmas present to myself last year. This year I decided to step up to the Elegoo Saturn, and what a change, for the prince this really is an amazing printer. It's crazy what you can get with a few more inches on the build plate. This makes me super excited for the Jupiter I pre-ordered, but I digress.

If you have any cleaning tips or tricks to preparing your 3D prints please add them here. I know in addition to what I posted below I am ordering a sonic cleaner to help with some of the tougher resins I use.

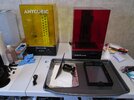
First up, the new equipment, Anycubic Wash and Cure Plus, and the new Saturn. The new wash and cure is thing is huge and will handle anything that comes off the Saturn. The cleaning mechanism is much more high speed than my old wash and cure and seems to do a pretty good job.

Also pictured is my "Wham Bam" flexible print build plate, I would not resin print without one.

IMG_20211225_103621690.jpg
 
Here is a shot of my old lab. Pictured is my work horse, Prusa Mini and my Mars Pro.

IMG_20211224_135229614.jpg


Here is the new setup. I just used an inexpensive pre-cut countertop from a local hardware store and installed it onto the shelving unit shown above. I have been using this setup for years to make cheap and effective work areas. I also installed a few new shelves and generally re-arranged things.

In the next few weeks, in preparation for my Elegoo Jupiter and the addition to an airbrush area in the lab, I plan to add active ventilation to get all the nasty air-ventilated to the outside. If anyone is interested in what that looks like let me know and I can post that here.

Here is the 3D printing area now:

IMG_20211226_152940255.jpg


IMG_20211226_163039752.jpg


IMG_20211226_164435127.jpg


IMG_20211230_104810349.jpg
 
Okay, so here is my current process for cleaning and preparing resin prints.

First I scrub them in a mix of 75% Mean Green to get the initial resin off the print. I feel this helps to extend the life of the IPA as I really don't like using any more of that than I have to. Pictured below is the first large print from this printer. It's a file from Gambody and it printed in Syratech Grey which is an awesome resin for general model making.

IMG_20211229_162935884.jpg


Next I give the model a rinse in water:

IMG_20211229_163121092.jpg


I use the tubs and containers shown below to keep my work area clean. I use containers I found at Walmart that have rubber gaskets to help keep all the liquids contained. The black tubs really help to keep the work area clean.

IMG_20211230_095714574.jpg


I use a stiff brush to get some of the harder to reach areas cleaned up:

IMG_20211230_095347186.jpg
 
Once that is done I send them through my Wash and Cure station which is filled with 99% IPA:

IMG_20211229_170131436.jpg


A blow dryer is a hand tool here to dry up any excess IPA:

IMG_20211230_104700823.jpg
 
Then it's on to curing. I use a few different types of resins. The Syratech Grey is super easy to work with, but the Sculpt and Blu are different animals. I will post a different thread outlining how I handle those and my experiments with water curing.

For this resin, it's only about a 2 to 3-minute affair to cure the resin, for Sculpt and Blu you are looking at 15 minutes plus.

IMG_20211229_193819852.jpg
 
Side note, while I was off for a week I decided to give my Mini some TLC. This is the printer that got me into 3D printing and it has been having a few issues as of late. I decided to pretty much gut the printer and add the following > Bontech Heat Break, Bontech Extruder, new bearings, 10 mm belts (an upgrade from the stock 6mm) and a new base. These upgrades have really brought the Mini into it's own:

IMG_20211226_223531132.jpg


IMG_20211227_192656682.jpg


This hand is part of what I think is an amazing 3D model. It's the hand from a 1/4 scale Darth Vader. The artist of these files has included all types of cool things like code for sound and saber effects. I will outline that build in an upcoming thread.

For now, check out what the upgraded Mini can do, it's really an amazing printer:

IMG_20211229_204123446.jpg
 
Okay, onto the meat of this thread, the 350% scaled up IG-11. I have printed a few versions of this droid, and while he has a pretty small showing in The Mandalorian, he is one of my favorite droids in Star Wars.

As a side note, these large silicone mats from Wham Bam (the same maker as the flexible and magnetic build plate) are a must. They are nice not only for resin printing for just general model making.

IMG_20211228_222645716.jpg


IMG_20211231_112304741.jpg


IMG_20211230_093702677.jpg
 
When I scaled up this print, it looked a little plain... I am not sure what it is but it just looks more like a toy than a model so I decided to break out some electronics to add a few more details. They are not accurate in any way but I think they will add some character to the larger kit.

IMG_20211231_112337522.jpg


IMG_20220112_000835377.jpg
 
I also decided that that I needed to light up his head a bit. I broke out the fiber optics to get a good lighting scheme. All I have on hand is flashing red LED's and I was not able to get a good picture. As soon as I get the new LED's I will get a good picture and I will outline how I installed them.


IMG_20211231_112434404.jpg


IMG_20211231_114505692.jpg
 
Nice!

I got the same Gambody file and printed it out at 1/12 scale

for what it is worth, I used Spaz Stik Chrome spray paint for the main metallic and did some oil washes


also some useful tips for getting started
 
I also have the Saturn and Wash and Cure Plus and love the setup, but I only use water-washable resins and the "Wash and Cure's" impeller has started to vibrate badly and I believe it's due to rust in the bearing from using water in the tank. Anycubic did send me a replacement impeller, but I believe it will do the same in a short period like the first one did. I plan on changing the bearing to a ceramic one and hope that cures the problem.
Let me know if you have the same issue when you start using the water in your tank. Here is a short video of the vibration.
 

Attachments

  • Resin printer setup.jpg
    Resin printer setup.jpg
    240 KB · Views: 78
  • Anycubic Wash and Cure impaler rusting after just two weeks of use with water..jpg
    Anycubic Wash and Cure impaler rusting after just two weeks of use with water..jpg
    240 KB · Views: 83
  • ceramic bearing.jpg
    ceramic bearing.jpg
    187.6 KB · Views: 76
Congrats on your Saturn! I bought one in August and I love it.

I just purchased the Robert James Models Gunstar and I'm working on rejoining many of the parts to print at 1/144 and 1/72 scale on mine (I should be able to print the 1/144 in one piece if my calculations are correct). I'm also a huge fan of the Siraya Tech resins, I'm using Build Sonic Grey and Fast Navy Grey and they're both fantastic.
 
what's the purpose of the new base for the prusa mini

Honestly, it's just to move some things around on the printer. It does not actually help anything but as I am running out of space this allows me to put the spool under the printer. I still have some detail parts to add, so really, 90% of it was that I just like the way it looked :)
 
I am working on the IG model, the black and Gloss Kote are drying so I will have an update on that very soon.

However, there is a very interesting project I have always wanted to work on. There is a maker that goes by the name of Tethan Props. You can find him on Youtube and Etsy, which is where I picked up the files I am about to present below.

I have been watching his Youtube and following his Etsy store for over a year and I have always admired his work. I have also wanted to print and finish a set of his amazing Star Wars/Lord of the Rings cross-over sabers. This is probably not for everyone but I think they are really cool, however, I have never wanted to pay for a fully finished product since I know that I can print and finish one of these on my own.

This all changed a few weeks ago when he released a few of his more popular files on his Etsy store and I immediately purchased them and started printing. I am including this project here as I am trying to cure prints with water for the first time. Syratech recommends this process for their high-strength resins such as BLU as they state that water more effectively transmits UV rays. These handles were printed utilizing their BLU resin, which is my favorite resin for things that need to be tough.

Normally this print is cut into parts, but I reached out to Tethan Props to see if he would combine them into a single print, and he did! It's so nice to print things like a full saber hilt on one print on the Saturn...

IMG_20220108_133749783.jpg


Single print, full saber hilt:

IMG_20220108_135144261.jpg
 

Your message may be considered spam for the following reasons:

If you wish to reply despite these issues, check the box below before replying.
Be aware that malicious compliance may result in more severe penalties.
Back
Top