SpamDaddy
Active Member
@cj Thanks for the good advice and encouragement. It means a lot coming from someone with your skillset. I pictured what I wanted my Falcon to look like when I was looking for one on ebay, ignorant of all that was out there. Then I found this site and it was like opening a door to another world! You guys are frickin' good at this, lol. I want mine to look similarly good ( I have no delusions about it looking as good as y'all's obviously) because I do want to proudly display it. I gotta have lights tho. That is why I chose a simple premade kit. This is a dumbed down build to be sure but hopefully it will be respectable for a first build...I got lucky and found a junked old MPC falcon kit at a vintage games store to practice painting on.
I am ordering Tony's rear engine grill. For now I am leaving the molded vents on top. CJ, tell me if you think this will work. I was thinking I should sand the clear plastic that came with the kit to "frost" it and mount it recessed about 1/4 inch from where it's supposed to be. The rear grill will go in it's correct place and will have some structure between the grill and the frosted plastic. Or...do you think there should be no structure and just put the frosted plastic against the grill?
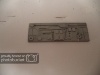
I am not going to lie, the idea of painting has me scared. I don't have an airbrush and I am unsure how to mask off all these panels and crevices. Plus I will be using the hairspray technique for the first time ever. I will be brushing the entire model. I think I am using the TFA paint reference chart (it's all in Japanese) so not sure if that is the correct way to go but it is the only paint schematic I can find. It was in one of the links HH sent me.
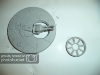
I did manage to use Tamiya "Basic Type" putty in gray to great affect as far as filling in around the radar dish and resurfaced after it dried. I also had to cut down the radar dish mount by over 1/4 inch to make it look correct - the tricky part was I had to cut out between the top mount area and the bottom spindle hole and then glue the two halves back together after sanding. Both projects seem to have turned out ok (see below). Your thoughts or critique are always appreciated guys!
pred Thanks for the kind words, I'm trying. The hobby wire made life sooo much easier. It took me an hour to get a piece of styrene formed and then it broke when I was installing it and I knew I HAD to go a different direction or go insane, lol.
Small Update:
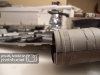
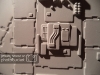
Jaw box wall (the kit came with a plain piece of plastic with no greeble (I realize it is horribly innacurate but I have no good jawbox reference pics)...

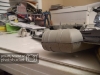
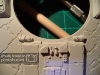
The gunner's window - masked it and then cut away the areas to be painted - after the paint dried I peeled away the mask and mounted it...


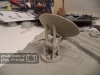
The modified radar dish base and mount...


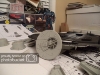
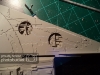
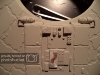
The incredibly bad fitting cockpit pieces...


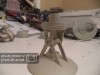
More "pipes"...!


Thanks for looking and for your input guys : )
Lee
I am ordering Tony's rear engine grill. For now I am leaving the molded vents on top. CJ, tell me if you think this will work. I was thinking I should sand the clear plastic that came with the kit to "frost" it and mount it recessed about 1/4 inch from where it's supposed to be. The rear grill will go in it's correct place and will have some structure between the grill and the frosted plastic. Or...do you think there should be no structure and just put the frosted plastic against the grill?
I am not going to lie, the idea of painting has me scared. I don't have an airbrush and I am unsure how to mask off all these panels and crevices. Plus I will be using the hairspray technique for the first time ever. I will be brushing the entire model. I think I am using the TFA paint reference chart (it's all in Japanese) so not sure if that is the correct way to go but it is the only paint schematic I can find. It was in one of the links HH sent me.
I did manage to use Tamiya "Basic Type" putty in gray to great affect as far as filling in around the radar dish and resurfaced after it dried. I also had to cut down the radar dish mount by over 1/4 inch to make it look correct - the tricky part was I had to cut out between the top mount area and the bottom spindle hole and then glue the two halves back together after sanding. Both projects seem to have turned out ok (see below). Your thoughts or critique are always appreciated guys!
pred Thanks for the kind words, I'm trying. The hobby wire made life sooo much easier. It took me an hour to get a piece of styrene formed and then it broke when I was installing it and I knew I HAD to go a different direction or go insane, lol.
Small Update:
Jaw box wall (the kit came with a plain piece of plastic with no greeble (I realize it is horribly innacurate but I have no good jawbox reference pics)...
The gunner's window - masked it and then cut away the areas to be painted - after the paint dried I peeled away the mask and mounted it...
The modified radar dish base and mount...
The incredibly bad fitting cockpit pieces...
More "pipes"...!
Thanks for looking and for your input guys : )
Lee
Attachments
-
 DSC00576.jpg178.4 KB · Views: 80
 -
 DSC00576.jpg178.4 KB · Views: 99
 -
 DSC00576.jpg178.4 KB · Views: 89
 -
 DSC00576.jpg178.4 KB · Views: 86
 -
 DSC00576.jpg178.4 KB · Views: 88
 -
 DSC00573.jpg248 KB · Views: 97
 -
 DSC00573.jpg248 KB · Views: 90
 -
 DSC00573.jpg248 KB · Views: 97
 -
 DSC00573.jpg248 KB · Views: 96
 -
 DSC00573.jpg248 KB · Views: 95
 -
 DSC00575.jpg337.1 KB · Views: 94
 -
 DSC00575.jpg337.1 KB · Views: 93
 -
 DSC00575.jpg337.1 KB · Views: 100
 -
 DSC00575.jpg337.1 KB · Views: 94
 -
 DSC00575.jpg337.1 KB · Views: 99
 -
 DSC00578.jpg198.8 KB · Views: 96
 -
 DSC00578.jpg198.8 KB · Views: 89
 -
 DSC00578.jpg198.8 KB · Views: 108
 -
 DSC00578.jpg198.8 KB · Views: 95
 -
 DSC00578.jpg198.8 KB · Views: 96
 -
 DSC00569.jpg205.4 KB · Views: 104
 -
 DSC00569.jpg205.4 KB · Views: 94
 -
 DSC00569.jpg205.4 KB · Views: 98
 -
 DSC00569.jpg205.4 KB · Views: 99
 -
 DSC00572.jpg213.7 KB · Views: 93
 -
 DSC00572.jpg213.7 KB · Views: 99
 -
 DSC00572.jpg213.7 KB · Views: 89
 -
 DSC00572.jpg213.7 KB · Views: 99
 -
 DSC00572.jpg213.7 KB · Views: 89
 -
 DSC00566.jpg221.5 KB · Views: 101
 -
 DSC00566.jpg221.5 KB · Views: 102
 -
 DSC00566.jpg221.5 KB · Views: 100
 -
 DSC00566.jpg221.5 KB · Views: 101
 -
 DSC00566.jpg221.5 KB · Views: 102
 -
 DSC00569.jpg205.4 KB · Views: 98
 -
 DSC00549_1.jpg255.6 KB · Views: 84
 -
 DSC00549_1.jpg255.6 KB · Views: 85
 -
 DSC00549_1.jpg255.6 KB · Views: 81
 -
 DSC00549_1.jpg255.6 KB · Views: 94
 -
 DSC00549_1.jpg255.6 KB · Views: 99
 -
 DSC00551_1.jpg290.2 KB · Views: 88
 -
 DSC00551_1.jpg290.2 KB · Views: 88
 -
 DSC00551_1.jpg290.2 KB · Views: 82
 -
 DSC00551_1.jpg290.2 KB · Views: 86
 -
 DSC00551_1.jpg290.2 KB · Views: 90
 -
 DSC00552.jpg282.1 KB · Views: 97
 -
 DSC00552.jpg282.1 KB · Views: 95
 -
 DSC00552.jpg282.1 KB · Views: 87
 -
 DSC00552.jpg282.1 KB · Views: 84
 -
 DSC00552.jpg282.1 KB · Views: 82
 -
 DSC00552.jpg282.1 KB · Views: 101
 -
 DSC00552.jpg282.1 KB · Views: 86
 -
 DSC00555.jpg292.9 KB · Views: 80
 -
 DSC00552.jpg282.1 KB · Views: 78
 -
 DSC00552.jpg282.1 KB · Views: 88
 -
 DSC00552.jpg282.1 KB · Views: 87
 -
 DSC00555.jpg292.9 KB · Views: 82
 -
 DSC00555.jpg292.9 KB · Views: 87
 -
 DSC00555.jpg292.9 KB · Views: 91
 -
 DSC00555.jpg292.9 KB · Views: 82
Last edited by a moderator: