!/24th Scale Police Spinner (Fujimi) with Lights

My goodness! I'm glad I didn't see this video earlier, I could have been discouraged to even try my build. Those lights are incredible! I had to subscribe to Teslabe's Youtube channel, lots of interesting tech stuff there.

Hi Avanaut, I love your build and would feel very bad if my posts did anything but motivate your creative juices...... Great job with this kit.....
 
Hi Avanaut, I love your build and would feel very bad if my posts did anything but motivate your creative juices...... Great job with this kit.....

It is inspiring alright, it is just so damn good! I gather you wired the roof light racks and made a cut in the roof for the wires? A cut like that should be practically unnoticeable after installing the roof windows. I am kicking myself for not figuring that out myself, I ran the wires through a hole in the roof next to the lamp brackets, I soldered wires after that. It was a bit tricky, the wires weren't too long.

Here's a short clip of the lighting pattern. One red and one blue led missing due to the fried driver board.

In the video you can also see the opening on the floorpan aft of the rear wheels. It's the door to the battery compartment, this thing has an internal 9 volt battery power source. The door stays closed with magnets.

I still need to install the two white lights on the floor. I kinda forgot them.

 
Last edited by a moderator:
The roof of the Spinner has six domes, each fitted with flashing leds. There are also smaller lights but I'm tackling the round domes now.

I got the system to work, beautiful flashing pattern, then the board shorted and killed current to two leds. I couldn't figure out where the problem was, so I rewired the whole thing. Found the fault when ripping the wires off, it would have been very simple to fix. It was just a stray strand, easy to remove with a toothpick or such. Damn!

Rewiring the board went well, I figured out a better way to solder it and it now has a solid clean wiring. Checking the bdriver, electric current goes to all the right places but, alas, two leds are dead. They are not not the same two that were dead earlier and the problem is not with the board.

Ten hours straight with the soldering iron today, and I cannot troubleshoot the fault. Putting the soldering iron down for today, I got four lights, two blanks and an urge to smash the whole thing to million pieces with a hammer.

You know how it is.
 
Love the grills at the bottom of the Spinner...patience is key:rolleyes (yes, I know the feeling:D) Stand back, breathe by the nose and go at it again!! Great work btw (love the vid!!)
 
Resurrecting an ancient thread for closure.

Back in 2017 I messed up with soldering the led driver boards. In clearing the mess I lost track of the wires that go to the leds in the light domes on the roof. To figure out which wire was to which led I made a stupid mistake and fried some of them. In order to replace the leds I would have needed to take down the light racks on the roof and most likely rebuild it all. Realising this I bagged the whole build thinking I might come up with a solution some day. This was almost eight years ago.

Three days ago I took the model from the box and concluded I can't fix the wiring and the leds. I decided to salvage what I could and finish the model with what I had. I soldered the remaining wires, glued the model shut permanently only to realise I hadn't actually finished the lighting before putting it on hold. I just didn't remember that. There are lights on the dashboard but I forgot to add one or two under the center consol. It had all the pre-work done, photoetched parts with coloured cels under it and everything insulated for light leaks. There is no light there now and never will be. It would have taken me five minutes to put them there.

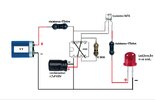
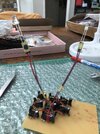
Anyway, the front light panels work, the yellow side light strip and some dashboard lights as well. Overall it looks "operational". On the bottom there are supposed to be eight flashing lights, four reds and four blues, I got six of them to work. There should have been an option to switch the flashers on and off regardless of the main lighting but I just couldn't make sense of the plans I made how to do it. Now they're always on when there is power.

Here's a YT link to the flashers on the bottom and some photographs of the finished model:


In the video you'll notice two metal studs on either side of the rearmost silver floor grille panel. They are magnets that hold the panel in place. Behind the panel is a removable 9 volt battery, the power source for the whole thing.

Police Spinner on White 1.jpg
Police Spinner on White 2.jpg
Police Spinner on White 3.jpg


Like all my models this was intended to be used for photography. That is why the effort with lighting. I have taken some photographs of it over the years regardless of the model being unfinished. I put it together temporarily using tape and blu-tac. I have also avoided photographing it too closely to hide the fact that the model was in fact unfinished.

The Spinner in the Woods.jpg
 
I would love to hear more about the lights.
Hello, I made this assembly which allows to obtain a fairly progressive flashing. You can use 5mm, 3mm and SMD LEDs. For my part, I use red and blue SMD LEDs 0630 and 1206 which easily fit into the small rotating lights of the Fujimi Spinner. There is no driver or Arduino, it is "old-fashioned" assembly with different components, which are not very expensive, but which involves a fairly long soldering work knowing that you have to repeat the assembly for each LED. The whole assembly does not take up much space and can be hidden under a base of the same size as the Fujimi Spinner.
 

Attachments

  • fini.jpg
    fini.jpg
    101 KB · Views: 55
  • MHMT7277.JPG
    MHMT7277.JPG
    1.5 MB · Views: 62
Love seeing someone using a 555! I see a lot of people bringing arduinos and other overpowered microprocessors into projects that a 555 would be perfect for. Nice work!
 
Back
Top