1/8 moebius frankenstein DONE!

ZOMBIEREPELLENT

Sr Member
Hey guys! It's been a minute or so since I've been active on this board. Finally trying to get back in the swing of making props and models. Up till now, I've been completing one kit every other year haha. Well, surprisingly enough, this is my second one of the year, and he's well on his way to actually being finished!

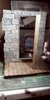
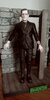
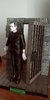
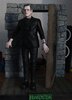
This is my first attempt of figure painting, I knew right off the bat, I didn't want to go with the traditional green. Since I wanted to build Frankenstein, and the kit comes with the head to build a model of Pat Kilbane, from mad tv, I opted to go with the amazing replacement head from Dedham Pond Designs.

So the first thing I set out to do, was carve out and allow some relief to the collar. My goal was to make it look more like it was folded over, than molded on. After I attached the fore arms, I sculpted a bit of a sleeve with some milliput to make them look a bit more natural.

My next step, is adding irises and pupils. Then somehow, making the clown shoes he comes with, look a bit more like boots.

I'm also building up and modifying the base, but we'll cross that bridge when we get to it. Maybe.
20200317_152657.jpg
20200317_165826.jpg
20200317_150245.jpg
20200317_151554.jpg
20200317_153520.jpg
20200318_205306.jpg
20200318_210559.jpg
20200320_203907.jpg
20200331_205315.jpg
20200331_205306.jpg
20200408_174105.jpg
20200409_220256.jpg
 
Last edited:
Thanks guys! It had been fairly slow progress on this one, until the whole quarantine thing haha.

Honestly, I've been nervous to do almost every step, just due to the fact that figures are unfamiliar territory. I am REALLY happy with him so far.

As for the base, I widened the door way to make an actual door frame, I'm moving the door out a bit and mounting it the way doors are actually hung. The kit is designed in a way that implies an axis is going all the way through the door. I also 3d printed a chest to go next to the door, like in the scene the kit depicts. I'm also printing some castle walls to put in behind the door so I can mount a light to the back of the current wall. I'll add a flickering white and a warm white LED somewhere on the front of the base, so I can alternate between simulating candle/torch light, and electricity.
20200408_214327.jpg
 
I finally got around to painting his eyes. I've been dreading it since day 1. I knew it was the main thing that would make or break the finish, but I'm really happy with the outcome.
20200413_134349.jpg
20200413_141652.jpg


He's fully done now, so it's full steam ahead on the base.
 
This is a great model from Moebius.
Your kit is ok but I think the coat and trausers seem too "new" - they need a more shabby look (just my opinion)
May I ask why did you choose that eye expression and not the semi closed eyes ?

frankenstein.jpg
 
The biggest down side to these kits, is there's no texture molded into any of the fabrics. So trying to rough them up, just doesn't look right. Depending on the scene, he goes from really clean to really dirty up, and there's no real rhyme or reason to it. So in my opinion, clean is the most visually appealing, while it still doesn't convey realism.

As for the head, I went with open, because that's what's available. obviously wasn't sculpted to match the scene. But still an upgrade regardless.
 
Last edited:
Well, well, well.... well...

After what? a month? of nothing but procrasturbation, I've finally picked back up on this. Not to get anyone too excited or anything, but I finally got around to waxing my floor.

Since the figure, and the door, won't be using the holes that were molded in. They need to go. The door will be in a different position, and I cut the mounting pegs off of Franks feet, to angle his toes out a bit.

Nothing really to write home about here, the holes were filled with super duper glue and filed down with an orphan file (I really got sick of dealing with the ******* one) The floors were pre shaded with nato black, then the center of the boards were done with a mix of desert sand and dull red, then misted over with some sky gray, and painted the nails with nato black. All tamiya paints. Then I hit it with some future floor wax and washed it with some AK interactive oil and grime.

With that said, I'm dreading painting the doors with all the stupid bolts sticking out of it. But if I don't get this one done, I'm not allowed to start on my 1:32 Tamiya F4u-1A Corsair :rolleyes:

So the door is next, unless I decide to paint the rock wall first? I'll try and be a little more consistent in progress either way.
 

Attachments

  • 20200504_213702.jpg
    20200504_213702.jpg
    2.4 MB · Views: 128
  • 20200505_111208.jpg
    20200505_111208.jpg
    1.9 MB · Views: 168
  • 20200505_112249.jpg
    20200505_112249.jpg
    4.1 MB · Views: 172
  • 20200505_120154.jpg
    20200505_120154.jpg
    3.7 MB · Views: 132
  • 20200505_161542.jpg
    20200505_161542.jpg
    2 MB · Views: 117
  • 20200505_152607.jpg
    20200505_152607.jpg
    1.6 MB · Views: 134
Last edited:
Well, I've finally made some real progress on the base. The door got the same treatment as the floor, just with some *slightly* different shades. And then.... The bolts... the bolts... On both side of the door. Each one with SEVEN faces on it...

My advice when painting the bolts, (you don't need to take it, but if you don't, you're wrong)

Put on that band you like to listen to, you know, the one you put on when you're driving with your significant other, and then your car just makes that nagging noise. So you turn it up to drown it out.

Then, the secret sauce to the whole process, is paint retarder. Tamiya makes one for their paints and it's amazing. I like to put some paint in one of those disposable shot glasses that people use for mouthwash, then add like two to three drops per tablespoon of paint. Put a splash of rubbing alcohol in it for flavor... Or to bring it to a nice brush-able consistency. I don't judge.

Rush through it, paint all the heads, and then STARTING AT THE FRONT END OF THE DOOR start painting the sides of the bolts. I say start at the front, which is really super important, because as you near the last row, you don't start getting sloppy on the edge people will see the most.

On the back side of the door, get REAL lazy. It's ok to do here, All's you's gotta do, is paint the three faces nearest you. No one will see the back sides of them. So don't waste sanity, or time, painting things people can't see.

As far as the wall goes, I just tried to add a few shades to keep in interesting enough to match the rest, whilst also being not at all interesting enough to take away from the main focus of the kit.

Both of these have been gloss coated, and awaiting filters/washes/dry-brushing
Once these are done, things will get more interesting.
 

Attachments

  • 20200508_205439.jpg
    20200508_205439.jpg
    1.8 MB · Views: 129
  • 20200508_205400.jpg
    20200508_205400.jpg
    1.3 MB · Views: 172
Last edited:
For the crickets that are still following along,

After I finished pretending to work at work all day, I rushed home to get the weathering done on this. The door, like the floor, got AK's oil and grime.
The rock wall, got a few washes of Nato black, and then dry brushed with some "granite grey" (Or as us 'Mericans like to call it "gray")

I got the whole base all mocked up, double checked to make sure my renters insurance was up to date, and then soldered up some led's that I had intended to put in the base to shine up on Frank, only to find that I would have to put my light source about 8" in front of the model to light it the way I pictured. So, looks like I paid my insurance for NOTHING.

Tomorrow I should be able to put the clear flat on, and tidy up any loose ends as far as the build goes. The only other thing this one will be waiting on, is the chest that goes next to the door. I really didn't feel like filling all the layer lines in the one I printed.

I finally dug out my old camera, and replaced the battery charger the ex stole. So I should be able to get some better pictures of the finished product.
 

Attachments

  • 20200509_192828.jpg
    20200509_192828.jpg
    1.4 MB · Views: 102
  • 20200509_210258.jpg
    20200509_210258.jpg
    1.6 MB · Views: 109
  • 20200509_210911.jpg
    20200509_210911.jpg
    1.3 MB · Views: 95
  • 20200509_212517.jpg
    20200509_212517.jpg
    1.4 MB · Views: 123
Last edited:
Well, I spose this one's done enough. Somewhere between my disorganized hobby desk, and my disorganized computer desk, I lost the eyelet for the outer door handle. I'm sure one of these days it'll bug me enough to just make one, and then I'll find it.

I'm really pretty happy with this one. Thanks for the comments.
 

Attachments

  • 20200510_134606.jpg
    20200510_134606.jpg
    1.1 MB · Views: 148
  • 20200510_134057.jpg
    20200510_134057.jpg
    914.9 KB · Views: 134
  • 20200510_134536.jpg
    20200510_134536.jpg
    1.1 MB · Views: 152
  • IMG_0324.jpg
    IMG_0324.jpg
    2.1 MB · Views: 136
Very nice work.

What is going on in the one picture with goop over the head and arms? Is it masking, or something else?

Silly putty! I thought it would be easier to mask his head and arms, than it would be to mask off all his clothes. It. Goes on and comes off easier than liquid mask
 
Excellent work!

I love how much better he looks without green skin.
Me too. They used green makeup so he would look pale on black and white film. When some color photos of him in green face turned up it became cemented as Frankie's color, even though it was never intended to be.

The biggest down side to these kits, is there's no texture molded into any of the fabrics. So trying to rough them up, just doesn't look right. Depending on the scene, he goes from really clean to really dirty up, and there's no real rhyme or reason to it. So in my opinion, clean is the most visually appealing, while it still doesn't convey realism.
Cotton flocking, the stuff used on model car interiors, would help make the clothes look more like fabric. Great job as it is though.
 
Cotton flocking, the stuff used on model car interiors, would help make the clothes look more like fabric. Great job as it is though.

Thank you! I thought about that, but was worried it may look fuzzy. Have you done it? I'd love to see some examples of it. After I get my corsair going, I might do the bride of Frankenstein kit with the both of them.
 
This thread is more than 3 years old.

Your message may be considered spam for the following reasons:

  1. This thread hasn't been active in some time. A new post in this thread might not contribute constructively to this discussion after so long.
If you wish to reply despite these issues, check the box below before replying.
Be aware that malicious compliance may result in more severe penalties.
Back
Top