You are using an out of date browser. It may not display this or other websites correctly.
You should upgrade or use an alternative browser.
You should upgrade or use an alternative browser.
1/24 X-Wing near 100% from scratch
- Thread starter Moska
- Start date
MonsieurTox
Master Member
Top notch work Mosa, that's really impressive !
Actually, only the outer panel of the wing was 1.5 mm on the hero (plexi) while the inner wing was 1 mm (styrene), it's not noticeable though ! :thumbsup
Actually, only the outer panel of the wing was 1.5 mm on the hero (plexi) while the inner wing was 1 mm (styrene), it's not noticeable though ! :thumbsup
Moska
Sr Member
Hi ralpheee, MonsieurTox and NAZGÛL.
Thanks so much for your kind words. I love working with styrene.:love
----------
MonsieurTox.
I've restudied more closely the reference images and, of course, you're absolutely right: 1.5 mm outer panel and 1 mm inner panel.
Oh God! it kills me! but now it's too late to correct it and I'll have to live with it.:behave
I'll keep that in mind when I build the new wings "Pyro" style to copy in resin.
Thank you very much for the warning.:love
Rafa
MonsieurTox
Master Member
Yes that's not important ! I found that the tickness is the hardest thing to figure out when replicating something !
MonsieurTox
Master Member
Yeah :/ The worst area of the ROTJ AT-ST is the thickness of the head panels, it's not even since it's a casting :/
Moska
Sr Member
Well, once put aside the unfortunate affair of the thickness of the wing surfaces ") cry), I've finished placing the details in relief of the outer surfaces of the wings.
cry), I've finished placing the details in relief of the outer surfaces of the wings.
I've also placed the pieces of the wing tips.
I hope not to be wrong again, but I've observed very closely the reference images and I've come to the conclusion that these pieces have a thickness of 1 mm.
I also observed that these parts are not centered vertically but appear to rest on the inner side of the inner surface of the wings. This means that the tips of the wings should stick leaving 1 mm. margin with respect to the inner edge of the wing.
I hope I did the right thing but, in this case, there would be no problem to fix.
Thanks for looking.
Rafa
cry), I've finished placing the details in relief of the outer surfaces of the wings.I've also placed the pieces of the wing tips.
I hope not to be wrong again, but I've observed very closely the reference images and I've come to the conclusion that these pieces have a thickness of 1 mm.
I also observed that these parts are not centered vertically but appear to rest on the inner side of the inner surface of the wings. This means that the tips of the wings should stick leaving 1 mm. margin with respect to the inner edge of the wing.
I hope I did the right thing but, in this case, there would be no problem to fix.
Thanks for looking.
Rafa
Attachments
Moska
Sr Member
Hi peza and Ray22. many thanks for your kind comments
-------------------
I have some doubts that I would like to clarify before continuing my work:
1 - The piece that goes in the rear channel of the wings: I will use the parts from the Hanomag, but now I hesitated whether I will use the correct one. There are two types of similar pieces in the Hanomag (p.16 and p.18) and I've seen that, in other models, has been used sometimes one and sometimes another.
I wonder which one is correct?
2 - Returning to the same piece, I have doubts if it must be placed as it is, or if I have to sand it to create a flat base that fits better in the channel.
3 - The same thing happens with the Sherman machine gun detailing the front sides of the wings. Should I leave it as is, or do I need to sand it for fits better? If not sand it, the barrel will not be properly seated on the base, and will be an uncomfortable gap under it that make it very difficult to copy in resin.
4 - Back in Sherman machine gun, must I keep the little detail that hangs from the barrel, or more correctly remove it?
I'm not asking what's most easy or comfortable. What I want to know is what is more accurate. :confused
Thank you very much for your attention.
Rafa
-... . .- --..
Sr Member
1 - The piece that goes in the rear channel of the wings: I will use the parts from the Hanomag, but now I hesitated whether I will use the correct one. There are two types of similar pieces in the Hanomag (p.16 and p.18) and I've seen that, in other models, has been used sometimes one and sometimes another.
I wonder which one is correct?
For the known hero model rear wing slots:
Red 1 had canisters from the Tamiya 8Rad kit
Blue Leader/Red 2 had part number 16 from the Tamiya Hanomag kit
Red 3 had canisters from the Tamiya 8Rad kit
Red 5 had canisters from the Tamiya 8Rad kit
and the pyro model rear wing slot greeblie cluster patterns and resulting castings had part number 18 from the Tamiya Hanomag kit.
2 - Returning to the same piece, I have doubts if it must be placed as it is, or if I have to sand it to create a flat base that fits better in the channel.
Flat sand it. The ILM modelers flat sanded a lot of the greeblies they used for these models.
3 - The same thing happens with the Sherman machine gun detailing the front sides of the wings. Should I leave it as is, or do I need to sand it for fits better? If not sand it, the barrel will not be properly seated on the base, and will be an uncomfortable gap under it that make it very difficult to copy in resin.
Flat sand it. The ILM modelers flat sanded a lot of the greeblies they used for these models.
4 - Back in Sherman machine gun, must I keep the little detail that hangs from the barrel, or more correctly remove it?
Keep it. Sometimes this part disappears as a bubble in the casting, but it's visible in a large number of the reference photos I have.
Really enjoying your incredible scratch build Rafa! :love
Last edited:
Moska
Sr Member
Hi -... . .- --...
Thank you very much for your help.
Your answers are very helpful. It's exactly what I needed to know, and I'm glad that the IL&M boys do things logically.:love
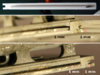
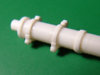
Are these the Tamiya 8Rad parts I need? (see image)
If yes, Would someone be so kind to share some photos of these pieces with good resolution? Please.
Thank you very much again. I'm so glad you enjoy following my progress.
Rafa
Thank you very much for your help.
Your answers are very helpful. It's exactly what I needed to know, and I'm glad that the IL&M boys do things logically.:love
Are these the Tamiya 8Rad parts I need? (see image)
If yes, Would someone be so kind to share some photos of these pieces with good resolution? Please.
Thank you very much again.
I'm so glad you enjoy following my progress.Rafa
Attachments
3d-builder
Sr Member
Just looked back through this thread.....awesome work!:thumbsup
Moska
Sr Member
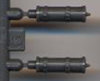
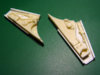
Thanks to the generous support of -... . .- --.. I have my scratched version of the Tamiya 8Rad part, and this is definitely the one I will use in my model.
This has forced me to change the depth of the wings rear channel as it was designed to use the Hanomag parts and, therefore, was deeper than I need to use the 8Rad parts.
The channel depth on the end of wing was correct but the on the wing startup I had to reduce their depth in 1.5 mm. For this, I cut new channel bases of 1.5 mm. and carved wedge-shaped with a blade to refine them at their ends towards the wing tip, leaving a very thin end zone of about 0.2 mm.
The goal is to get the 8Rad parts protrude from the channels as in the reference images.
Once I returning to work in those rear channels, I have taken the opportunity to also reduce the thickness of the walls, achieving a thickness of 1 mm. only in the inner panel of the wings and not 1.5 mm. that I mistakenly gave them.
Thanks for looking.
Rafa
Attachments
Moska
Sr Member
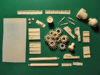
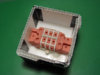
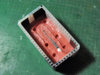
Hey people.
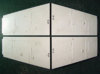
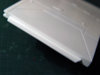
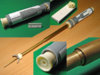
It's been over a month since my last post, but don't you think I've abandoned my model. Quite the contrary. Actually I have been very busy these past few weeks preparing my pieces to make molds, making resin copies, soldering brass tubes ...
The idea of being able to make copies of all my pieces makes the work more complicated than I expected. But, well, I keep going.
I found interesting the type of plastic that I used to make the molds boxes. It's the first time I use this stuff and think it's a good find because it makes the work easy. It is a cheap material, is easily cut, is also folded very easily, and is more than sufficient strength for this application.
Again, I got this material through my friend who works at a signage company.
I hope any of you can check it and find it as useful as it has been for me.
Here I show you a few pictures of my latest progress.
Thanks for looking.
Rafa
Attachments

Just amazing Rafa. Its still hard to comprehend, you making all these "donor" parts from styrene......you have some patience bud.
Mold boxes, ive pretty much started out casting, but i find using Lego the simplest method for me, though your corrugated board seems to work like a charm!
lee
Mold boxes, ive pretty much started out casting, but i find using Lego the simplest method for me, though your corrugated board seems to work like a charm!
lee
MonsieurTox
Master Member
That's stunning Rafa ! Once finished noone could tell it's not the original kitparts !
Similar threads
- Replies
- 15
- Views
- 2,409