You are using an out of date browser. It may not display this or other websites correctly.
You should upgrade or use an alternative browser.
You should upgrade or use an alternative browser.
1/24 X-Wing near 100% from scratch
- Thread starter Moska
- Start date
jawsmodels
Sr Member
Awsome scratch building.
:eek :eek :eek :eekRafa, you're just a whizz on that mini lathe of yours mate!. Just absolutely WOW work. Those cannon pods are stunning. I think you will get more satisfaction from seeing this build mostly scratched yourself, rather than any resin kit just put together.
Stu
Stu
jedimaster
Sr Member
I bet you turn your own toothpicks right?
Sir,
Mad, mad, mad skills.
Just the amount of time and effort for the smallest of pieces, be it research or manufacture is truely inspiring.
May i ask what you do for a job because if you are not a craftsman of some description, you definately should be my friend, as i said in the beginning, MAD, MAD Skills.
Also, are you taking molds of the sub assemblies, so in the future you can complete the whole squadron?
A full set of Red squadron X-Wings would look awesome together.
Keep up the astounding progress.
The Nylon Gag
(Fellow scratcher)
Moska
Sr Member
Hi NAZGÛL, Talkierg, Ryder and omes72.
Many thanks for your kind words and support. I'm very glad you like my work.")
Hi Stu.
You can be sure. The pleasure of building a model, making all the necessary parts by yourself, isn't comparable to that of building a commercial kit. The work is long, but the satisfaction is worth it.:cheers
Best wishes.
Hi jedimaster.
Of course. I always carry my mini lathe in my pocket.:lol
Hi TheNylonGag.
Many thanks. You're very gentle.
My "official" job is graphic designer, but I'm much happier building models.
I have the intention to make all the molds needed to build more than one model. Are being too many months and I think it's worth to get more out of all this work and to have the possibility to make several models.
--------------
Currently working on the wings, but I postponed the work when I realized I need an astromech droid.
These astro-droids are getting quite out of hand.
New updates coming soon…
Best regards.
rafa
Many thanks for your kind words and support. I'm very glad you like my work.
:eek :eek :eek :eekRafa, you're just a whizz on that mini lathe of yours mate!. Just absolutely WOW work. Those cannon pods are stunning. I think you will get more satisfaction from seeing this build mostly scratched yourself, rather than any resin kit just put together.
Stu
Hi Stu.
You can be sure. The pleasure of building a model, making all the necessary parts by yourself, isn't comparable to that of building a commercial kit. The work is long, but the satisfaction is worth it.:cheers
Best wishes.
I bet you turn your own toothpicks right?
Hi jedimaster.
Of course. I always carry my mini lathe in my pocket.:lol
Sir,
Mad, mad, mad skills.
Just the amount of time and effort for the smallest of pieces, be it research or manufacture is truely inspiring.
May i ask what you do for a job because if you are not a craftsman of some description, you definately should be my friend, as i said in the beginning, MAD, MAD Skills.
Also, are you taking molds of the sub assemblies, so in the future you can complete the whole squadron?
A full set of Red squadron X-Wings would look awesome together.
Keep up the astounding progress.
The Nylon Gag
(Fellow scratcher)
Hi TheNylonGag.
Many thanks. You're very gentle.
My "official" job is graphic designer, but I'm much happier building models.
I have the intention to make all the molds needed to build more than one model. Are being too many months and I think it's worth to get more out of all this work and to have the possibility to make several models.
--------------
Currently working on the wings, but I postponed the work when I realized I need an astromech droid.
These astro-droids are getting quite out of hand.
New updates coming soon…
Best regards.
rafa
Moska
Sr Member
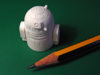
Well, here is finally my R2 unit.
This little b*st*rd has taken me quite a lot of hours to complete, but now I'm satisfied with the outcome.
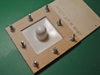
First I started thermoforming a sheet of styrene, using as master a marble attached to a tube. I must say I don't have a vacuum forming machine, but I manage to build a simple rigid cardboard frame that holds the styrene plate. Then I heat up the styrene in the oven in my kitchen and then I press it down over the master, with the help of some pipe or container having a mouth diameter similar to that I need.
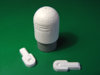
In my first attempt I wanted to go too fast and didn't take good references from the proportions of the R2 head, so that first head only helped me to practice the detailing work, and this first attempt was tried, convicted and sentenced to beheading.:behave
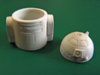
A second head was the final, and I spent many hours carefully scribing all the panel lines and creating all the details to give life to my astro-droid. Hope you like.
Next… wings.
Thanks for looking.
Rafa
This little b*st*rd has taken me quite a lot of hours to complete, but now I'm satisfied with the outcome.
First I started thermoforming a sheet of styrene, using as master a marble attached to a tube. I must say I don't have a vacuum forming machine, but I manage to build a simple rigid cardboard frame that holds the styrene plate. Then I heat up the styrene in the oven in my kitchen and then I press it down over the master, with the help of some pipe or container having a mouth diameter similar to that I need.
In my first attempt I wanted to go too fast and didn't take good references from the proportions of the R2 head, so that first head only helped me to practice the detailing work, and this first attempt was tried, convicted and sentenced to beheading.:behave
A second head was the final, and I spent many hours carefully scribing all the panel lines and creating all the details to give life to my astro-droid. Hope you like.
Next… wings.
Thanks for looking.
Rafa
Attachments
You can almost hear the little fella beeping,
brilliant
Gag
brilliant
Gag
Unreal Rafa!. Best small scale Astromech Iv'e ever seen IMO.
To get all the details & scribing looking so good is no mean feat, but you have pulled it off & some!.
Good idea taking molds off your parts Rafa, you can build a whole squadron at your leisure then.
Stu
To get all the details & scribing looking so good is no mean feat, but you have pulled it off & some!.
Good idea taking molds off your parts Rafa, you can build a whole squadron at your leisure then.
Stu
Moska
Sr Member
Hello friends.
Thank you very much for your kind words.
Your support gives me strength to continue this project, trying to do my best.
My work on the wings going very well, but I must stop progress because all next week I will be away from home. Resting in the countryside with cows, goats ... and without even a bit of styrene in my hands.:unsure
My next update will be later this month.
I assailed by doubts: Should I carve a 1/24 Kenny Baker to put him into my R2-D2?:lol
Be happy.
Rafa
Moska
Sr Member
Hi Dao2, ralphee, NAZGÛL and Deadmike.
I'm so glad you like my R2. It took many hours, but it was worth it.
Thank you very much for your support.
------------
With some delay, but the update is here as promised.
The truth is I've been very busy constructing the wings of my model, a process that I found it fascinating, rewarding and fun.
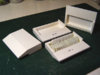
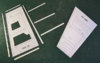
Picture 1 - The first thing I built were the panels detailing the walls of the wells of the motors: 4 wells / 8 walls / 16 pieces each panel = 128 bits of styrene. :wacko
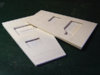
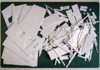
Picture 2 - The construction of the wings and the boxes that house the engines were previously planned using the 3D application Google SketchUp. From this preplanning I got all the parts needed to be cut from 1 mm. sheet styrene. In this picture you can see all the pieces already cut and still retaining the printed paper that serves me as cutting, paneling and detailing guide. (Yes, a lot of pieces and a lot of work to cut them one by one). :wacko
Picture 3 - In this first version, my purpose is to construct the wings at "hero" style, leaving the internal openings of the wings without walls, so I plan the construction including internal reinforcements to make the wings more resistant, but taking good care that these reinforcements were not visible once assembled all the pieces.
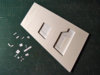
Picture 4 - I have to confess that I made a mistake by cutting the top and bottom main surfaces of the wings in 1 mm styrene. Once a first trial was done, I found that these pieces were too thin, and that really should have a thickness of 1.5 mm. :behave
To correct this error I glued pieces of 0.5 mm thick by the inner part of the apertures (A), in the inner central area of the other half of the wings (B) and on the inner side of the walls of the rear trenches of the wings (C).
Picture 5 - Once fully assembled the wings, the repair is not seen at all and the result is optimal.
Despite wanting to build a "hero" style wings, I took the liberty of placing an inner wall on the side of the openings that goes closest to the fuselage of the ship. The truth is that I prefer the trapezoidal piece rests on a background wall, and not that this gap remains empty (I hope purists can forgive me). :unsure
Picture 6 - The construction of the boxes of the engines was very good and I didn't find any problems. In this picture you can see that I checked that interior detailing parts and motors fit properly into the socket.
Picture 7 - This is how the union of the wings and engines boxes will be, with only a small union line easy to eliminate with putty.
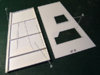
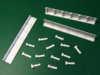
Picture 8 - The small relief panels that complete the detailing on the main surfaces of the wings are different in each of them, and I carefully copied it from the reference images of the RED-3 model availables on the website "modelermagic.com ".
I drew and numbered all these little panels and them cut on 0.4 mm styrene. To accurately place them in their proper places, before removing the printed paper I punched the corners of every detail on the surfaces of the wings. If you look good in the picture you can see these marks made with the punch inside the openings of the wing.
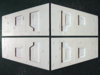
Picture 9 - The four wings already completed by its inner side.
Thanks for looking.
Rafa
I'm so glad you like my R2. It took many hours, but it was worth it.
Thank you very much for your support.
------------
With some delay, but the update is here as promised.
The truth is I've been very busy constructing the wings of my model, a process that I found it fascinating, rewarding and fun.
Picture 1 - The first thing I built were the panels detailing the walls of the wells of the motors: 4 wells / 8 walls / 16 pieces each panel = 128 bits of styrene. :wacko
Picture 2 - The construction of the wings and the boxes that house the engines were previously planned using the 3D application Google SketchUp. From this preplanning I got all the parts needed to be cut from 1 mm. sheet styrene. In this picture you can see all the pieces already cut and still retaining the printed paper that serves me as cutting, paneling and detailing guide. (Yes, a lot of pieces and a lot of work to cut them one by one). :wacko
Picture 3 - In this first version, my purpose is to construct the wings at "hero" style, leaving the internal openings of the wings without walls, so I plan the construction including internal reinforcements to make the wings more resistant, but taking good care that these reinforcements were not visible once assembled all the pieces.
Picture 4 - I have to confess that I made a mistake by cutting the top and bottom main surfaces of the wings in 1 mm styrene. Once a first trial was done, I found that these pieces were too thin, and that really should have a thickness of 1.5 mm. :behave
To correct this error I glued pieces of 0.5 mm thick by the inner part of the apertures (A), in the inner central area of the other half of the wings (B) and on the inner side of the walls of the rear trenches of the wings (C).
Picture 5 - Once fully assembled the wings, the repair is not seen at all and the result is optimal.
Despite wanting to build a "hero" style wings, I took the liberty of placing an inner wall on the side of the openings that goes closest to the fuselage of the ship. The truth is that I prefer the trapezoidal piece rests on a background wall, and not that this gap remains empty (I hope purists can forgive me). :unsure
Picture 6 - The construction of the boxes of the engines was very good and I didn't find any problems. In this picture you can see that I checked that interior detailing parts and motors fit properly into the socket.
Picture 7 - This is how the union of the wings and engines boxes will be, with only a small union line easy to eliminate with putty.
Picture 8 - The small relief panels that complete the detailing on the main surfaces of the wings are different in each of them, and I carefully copied it from the reference images of the RED-3 model availables on the website "modelermagic.com ".
I drew and numbered all these little panels and them cut on 0.4 mm styrene. To accurately place them in their proper places, before removing the printed paper I punched the corners of every detail on the surfaces of the wings. If you look good in the picture you can see these marks made with the punch inside the openings of the wing.
Picture 9 - The four wings already completed by its inner side.
Thanks for looking.
Rafa
Attachments
-
 8 wing relief details.jpg206.8 KB · Views: 535
 -
 7 box-wing union.jpg155.7 KB · Views: 641
 -
 6 engines boxes.jpg161.3 KB · Views: 668
 -
 5 wing inner wall.jpg150.1 KB · Views: 544
 -
 4 wings thicknessing.jpg128.6 KB · Views: 562
 -
 3 wing reinforcements.jpg199.2 KB · Views: 554
 -
 2 wings and boxes parts.jpg184.7 KB · Views: 599
 -
 1 wells walls.jpg154.4 KB · Views: 517
 -
 9 wings inner side.jpg291.6 KB · Views: 682
Similar threads
- Replies
- 15
- Views
- 2,410