You are using an out of date browser. It may not display this or other websites correctly.
You should upgrade or use an alternative browser.
You should upgrade or use an alternative browser.
1/144th Prometheus scratch build
- Thread starter TheNylonGag
- Start date
Ello,
Well, what can i say.
Squeezed a few hours in
Had to adapt a few things,
But
I made some progress
Ready, is everyone in, this is a small update, about 10,1/2 hours at the bench
Lets go
During my sick time i spent some dough

10" Bench top pillar drill, 18 pcs hole saw set including arbour, 3 piece step drill set from 1/16" to 3/4" in 1/16" steps, including delivery.
Guess, go on guesss.
$93, thats 58 quid, for the lot.
Then i tidied up the cave


Then it was back to the Prometheus
Engines build up.
Cut out all pieces for the bottom nozzel assembly

Had to use sizzors instead of a knife
Did three sets

Top rings

Sides and top ring fitted and trimmed

Three done

Fiddled with this for a night and managed to fit the front wing

Outer nozzel covers

Rough Trimmed

Inners glued and basic shaped

Action shots


Thats about the story so far.
Just wanted to thenk all the people who supported me though my wrist malfunction
Your support and kind words ment alot to me.
Thank you friends
Gag
Tony
Toe
Well, what can i say.
Squeezed a few hours in
Had to adapt a few things,
But
I made some progress
Ready, is everyone in, this is a small update, about 10,1/2 hours at the bench
Lets go
During my sick time i spent some dough
10" Bench top pillar drill, 18 pcs hole saw set including arbour, 3 piece step drill set from 1/16" to 3/4" in 1/16" steps, including delivery.
Guess, go on guesss.
$93, thats 58 quid, for the lot.
Then i tidied up the cave
Then it was back to the Prometheus
Engines build up.
Cut out all pieces for the bottom nozzel assembly
Had to use sizzors instead of a knife
Did three sets
Top rings
Sides and top ring fitted and trimmed
Three done
Fiddled with this for a night and managed to fit the front wing
Outer nozzel covers
Rough Trimmed
Inners glued and basic shaped
Action shots
Thats about the story so far.
Just wanted to thenk all the people who supported me though my wrist malfunction
Your support and kind words ment alot to me.
Thank you friends
Gag
Tony
Toe
CyberGolem
Active Member
Yessssss!!
SmilingOtter
Master Member
Even in their early stages, the engines look awesome.
Glad you're recovering well, and I look forward to more progress shots.
Glad you're recovering well, and I look forward to more progress shots.
So glad to see an update! I like your new toys, can't wait to see what you do with them.
Caretaker10
Active Member
It's good to see you back at work Gag...
Nice progress as usual.
How's the wrist?
Nice progress as usual.
How's the wrist?
Vacformedhero
Sr Member
Welcome back, a wrist injury for an artist is a serious problem, and you are creating art......glad your at it again
the DOCTOR
Sr Member
Phew! All is right with the world, Gag's back in his cave!
")
Last edited:
yuumi2891103
Master Member
What a wonderful world!!
Your golden hands are recovered!!
I can see you work again.
YOU ARE NUMBER ONE!!
I really wish all the best things happen to you.
katsu
ps. I wanna one of those drill.:eek
Your golden hands are recovered!!
I can see you work again.
YOU ARE NUMBER ONE!!
I really wish all the best things happen to you.
katsu
ps. I wanna one of those drill.:eek
Welcome back old boy. So glad to see you here. How's the wrist holding up? All good?
Thank you everyone so much for your comments and for visiting
Still have pain, but, by cricky we are gunna finish this thing with or without pain.
The wrist has its limitations but i am adapting well to my new situation.
But
On ward my friends
PIX
Hope you have all recovered from my action shots.
Filled with bondo......

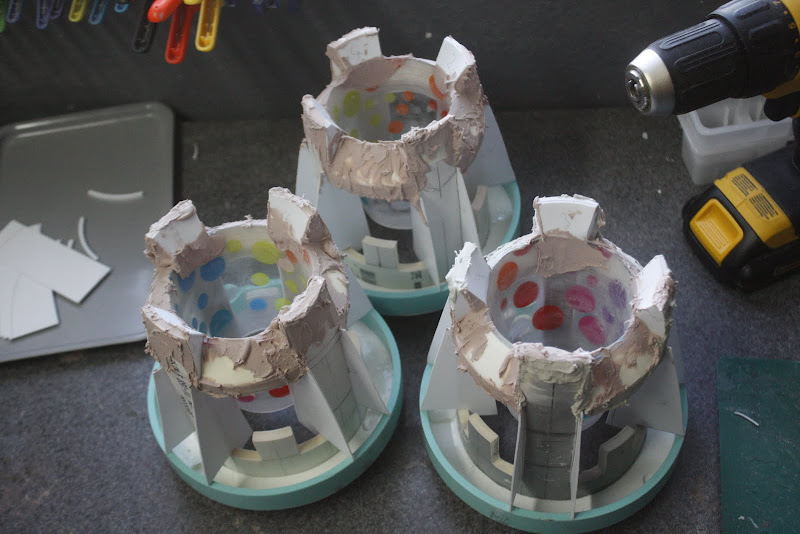
Three, everything is three at the mo......
Sanded......

Three........main engine bodies

Covered the outsides and sanded all nice like

Started molding the outer rings, inner and outer are the same

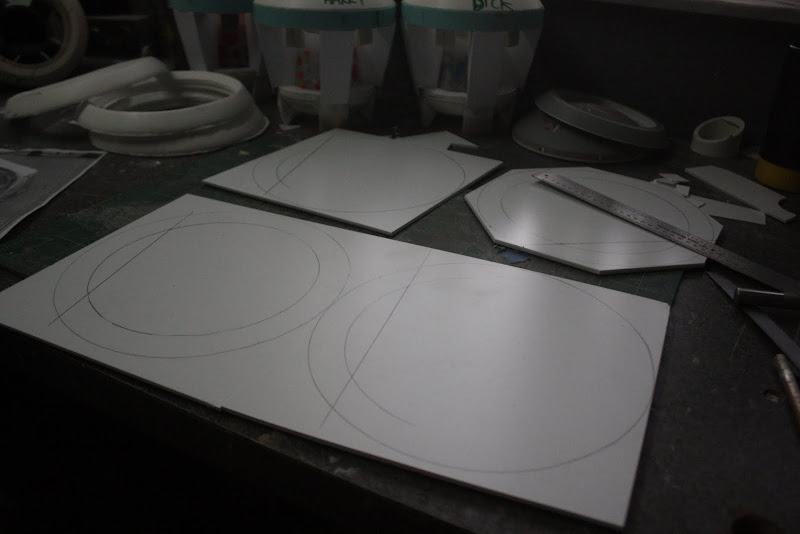
Now we're doin eights

Marked

Rough cut

Four, yes four inner walls
Glued inner wall to outer inside ring, i think.....only one this time......to test

Cut bottom bit off

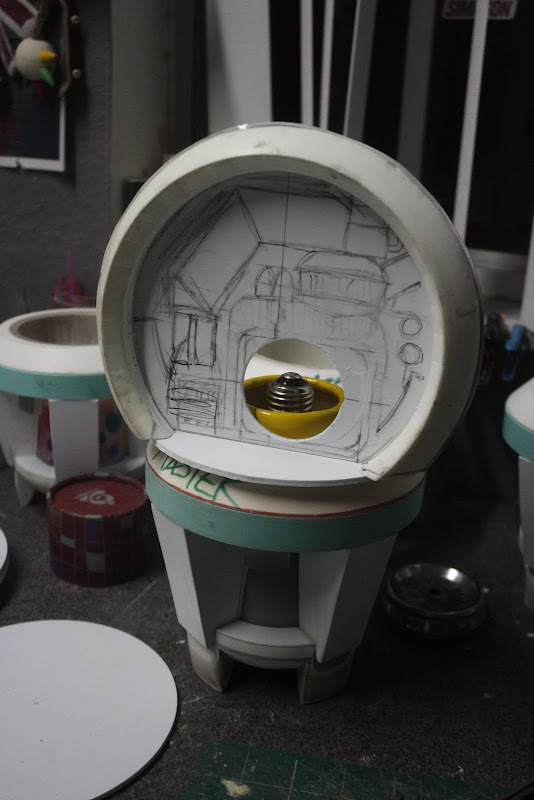
Moved on next to the inner workings of the engine, lights and sum such.....
1,000,000 watt LED spot light, i plan to use a dimmer.....i think.

Cut hole in tube with cap to hold 1,000,000 watt LED bulb

So......


1 million watts, watch your eyes people

Dry fit in the main engine body


Cut support for outer wall

dry fit.......again

Very rough sketch of detail positions

Dry fit.............again

Hole saw action

Hole by saw

Final Dry fit
Thats the story so far
Definately more to come
Still making it up as i go
Hope you are having as much fun as me
Its good to be back in the groove baby
Gagster
OUT
Still have pain, but, by cricky we are gunna finish this thing with or without pain.
The wrist has its limitations but i am adapting well to my new situation.
But
On ward my friends
PIX
Hope you have all recovered from my action shots.
Filled with bondo......
Three, everything is three at the mo......
Sanded......
Three........main engine bodies
Covered the outsides and sanded all nice like
Started molding the outer rings, inner and outer are the same
Now we're doin eights
Marked
Rough cut
Four, yes four inner walls
Glued inner wall to outer inside ring, i think.....only one this time......to test
Cut bottom bit off
Moved on next to the inner workings of the engine, lights and sum such.....
1,000,000 watt LED spot light, i plan to use a dimmer.....i think.
Cut hole in tube with cap to hold 1,000,000 watt LED bulb
So......
1 million watts, watch your eyes people
Dry fit in the main engine body
Cut support for outer wall
dry fit.......again
Very rough sketch of detail positions
Dry fit.............again
Hole saw action
Hole by saw
Final Dry fit
Thats the story so far
Definately more to come
Still making it up as i go
Hope you are having as much fun as me
Its good to be back in the groove baby
Gagster
OUT
CyberGolem
Active Member
This is exciting, inspiring and overwhelming ... all at once.
Constantine
Well-Known Member
Luv the ingenuity and dedication, great work!
yuumi2891103
Master Member
One of the most exciting scene would be seen soon.
GAG! your work makes mine a toy stuff! :facepalm
katsu
GAG! your work makes mine a toy stuff! :facepalm
katsu