1/1000 PHASE II Enterprise

There were two inherent problems, in this case: 1) This is a resin kit, so plastic-welding glues wouldn’t work; 2) During my original construction of the kit, I’d failed to notice that the stock UGH! Models pylons were too long and inaccurate. So, I had to cut and Dremel them out, shorten them, and reinstall them. They came with metal rods already embedded in them, but those were cut during the removal process. They clearly needed additional strength, but I only discovered this the hard way, after I was already into painting.
Understood: Devcon "Plastic Welder" is more like an epoxy only not as brittle (dunno why they call it "plastic welder"). I've used it successfully on resin with no issues, and it holds really well:

e7338a53-eaa6-44f1-8214-6536b60b27ce_1.f648b474740077fc24344a159c710087.jpeg


As you can see, it bonds a lot of stuff (as I found in use, that includes resin). I suggest it because it cures in 4 minutes and handles in 1 hour (JB Weld seems to take forever!).

As for the pylons: OUCH!!! That had to be a royal pain for you (especially finding this out during painting!).
 
Understood: Devcon "Plastic Welder" is more like an epoxy only not as brittle (dunno why they call it "plastic welder"). I've used it successfully on resin with no issues, and it holds really well:

View attachment 1599100

As you can see, it bonds a lot of stuff (as I found in use, that includes resin). I suggest it because it cures in 4 minutes and handles in 1 hour (JB Weld seems to take forever!).

As for the pylons: OUCH!!! That had to be a royal pain for you (especially finding this out during painting!).


Thanks for the tip!

I seem to recall that I actually used JB Kwik, initially, which isn't is strong and has more of a rubbery feel than proper, 24-hour-cure JB Weld. The reason I went with Kwik was so I could keep the pylons aligned by hand as the epoxy quick-set, because I didn't have a jig or anything else to support them. Unfortunately, the late, lamented UGH! didn't design the pylons to key very securely into the secondary hull, and my mods required something a little more radical.

But the combination of the brass rods with JB and Apoxie Sculpt (which also cures rock-hard) has resulted in what appears to be a solid connection. The problem was having enough rigidity for the model to support itself while upside-down on a table for paint/decals. That shouldn't be an issue, now.
Ah, gotcha! I used both the kwik-set and regular on a project and did not like them at all. I've heard good things about Apoxie-sculpt though; I'll have to try it out sometime!

I also looked up the UGH! Phase-II Enterprise model ki; this is the one, right?
 
Detail painting is pretty much done. Still needs some touch ups of the base hull color on the pylons and a few other spots. Painted steel on the nacelle grilles and details, and a custom medium-gray mix for the linear accelerator.

Once the paint cures, I’ll do a wash to highlight the nacelle details. Maybe a smidge of pastel chalk weathering, which will also tone down the shine and provide more contrast.

Still need to mold and cast the nacelle front endcaps, too. But we’re getting closer.


Here are some quick and dirty photos.

95BA4BE5-F45B-4F3C-AA84-B446F83CE26D.jpeg
CC30CA5C-94EB-4558-A055-0FCB9B8CEB0C.jpeg
 
Looks great just like that.


As noted, she still needs work, but I’m very pleased with how she’s shaping up. A few little things nag at me, but those are the result of having to rebuild my initial version of the model, and my having to modify and scratchbuild certain details.


And, as before, I’ve tended to agree with Shaw’s thoughts on paint and decaling. I left the impulse engines hull-colored, since they would have been using the 33-inch TOS model as a reference. And I’m sticking with the sans-serif “1”s on the registry decals, since that’s what was on the closeup model of the secondary hull docking port that Brick Price and and his team built.

Still on the fence about weathering, though. Ah, well. Still time to decide.
 
Skimming through my references while thinking about the finer details, and I figured I’d share some thoughts:

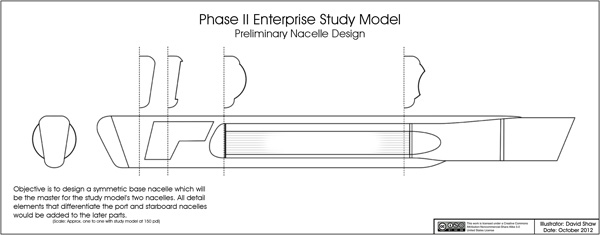
As Shaw noted during his extensive research on the PHASE II design, a great many fan-made models (both CG and physical) had tended to take elements of the TOS and/or TMP designs and apply them to the overall design seen in the PHASE II blueprints to fill in the gaps.

Of course, it wasn’t until Shaw’s research and his fabulous study model that we really got an accurate sense of what this ship was gonna look like. And, even now, there are still gaps in data which remain. The studio model was supposedly pretty far along when the project morphed into THE MOTION PICTURE, with paint and decals waiting in the wings. Yet, to this day, no photos of the model in its later stages have ever publicly surfaced. Just test assemblies of the unfinished masters.

Anyway, ever since Shaw’s work came along, his version has essentially been codified as the default PHASE II design, with variants appearing here and there as other artists have interpreted various aspects of it.

Here are two examples for comparison: The digital model (top) created to promote the Eaglemoss miniature replica of the ship, and the fan art (bottom) of VFX artist Marc Bell (https://www.artstation.com/artwork/D5xdD9).


In this top view, you can see how the Eaglemoss model adds TMP-style running lights to the rear of the nacelles and to the saucer, whereas Bell’s model uses the round TOS bow light on the saucer, and has no lights on the rear of the nacelles. Both also use variations on the TOS’s saucer’s “rust ring”, but the Eaglemoss model has six concentric gridlines on the saucer (as per the Price/Loos studio model), while Bell’s model has only has five (as per the PHASE II blueprints). The Eaglemoss model also uses the TMP’s saucer’s number/spacing of radial gridlines, which does not match either the PHASE II blueprints or the studio model.


CDD8F1D7-E701-40CB-9A9D-88D6A8CC4464.jpeg
086EFF53-664A-4E32-AD72-D1E69F76A1F7.jpeg


In this view, you can see how both models misinterpret the blueprints, and add raised rectangular shapes next to the upside-down “L” vents on the front of each nacelle, rather than the indented areas of the Price/Loos and Shaw models.

And of course, both models make the key mistake of slapping the TOS sensor/deflector dish (complete with antenna spike) onto the front of the secondary hull, which was not at all Jefferies’ intent. Bell’s model gets it closer, but still lacks the proper bowl design of Jefferies’ PHASE II dish, and adds that TOS-style antenna.

D05A1240-3163-4B43-8BF8-7A8810807EC5.jpeg
3FC20451-7DAE-4EDD-8E00-AA0A9A7CF8F3.jpeg


And, in this view, we can see that both models get the shape of the weapons assembly at the base of the dorsal wrong, pushing it much more toward the boxy look of the TMP Refit’s torpedo tubes, rather than the merged cylinders of Jefferies’ PHASE II design.

Also note the TMP-style rings on the lower saucer sensor domes of both models, the dark coloration of the rear of each nacelle grille trench on both models (which gives them a TMP look, rather than Jefferies’ concept of the grilles as a metallic silver-ish color), and the TOS-style red/green formation lights on the rear fronts of the nacelles, as well as the clusters of three marker lights (top/bottom/rim) on either side of the saucer.


FFE8CC56-717C-4D67-B11D-F46B641EA6D3.jpeg
180EC1C3-C505-4C9F-8144-0D4FB14EEC6E.jpeg


For all intents and purposes, designs like these have basically ripped off—er…been inspired by the Shaw study model’s overall look and then made a few minor tweaks. Each version has its interesting points, although many of the little choices clearly move the design away from what was actually intended for the PHASE II model.

Still, it’s really neat to see these far more accurate versions of the design floating around out there. For a long time, there was just so very little info to work with in regards to this fascinating “What if?” ship (and show) that almost happened. Most fan-made versions of the ship would tend to use the Mike Minor production art (among other things) as a general guide, and then add in a bunch of TMP Refit elements to fill in the gaps.
 
Last edited:
And of course, the unfinished model pics courtesy of Memory Alpo:
Aridas is a king among nerds. SHIPS OF THE STAR FLEET may just be the greatest unofficial/fanon technical manual ever.
I looked at his stuff on Cygnus-x1 but didn't find his version:


Also, I found out what happened to the Phase II model:

(yeah, I saw you in that topic, Gregatron! :D )
 
I suppose I’ll let the cat out of the bag, too: This is a dual build. After nearly 20 years, and a whole bunch of the 1/1000 Polar Lights kits, I’m finally—FINALLY—building the production-style TOS Enterprise. Complete with superdetailing, penciled gridlines, and a color scheme/weathering based on the Smithsonian restoration. She’s a bit further along than the PHASE II, and nearly ready for decals. I’ve been bouncing between the two models for weeks, doing a little bit on each.

It only seemed appropriate to build both iterations of the ship simultaneously, given the similarities in color scheme and detailing, instead of doing them one at a time.

After these builds are complete, I’ll have essentially reached the mountaintop—all three versions of the TOS ship, PHASE II, the Refit, the destroyed Refit, 1701-A, and all of the other TOS Constitutions. I was planning to save the production Enterprise for last, but I go where the modeling gods blow. All that’ll be left to do is Excalibur, and to finish a half-built I.S.S. Enterprise.


Again, some quick and dirty photos:


043E0E57-917A-43B8-82F5-5E01E4C1042D.jpeg
3FEF3CFE-F9C9-47BE-A027-005BE0C7F083.jpeg
 
Getting close, now. Just a few touchups and details, then I can glosscoat for decals. While I'm still waiting on silicone rubber to mold the nacelle front ends, the endcaps can be cast and attached at any time, so I don't have to wait for the rubber to arrive to continue the build.

I also have to say that I'm very pleased with how the steel-painted areas have turned out. Depending on the lighting, they can look very shiny/metallic (and almost blend into the hull color) or very dark and contrasty, the latter of which I was hoping for. The washes really helped with that, and also to get the detailing to pop.

Still thinking about those nacelle chinguards, though. They ARE marked with "x"es on the blueprints, which usually means "omit". And Shaw admitted during his own build that he wasn't sure how to handle them in regards to whether they would have been on the filming model (although he put them onto his own study model, since that model was more representative of Jefferies' plans, rather that the Price/Loos studio model).
 
I suppose I’ll let the cat out of the bag, too: This is a dual build. After nearly 20 years, and a whole bunch of the 1/1000 Polar Lights kits, I’m finally—FINALLY—building the production-style TOS Enterprise. Complete with superdetailing, penciled gridlines, and a color scheme/weathering based on the Smithsonian restoration. She’s a bit further along than the PHASE II, and nearly ready for decals. I’ve been bouncing between the two models for weeks, doing a little bit on each.

It only seemed appropriate to build both iterations of the ship simultaneously, given the similarities in color scheme and detailing, instead of doing them one at a time.

After these builds are complete, I’ll have essentially reached the mountaintop—all three versions of the TOS ship, PHASE II, the Refit, the destroyed Refit, 1701-A, and all of the other TOS Constitutions. I was planning to save the production Enterprise for last, but I go where the modeling gods blow. All that’ll be left to do is Excalibur, and to finish a half-built I.S.S. Enterprise.


Again, some quick and dirty photos:


View attachment 1601801View attachment 1601802
The Smithsonian restoration (the good one) is where I took cues for both my 1/1000 and my 1/650 AMT versions. :D
 
The Smithsonian restoration (the good one) is where I took cues for both my 1/1000 and my 1/650 AMT versions. :D

On a related note, we have to remember just how spoiled we now are when it comes to the Enterprise. For many, many years, the finer details were shrouded in mystery, partly due to lack of reference, and partly due to the early Smithsonian restorations, which replaced missing parts, removed most of the weathering, and applied new paint.

For decades, those nacelle domes were believed to be red, most people thought the ship was perfectly clean, and the existence of the penciled gridlines was hotly debated. Everyone had their copies of the Franz Joseph plans and the STAR FLEET TECHNICAL MANUAL, and the most accurate plans of the studio model to be found were Allen Everhart’s.

It was during this era that the PHASE II ship was designed, which is why it wouldn’t have been such a leap for the design to come across as the TOS ship with new engines and a few other tweaks. The changes in proportion and shape would have been right in line with something like the Franz Joseph plans, which were closer to the look of the AMT kit than the 11-foot studio model. It really wasn’t until years later that we started to get a better sense of what the studio model actually looked like, to the point that all of those earlier blueprints and fan interpretations were actually listed as entirely different classes and sub-classes of starships by fan-works like the aforementioned SHIPS OF THE STAR FLEET.


And, of course, the PHASE II design has been far more of a mystery for all these years. It really wasn’t until David Shaw’s deep-dive into it that the actual intended look of the ship became known. Sure, there were lots of cool fan interpretations of the available blueprints and under-construction photos, but the majority of them just applied TMP-ish details to fill in the blanks. Up to and including the UGH! resin kit that my own model is being built from.

For example, Dennis Bailey’s…

1CF29886-8F3E-426C-A399-B915EE9DCB65.jpeg


…and Daren Dochtermans’s (made for the NEW VOYAGES/PHASE II fanfilms), which went so far as to include the staggered saucer rim windows from the STAR TREK- THE MOTION PICTURE teaser poster artwork:

CCA360F4-E6E9-4B98-88FF-4B64B599D6C2.jpeg
 
Last edited:
Back
Top