1:1 Millennium Falcon Cockpit Replica - Group Build

Hi Gang,

Weekend Update!

Saturday started off in one direction with the new corridor wall panel. By Sunday I was heading in a totally new but much better direction. And away we go...

The capstone panel continues to get attention
20170909_102914_zpstrpbo7xy.jpg


20170909_102922_zpsgklwz4ga.jpg


20170909_102940_zpswyeyzxzc.jpg


20170909_115228_zps3ewlyrur.jpg


20170909_115258_zpscqxew32h.jpg


20170909_115312_zpspzgedlxn.jpg


20170909_115340_zpskob7e85c.jpg


20170909_115345_zpshahtrwwm.jpg


Primer
20170909_115953_zpspk4cs630.jpg


Lots of primer and lots of greeblies!
20170909_140326_zpsj2dyz1ju.jpg


20170909_140333_zpswfabckrl.jpg


20170909_140337_zpsnaiwrnb7.jpg


20170909_140419_zpsnyaphcia.jpg


20170909_140434_zpskjjeuvc1.jpg


20170909_140454_zpsaxktb9wv.jpg


Paint!
20170909_145813_zps7ti3ejll.jpg


20170909_145826_zpszjyr0ziy.jpg


Love that panel light!
20170909_145832_zps6cxfzaff.jpg


20170909_145843_zpswrzrmpr3.jpg


20170909_145853_zpsy0qkzdx6.jpg


New bases designed and laser cut
20170909_164451_zpsig0imiyq.jpg


20170909_164516_zpsibw7quw6.jpg


UGH... Forgot about the angle...
20170909_164618_zpsr7rn9el8.jpg


Redesigned and laser cut a new base then sanded and added primer
20170910_115314_zpsnlv2evfn.jpg


20170910_115318_zps995njexn.jpg


20170910_125111_zps77sfl1dv.jpg


Paint
20170910_130352_zpsriqp73xr.jpg


New base
20170910_151831_zps78qjlqt6.jpg


20170910_152029_zpsumievfrc.jpg


20170910_152038_zpssmcnpfpa.jpg


20170910_152043_zpskubl5o2t.jpg


Basic configuration
20170910_152127_zps2ifkcp6t.jpg


There will be two red panel lights and one white
20170910_152132_zps9uvmxomn.jpg


20170910_152145_zpslva8a0mq.jpg


I think I'll add this wiring harness to the fun
20170910_162143_zpshm1s9ymz.jpg


Maybe a yellow light instead of white? Or maybe two yellows and a white to match the wiring?
20170910_162148_zps51wmsrgv.jpg


On to the corridor panel
20170909_102958_zps2lmneioo.jpg


I finally laser cut a bottom that will also have a skirt
20170909_140508_zpsoyz49u4y.jpg


20170909_115937_zpshk0hfhmz.jpg


20170909_140720_zps9hdzb9p3.jpg


The skirt hides part of the lower corridor panel which I designed and laser cut
20170909_142922_zps76l1jw1p.jpg


20170910_125102_zpsoxfqrsw1.jpg


Sanded and primed
20170910_144325_zpsjloowreh.jpg


20170910_144329_zpsp4gvqfdo.jpg


Parts of the new lower corridor panel design included a bunch of new round greeblies
20170909_144042_zpsd8vpcaql.jpg


Which of course receives lots of sanding, primer and paint
20170909_144100_zpsgjsvzrgj.jpg


And a few extra details
20170909_153600_zpsalfxwism.jpg


The lower panel basically looked like this - these are two sides
20170909_154313_zpshsfpmkut.jpg


I laser cut these details
20170909_154320_zps4jawizmv.jpg


20170909_154347_zpsrrnpp0bu.jpg


I laser cut this 1/16" acrylic
20170909_161236_zpskbxbjuhc.jpg


Primed
20170909_161608_zpsy1ptdcpg.jpg


20170909_161612_zpselcfj0yu.jpg


20170909_163310_zps9x5iei4g.jpg


I liked it... But it just lacked something
20170909_163322_zps5jd5cwmk.jpg


20170909_163329_zpsnunpwyeb.jpg


So I scrapped that design and went in a whole new direction!
20170910_101356_zpsy7ibcgra.jpg


20170910_113224_zpsqokmjans.jpg


I left a 1/4" lip around the edges - this helps boxing everything in
20170910_113232_zpswt2lyogf.jpg


Lots of finer details
20170910_101404_zpsfaqnoz8b.jpg


I began to have a lot of fun and knew I was heading in the right direction!
20170910_120940_zpssy7mitcy.jpg


20170910_121019_zpszlls74jl.jpg


Dry fitting
20170910_121100_zpsre21ztwi.jpg


Random placement - nothing final just yet
20170910_121115_zpsh04ay60h.jpg


I love the fact that I can laser cut where the pin striping will go (is that cheating?)
20170910_121124_zpsazzlisxg.jpg


20170910_121907_zpslk5w8ok4.jpg


20170910_121928_zpsfls7cnjp.jpg


20170910_121941_zpsgy7arud8.jpg


After primer I added paint
20170910_130356_zpsbr4gfc8b.jpg


While everything was drying and laser cutting I boxed in the new lower panel
20170910_132044_zpstktvkxm9.jpg


I couldn't help but continue to dry fit everything
20170910_133001_zps4xxpnstx.jpg


I really layered up the primer prior to paint to smooth the surface and edges
20170910_133008_zpssjobqueb.jpg


This is actually upside down
20170910_141525_zpseiidev0f.jpg


Adding filler
20170910_141532_zpsinq71sps.jpg


More laser cut details - these will be painted a gloss white
20170910_141733_zpswpj8xafv.jpg


20170910_141736_zpsemidgfss.jpg


This is the basic look minus the gloss white
20170910_141740_zps6r4btmqd.jpg


I absolutely love how these parts turned out
20170910_141745_zpscyuuh0pb.jpg


20170910_141939_zpspfb22xwy.jpg


20170910_141948_zpsapk85wug.jpg


Lower panel gets sanded and primed
20170910_144334_zpstzvb8nuy.jpg


Another dry fit
20170910_145448_zpstpd6ecgv.jpg


20170910_145455_zpslhpf9cgt.jpg


20170910_145529_zps2ebajhgl.jpg


The idea is to make those black frames look like a real world item
20170910_145535_zpsjqi1fvxz.jpg


The interior of the panel will have some hoses and maybe a few wiring harnesses. So I began to design and laser cut the interior panel
20170910_144930_zpsp3n0jh1g.jpg


Base panel
20170910_144934_zpsqwqli4rg.jpg


20170910_145119_zpsyowm07eb.jpg


20170910_145124_zpsvxixg8bu.jpg


20170910_145129_zpszoohtdos.jpg


20170910_145133_zpsdyxgd8me.jpg


Primer
20170910_145346_zpskpyaah31.jpg


Basic layout
20170910_161847_zpsra5chdlo.jpg


20170910_161908_zpss2r82hnj.jpg


This panel will be mounted vertically on the inside of the new panel
20170910_161913_zpstbkqekfo.jpg


20170910_161917_zpsts2rrdi4.jpg


Early Saturday I purchased more of the CPVC pipe fittings
20170909_114805_zpsf3y44e0k.jpg


20170909_114813_zpsf5wioq2t.jpg


20170909_114822_zpszjdundkm.jpg


20170909_114905_zpshfdhjbif.jpg


20170909_115238_zpsi4cal1dg.jpg


Primed
20170909_120001_zpsetjq0fus.jpg


Then painted and placed in a basic layout
20170910_162003_zps975h6oxb.jpg


I'm not sure yet how this is all going to work...
20170910_162008_zpsu6nqgd1t.jpg


20170910_162035_zpsvpq69vsp.jpg


Looking at the panel in its correct position
20170910_145657_zpszvnd4vhl.jpg


This is the side looking at it if you were to walk into the cockpit
20170910_145738_zpsdflzvsr8.jpg


20170910_150235_zps9kycqslk.jpg


Close up of the panel light
20170909_185433_zpsscxodxex.jpg


20170909_185247_zpseystlowe.jpg


And this is where are
20170910_163052_zpsgi8wazga.jpg


More to Follow so stay tuned...
 
Last edited:
Me: WOW, Sofa! That is a lot of amazing stuff you did this weekend. Bravo!

Sofa: Thanks, man! What did you do this weekend?

Me: Well, uh....................I took a couple of toy guns apart and....just...stared at them for 3 hours........trying to figure out how to swap the electronics out. :unsure

Me: Hey Solo, thanks so much! The only I get to stare off into space is when my eyes are closed. ;)

Did you have any success?

- - - Updated - - -

Wow thats a lot of crazy nice detail there. Love it.

Hey JM,

Thanks! I'm really happy with this lower panel is turning out. I'm hoping to have the same success with the interior.
 
Very good week-end right there Sofa! Lots of things have been solved/done and it's really looking great:cool
 
Me: Hey Solo, thanks so much! The only I get to stare off into space is when my eyes are closed. ;)

Did you have any success?

Oh, LORD no. I'm the worst procrastinator there is. I could NEVER do what you've done. So, my admiration for your fortitude has no bounds.
 
First post in this forum, so I must say fantastic work! I've been following this for over a year and it just keeps getting better!
That box in the Falcon hallway is fascinating, and it's in the movie for one shot at least:
j7krZXI.jpg
 
Hi Gang,

A quick mid-week update!

Work on the new lower corridor panel had me thinking to readdress the sides the of the upper panel. Nothing is final but I did some design work and cut a few pieces of MDF. What do you guys think?

Left side
20170912_120910_zpsbn19ks16.jpg


Right side
20170912_120916_zpsstva1wnn.jpg


With trim
20170912_123650_zps0s6foinq.jpg


As many of you know this greeblie mounts to the side of the panel. I thought this might dress up the overall look and feel?
20170912_123756_zpsc5aoqtxz.jpg


20170912_123802_zpsstnwg7cu.jpg


It will be painted black and have the gloss white screen in the middle - very similar to the lower panel
20170912_123809_zpsnih7pszg.jpg


20170912_125821_zpswvrnj774.jpg


20170912_125824_zps67znjfz5.jpg


Details
20170912_125828_zpsucn3cpyn.jpg


Primer
20170912_125911_zpskfalpnhy.jpg


Several layers of primer to smooth out the edges and seam lines
20170912_125916_zpsrupljhoo.jpg


20170912_125921_zpsfzydyqvr.jpg


20170912_125927_zps3ejbagyz.jpg


20170912_133612_zps35h5kgdc.jpg


20170912_133616_zpslqpioyqo.jpg


20170912_133621_zps9ex18mzw.jpg


I'm wondering if I'm adding too much detail?
20170912_142238_zpsaxwocmmg.jpg


I then did a little work on the interior panel of the lower corridor panel
20170912_141215_zpsksojdxpt.jpg


Still not sure how this is going to work
20170912_141548_zps49lwacjv.jpg


After looking more closely at the few images we have of the new corridor panel I've built I decided to change the basic shape - I cut these two simple pieces
20170912_141858_zpsdi5afmnc.jpg


They would, in essence, be adhered in place and then a 1/8" laser cut piece of MDF, matched to fit the entire panel side, would lay over and adhere to the entire panel adding strength
20170912_141955_zpsv4xa0pox.jpg


20170912_142010_zpssvd9iuwd.jpg


Oh Yes! I like this MUCH better!
20170912_142128_zpsmfx1xttf.jpg


And this is where we are...
20170912_142248_zpscbcrglc1.jpg


I'd like your feedback on what you think of those new side details! :)

More to Follow
 
Last edited:
Very good week-end right there Sofa! Lots of things have been solved/done and it's really looking great:cool

As always, thank so much for the kind words and continued support, J! Don't go anywhere, I'm going to need some honest opinions in the weeks to come ;)

- - - Updated - - -

Oh, LORD no. I'm the worst procrastinator there is. I could NEVER do what you've done. So, my admiration for your fortitude has no bounds.

Thanks! Whether fortunate or unfortunate I don't have much going in life so most of the time is spent on the project. :)

You're the worst procrastinator? We'll talk about this later!

- - - Updated - - -

First post in this forum, so I must say fantastic work! I've been following this for over a year and it just keeps getting better!
That box in the Falcon hallway is fascinating, and it's in the movie for one shot at least:
View attachment 758175

Hi NG,

Welcome and thanks for taking the time to post. Also, thanks for the very kind words and support. And I have to admit... I totally forgot (age is creeping up on me) about that one shot from ANH showing the cockpit corridor and the brief view of the aux panel!

Great find / memory! :)

- - - Updated - - -

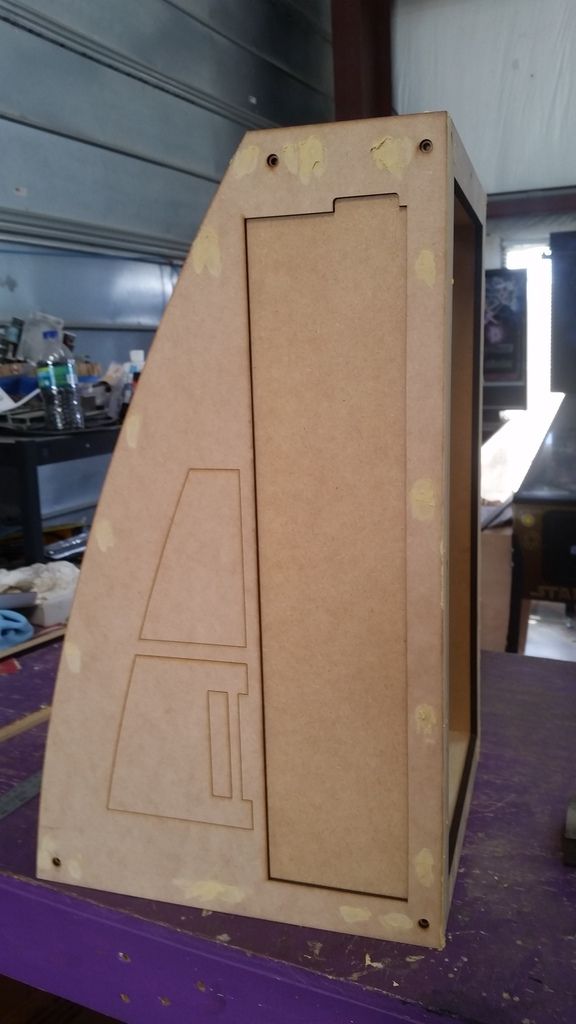
Side details are great! I like the way it's shaping up:)

Thanks, J! I have to decide whether or not to add the side details. I know I'm adding the curve to the front/side panels but cutting the MDF is critical for the side details - decisions decisions!

- - - Updated - - -

What are you going to do if the new movies actually show this part of the Falcon and it's all different?

NO! I don't hear you! (eyes closed and fingers in ears) LA LA LA LA LA LA ;)
 
Oh I,ve missed two weeks of updates!! Oh dear!!! but still very excited to be back and more pics for me too see... Great idea about the aux console! It is true and unbelievable that the wall beside the entrance door is empty!!!! Now my concern is, with this new console, is that it's hiding parts of the job you,ve done.. it could look too cluttered (too busy for the eye) and at some point frustrating to not see what's on the wall , cause it's hidden by the console...to figure out a solution (if there is in fact a visual problem) put the console back in it,s place and take a few pictures from different angles (human eye level) close and far... so in that way, it will be easier to see the impact on all the hard greebeing work you,ve done on that side of the wall... See where i,m going? Anyway I really like those two pieces you,ve added the new cure is great and it also fits the shape of the corridor. I'm sorry if i'm strong opiniated... but i only want to provoque a reflexion... it,s all about proportions, esthetics, logic and making it believable! Like you say Decisions, decisions , decisions!!! Cheers
 
Oh I,ve missed two weeks of updates!! Oh dear!!! but still very excited to be back and more pics for me too see... Great idea about the aux console! It is true and unbelievable that the wall beside the entrance door is empty!!!! Now my concern is, with this new console, is that it's hiding parts of the job you,ve done.. it could look too cluttered (too busy for the eye) and at some point frustrating to not see what's on the wall , cause it's hidden by the console...to figure out a solution (if there is in fact a visual problem) put the console back in it,s place and take a few pictures from different angles (human eye level) close and far... so in that way, it will be easier to see the impact on all the hard greebeing work you,ve done on that side of the wall... See where i,m going? Anyway I really like those two pieces you,ve added the new cure is great and it also fits the shape of the corridor. I'm sorry if i'm strong opiniated... but i only want to provoque a reflexion... it,s all about proportions, esthetics, logic and making it believable! Like you say Decisions, decisions , decisions!!! Cheers

Hey D,

You've missed 2 weeks? Unacceptable! ;)

I also thought about how that corner area might look with all the greeblies and then a huge panel sitting in front of all the work I've done. My original idea was to have the new aux panel sitting dead center on the corridor wall. I VERY quickly realized that the panel would be TOO close to all the entrance greeblies making it tough to remove the panel or address / fix any greeblies so I pushed the panel closer to the outer ring. I might move it a bit more but I still have a few hoses to add around the ring so I need to be careful of its final position.

Having said all that I think adding all these new shapes to the side panel might become too visually overwhelming and complicated. As much as I love the new greeblies I really want to avoid over cluttering so I might go back to just a few of the original SW style greeblies on the side on the panel and leave it at that.

Hope that makes sense? And keep those comments and opinions coming. I'm not just doing this for me, I'm doing for all of you guys/gals as well so I have to do it right and still have fun! :)
 
You're right Sofa: what is "too much or not enough greeblies"? It's a fine balance for sure. You really have to do lot of research to capture the "look" of the movies (not just on the MF, but also other space-ships, sets, etc...). I wouldn't worry too much about you, as a matter of fact, I don't know why Disney hasn't hired you to work with the set designers on the new movies;)
 
You need look no further than the cockpit itself. Even the difference between ANH and ESB the cockpit lost a lot of its clutter (i.e., toggles and blue square lights). Sometimes less is more, as they say. I'm like you, I hate to see all the bulkhead detail get masked by the console. We know the console is supposed to be there so, what to do? Cheat the console to the right and crowd the ring or de-greeblie some of the bulkhead?

Of course, there's the option of just saying screw it and have both. As your mom used to say "you just do what YOU think is right", slathered in a heaping spoonful of guilt-ridden sarcasm.
 
Thank you SK I'm releived...

Every part, every greebies you make is exciting! But as a whole i agree with you that could cause a visual problem... decisions , decisions, decisions,... everything is about the emotionnal/visual expérience of the visitor. As well for the SW freaks to the SW casual fans! LOL

Can't wait for next monday!

Cheers

Éric
 
Back
Top