Kmagz007
New Member
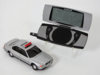
Hi there, I am very new to this so please go easy on me. I have been a big fan of James Bond for many years and one of the very 1st movies I saw, was Tomorrow Never Dies. Brosnan was the Bond of my childhood and is one of my favourites. Anyway, I had always thought the best scenes of this movie was the car chase scene in the car park, where Bond uses his mobile phone to remotely drive the car form the rear seat to escape. Until now, I had not possessed the skills to replicate this and I cannot see myself ever having the money to acquire a real prop. The phone itself was never in production and was created by Ericsson specifically for the movie, with the model number JB988. The phone was modelled off the production phones R320 and R380. For my build, I used a dummy phone model R320 to use a template.

As you can see, the base design of the phone is similar in terms of the overall shape and layout of the buttons, but thats where it ends. The screen needed to be stretched, as the JB988 ear piece is half the size of the R320. The directional buttons are also incorporated into a single oval button on the JB988. Thee are lots of other differences but these are the most significant on the main face.


Once I was satisfied with the main face of the phone, I started work on the back piece of the phone which acted as the remote for Bond's car when he flipped it open.
I scratch built the back piece out of about 3 layers of styrene to get the thickness.


The next step was to create the hinge to flip open the phone to reveal the track pad and screen. I had some spare rockets from an old warship kit which I used to make the ends of the hinge. The centre part was made using a hollow tube and a wooden skewer. This is mostly as it was all I had lying around at the time but it all fit together perfectly. Again, I must repeat that I am not a very experienced modeller and have never scratch built anything to this extent before.


I had trouble trying to replicate the look of the blank screen. I didn't want to put an image on the screens as I wanted it to look static, as it would when it's switched off. I played around with some textures as you will see from the pictures. I finally settles with a green tint film, stuck over a bright silver painted piece of styrene.


And then its was painting time. I scratch built the directional buttons and used a screen shot of the original prop. I scaled the image in Illustrator to size of the button I had made, then stuck this over some masking tape to cut out the arrows. I then stuck the tape over the button to get the exact look I wanted. I am pretty happy with the result. I am planning to eventually have some 'Ericsson' decals made for the tops of the screens.


You will notice the paint is quite bad along the edges. I didn't prep very well and the masking peeled the paint. I had to strip the whole back piece down and re-paint. I decided the easiest way to ensure clean lines along the button edges, was to cut them out as separate pieces and pain individually, then stick down once painted. I will add some later pictures of my final result. Also the little 'dots' on the buttons are sewing pin heads.

Well thats it for now. I hope you enjoyed my short build. I must say this was a rater fun project and I am pretty happy with the results. I do plan to try this again and cast in resin, as I want to add in some of the other gadgets. I might even try and ad in a working screen for the remote, but for now, this will do.
As you can see, the base design of the phone is similar in terms of the overall shape and layout of the buttons, but thats where it ends. The screen needed to be stretched, as the JB988 ear piece is half the size of the R320. The directional buttons are also incorporated into a single oval button on the JB988. Thee are lots of other differences but these are the most significant on the main face.
Once I was satisfied with the main face of the phone, I started work on the back piece of the phone which acted as the remote for Bond's car when he flipped it open.
I scratch built the back piece out of about 3 layers of styrene to get the thickness.
The next step was to create the hinge to flip open the phone to reveal the track pad and screen. I had some spare rockets from an old warship kit which I used to make the ends of the hinge. The centre part was made using a hollow tube and a wooden skewer. This is mostly as it was all I had lying around at the time but it all fit together perfectly. Again, I must repeat that I am not a very experienced modeller and have never scratch built anything to this extent before.
I had trouble trying to replicate the look of the blank screen. I didn't want to put an image on the screens as I wanted it to look static, as it would when it's switched off. I played around with some textures as you will see from the pictures. I finally settles with a green tint film, stuck over a bright silver painted piece of styrene.
And then its was painting time. I scratch built the directional buttons and used a screen shot of the original prop. I scaled the image in Illustrator to size of the button I had made, then stuck this over some masking tape to cut out the arrows. I then stuck the tape over the button to get the exact look I wanted. I am pretty happy with the result. I am planning to eventually have some 'Ericsson' decals made for the tops of the screens.
You will notice the paint is quite bad along the edges. I didn't prep very well and the masking peeled the paint. I had to strip the whole back piece down and re-paint. I decided the easiest way to ensure clean lines along the button edges, was to cut them out as separate pieces and pain individually, then stick down once painted. I will add some later pictures of my final result. Also the little 'dots' on the buttons are sewing pin heads.
Well thats it for now. I hope you enjoyed my short build. I must say this was a rater fun project and I am pretty happy with the results. I do plan to try this again and cast in resin, as I want to add in some of the other gadgets. I might even try and ad in a working screen for the remote, but for now, this will do.