Moonraker stack in 1/72 (Finished!)

Jay, WOW!!!!!!

What can I say that hasn't, but that is just AWESOME!!!

Nice work, the subtle paint and weathering is just fantastic!!! VERY, VERY NICE! (y)thumbsup(y)thumbsup:thumbsup

Now I'm going to have to go get that Stack kit and try this thanks to your inspiration!!

-Sean
 
Yes, the kit is scheduled to come back out in the states late this month. It is going to sell for about $89.00 US, so expect it to cost a bit more to get it to NZ. But at least it will be available once more and for a price less than what typical sellers tend to charge for it on eBay.

$89 doesn't sound too bad compared to $349 for a vintage kit on ebay. I just asked CultTv (which is where I usually buy kits which are either not available or overpriced here) but it doesn't sound like they're planning on stocking it.
 
$89 doesn't sound too bad compared to $349 for a vintage kit on ebay. I just asked CultTv (which is where I usually buy kits which are either not available or overpriced here) but it doesn't sound like they're planning on stocking it.

Yeah, the model is a bit of a monster. Starship Modeler might carry it. HLJ.com also occassionally gets Revell USA kits in, but they typically get marked up somewhat for the Japanese market. I'll ask Steve (CultTVman) about it at WF to see if he might carry some, but the boxes for these things are HUGE and would likely cost more than a Fine Molds Falcon to ship.
 
Hobbylink Japan just listed the kit with a July release date US$142 plus shipping is probably still cheaper than it would be on the shelves at the LHS down here (assuming they even stocked it).

I'll also keep an eye on the UK stores - shipping is sometimes more economical from Europe than Japan.
 
Looking GREAT! Wish I had "space" for those big models.
Looks like it's my turn to "huddled on the floor: Make it stop, make it stop!!! He's making us feel so inadequite!":thumbsup

Cheers mate.
 
Thanks man. I appreciate it. I've got to repair one of the boosters as the thing didn't come off the base cleanly when I tried to pack it for the trip home after Wonderfest and one of the SRB struts broke as a result (a clean break though). The thing only took a merit there. At least I know many of you guys liked it. :)

As for space to store these big models... well I have to find a good spot for it now. I spent so many crazy nights working on it this past year I hadn't really fully thought about exactly where I am going to put it. ;)
 
Well, for those of you that want to get the Monogram full stack shuttle kit (for building stock or as Moonraker), it is now back out and shipping to hobby shops. I picked one up locally this afternoon. Except for the box art and the new decal sheet (which isn't very useable for even a stock space shuttle model IMHO), it looks like the previous issues. The parts molds have held up well over the years.

BTW Jon, while CultTVman doesn't plan to carry it, Starship Modeler will and he will ship to New Zealand with no problems.

As for me, I have started work on an STS-1 Columbia stack. I hope to get it done for Nationals. But if I finish it a month early, I may be taking it with me to Florida as I'll be watching STS-135 lift off. You didn't think I was going to miss the final flight of the space shuttle, did you? ;)
 
Wow! Fantastic Moonraker Stack!(y)thumbsup
I just watched your 5 part Space Shuttle kit history on U-Tube as well as your video on this Moonraker build. I guess saying your a fan of the Shuttle is an understatement!

I have wanted to build a 1/72 Moonraker stack for years! I'll be referring to your build when I start mine! (If I can ever get decals)

Excellent job sir. Excellent!:thumbsup
 
Thanks for the kind words. This one truly was a labor of love for me. Indeed I am a fan of the shuttle program because it was "my" space program. I was too young to remember Apollo or Skylab (I was born in late 1970), so my first exposure to spaceflight was the drop tests of Enterprise, then Young and Crippen riding Columbia into orbit the first time. Plus, Moonraker warped my brain just a bit. ;)
 
Last edited:
I also am a fan of the shuttle program. From where I live in Florida we could go outside and watch if it was a night launch. I live about 70 miles away from the space coast so all you could see was the rocket plumes but it was still neat. Back in the 90's we went to KSC and took the tour and one of the Shuttles was on the pad. Back then I think the closest you could get was a mile or two away but it was cool to be there!:thumbsup

I never watched a close up Shuttle launch but in the early 70's we watched one of the last Appolo Saturn V launches. We also watched the Skylab/Saturn V and Saturn 1B launches. The Saturn 1B looked so small perched up on her milk stool!:lol

Thanks again for posting your Moonraker!:thumbsup
 
You know, I have just re-read this for at least the sixth time (I'm a slow study :lol) and you have done all the research for us. It has been at least 10 years since I watched Moonraker and that was on VHS. I never would have guessed the the normally very dark gray almost black areas of the Shuttle were dark brown on Moonraker. You have also taken on the task of removing details to make the kit more like a model than a reality based Shuttle. Which of course the studio models were. I have seen other 1/72 and 1/144 Moonraker Shuttles on RPF and other sites on the web and you are the first that I have seen to do so. Most seem to build with the "what if it was real" approach. Now don't get me wrong. That approach looks fantastic to me also but I now have a different perspective to considder. Your approach is quite refreshing also. A lot of thinking to do before I start. You truley captured the look of the prop IMO. Kudos for your efforts!

After my Wife gave me a new Monogram 1/72 stack last Christmas I was just going to build a standard Columbia with the great aftermarket tile and marking sets. Now I know it must be Moonraker! Ah...inspiration is indeed a wonderfull thing...

:cool
 
I know, this is a bump. Reason I wanted to make a new posting is to make mention to other modelers intending to do Moonrakers that Tamiya has just issued a new color in their acrylic line calle Linoleum Deck Brown (XF-79). It is about the same tone as the Tamiya flat brown shade I used on my build, but it is a little lighter and might work well for doing the bottom tile areas. I am still pretty sure I got the coloring close on the launch stack models, but the orbiters for the space and station docking scenes seem to be a little lighter colored down there based on some pictures of the smaller studio models on display that I didn't have access to when I did my build. They also apparently have done it in spray can form as well (I prefer the airbrushed acrylics myself).

TowerHobbies.com | TAM81779 81779 Tamiya Acrylic Mini XF-79 Linoleum Deck Brown 1/3 oz

Other than that, the Moonraker has survived its year on display in my television room. I see it everytime I go in and I still marvel at the work done (did I really do that?)

BTW, if you've ever wanted to see what a Moonraker looked like next to an actual shuttle, here's some eye candy for you. I had to do some patch work to the STS-117 Atlantis stack for the museum (the orbiter popped off the ET again) during the late summer last year. So I brought it back into my VAB and did some repair and refurbishment work to it, beefing up some of the sub-assemblies a little bit. And when done, I took the opportunity to shoot some photos of the pair next to one another:

shuttlepair4s.jpg


shuttlepair8.jpg


shuttlepair5s.jpg


And I'll leave you with a photo I shot of STS-135 leaving the pad since we are nearly to the first anniversary of the last flight of the shuttle. My photo might not be as good as others taken that day, but this one is mine. As long as I live, the launches I had the rare honor of seeing up close I will never grow tired of remembering over and over again as long as I live.

JMC135-2.jpg
 
Re: Moonraker stack in 1/72

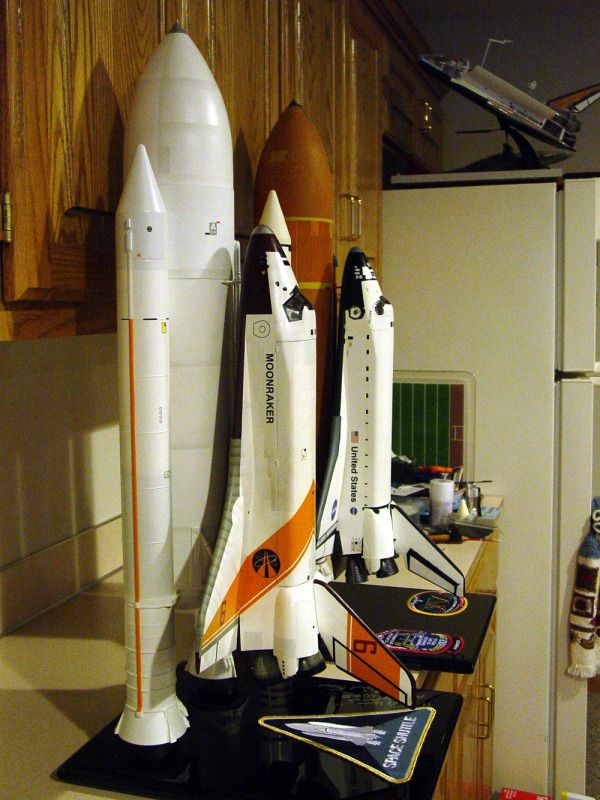
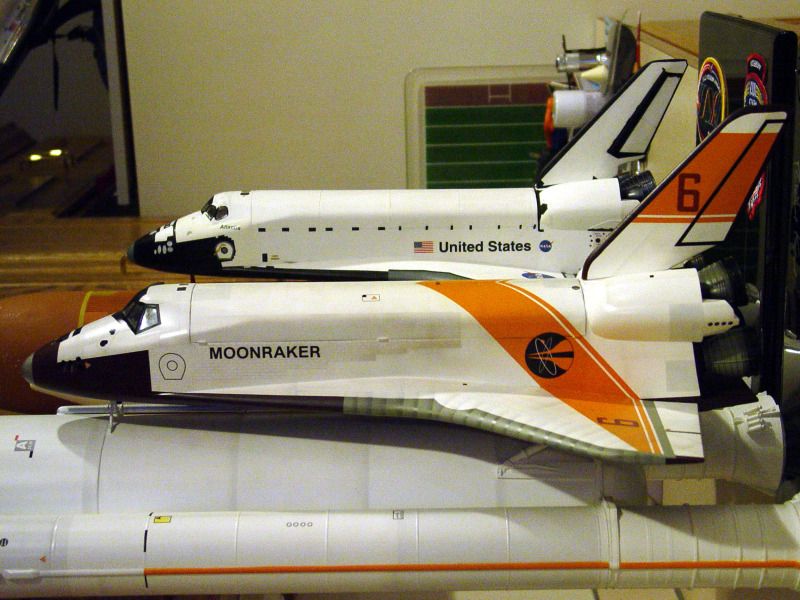
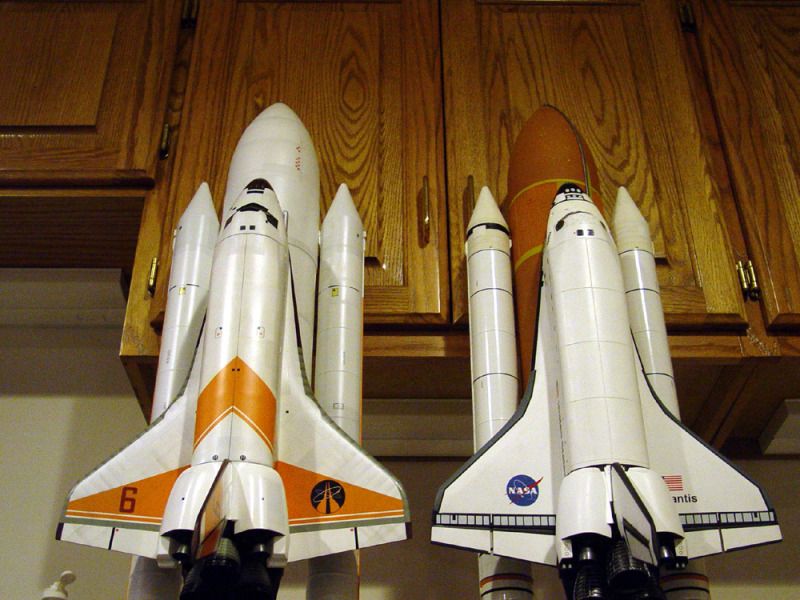
I also have been working on new artwork for my model. Decals have been done in the past, but I haven't been entirely happy with their results. So I went ahead and created some artwork of my own using all available references (screen captures, the DVDs, model kit decal sheets).

Bit of a noob question... how did you get your final decal to have white for the rings of the logo but transparent for for the orange parts it looks transparent? Does the decal have orange in it, or is it showing through to the painted stripes? If so, it's a perfect match! Thanks.
 
Not a noob question at all. I built the artwork in a vector graphics program called Macromedia Freehand (Adobe Illustrator is a similar program). It generates the artwork as shapes which are "resolution independent" meaning they scan scale up and down infinitely without pixelating. It did take a bit of work to pull off though given that the white orbits in the Drax logo both loops above and behind the artwork and so I had to do something to get it to work which a more skilled graphic artist would probably scoff at (but it worked for my uses).

I used an ALPS printer to make the decals since white cartridges are available for it (they are getting VERY scarce now though given the printers haven't been made for years). One of the reasons why the ALPS works so well for decal printing is its inks come from solid ribbon strips. There is no liquid ink in these printers, so they take clear coats rather well and won't soften when they get wet. The white ribbons are the other reason why ALPS printers are perfect for decals given that except for black, most printed inks are translucent. So a spotcolor white layer behind colored artwork is practically a necessity to keep a dark base color from bleeding into the artwork. Now on one of the markings, I wanted that color bleed. So for the number "6" decals I didn't back them up with white so the orange stripe paint would turn the brown numbers into more of a red/brown shade.

I just wish something better would come along for decal printing, given I have to use an older PC running Windows ME on it to even operate the printer properly. ALPS supplies are also starting to get a bit scarce these days. But, I will keep my old printer operating for as long as I can to use on projects where no better alternatives exist.
 
Last edited:
This thread is more than 9 years old.

Your message may be considered spam for the following reasons:

  1. This thread hasn't been active in some time. A new post in this thread might not contribute constructively to this discussion after so long.
If you wish to reply despite these issues, check the box below before replying.
Be aware that malicious compliance may result in more severe penalties.
Back
Top