armamentfactory
Sr Member
Hi everybody,
I managed to get a hold of one of these, and thought it could use some "accurize-ing". Still trying to track down a correct version of Ripley to go with it.


While it does a good job at being a Power Loader figure, it's got it's share of short-cuts, incorrect assembly & general inaccuracies.
The plan is to correct most of the errors without going into too much surgery - I want it to retain it's play-value.
These are most of the areas that will get the treatment.
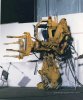
Those hydraulic lines are a mess! Good excuse to pop in the DVD for piping reference.

The roll cage is the wrong shape & is protruding too far forward, plus the unsightly fabric net. (everything behind it too, but that's another story)


The forearms were designed to be interchangeable for the left & right, so they have the keypad detail on both sides. The claws will need filling-in.
The control sticks are sculpted in an awkward shape - there's no way the figure can grab them.


The ankle pistons are facing the wrong way & don't have any pipes.

The hips are too far apart - not sure how I'll approach this area without compromising the structural integrity...
Also, deformation on the plastic.

Stage 1 is pretty much ripping things apart & test fitting stuff.
Replaced the net with a proper wire mesh for now. I'll do the cutting & reshaping after I do the math.

And cleaned up the hydraulic lines. A couple of lines are too short though, I'll have to replace all the tubes!
There's a pair of looped pipes on Loader 4, I think I have an idea how they fit, but the existing tubes are too short to confirm it (for now).

Pretty much every Power Loader figure gets this part wrong - the tubes for the forearms are supposed to go over the shoulder joint.

So far so good, I still have a few more things to take apart.
Thanks for looking!
I managed to get a hold of one of these, and thought it could use some "accurize-ing". Still trying to track down a correct version of Ripley to go with it.
While it does a good job at being a Power Loader figure, it's got it's share of short-cuts, incorrect assembly & general inaccuracies.
The plan is to correct most of the errors without going into too much surgery - I want it to retain it's play-value.
These are most of the areas that will get the treatment.
Those hydraulic lines are a mess! Good excuse to pop in the DVD for piping reference.
The roll cage is the wrong shape & is protruding too far forward, plus the unsightly fabric net. (everything behind it too, but that's another story)
The forearms were designed to be interchangeable for the left & right, so they have the keypad detail on both sides. The claws will need filling-in.
The control sticks are sculpted in an awkward shape - there's no way the figure can grab them.
The ankle pistons are facing the wrong way & don't have any pipes.
The hips are too far apart - not sure how I'll approach this area without compromising the structural integrity...
Also, deformation on the plastic.

Stage 1 is pretty much ripping things apart & test fitting stuff.
Replaced the net with a proper wire mesh for now. I'll do the cutting & reshaping after I do the math.
And cleaned up the hydraulic lines. A couple of lines are too short though, I'll have to replace all the tubes!
There's a pair of looped pipes on Loader 4, I think I have an idea how they fit, but the existing tubes are too short to confirm it (for now).
Pretty much every Power Loader figure gets this part wrong - the tubes for the forearms are supposed to go over the shoulder joint.
So far so good, I still have a few more things to take apart.
Thanks for looking!
Last edited:
")