Thank you very much. Keep watching. It's been a slow couple of weeks but I'm making progress. I plan on painting and attaching greeblies this weekend. I'll post progress shots as I make progress.I tried to convince my wife to let me build this, didn't go as smoothly for me thoughgreat work so far, I love it!
You are using an out of date browser. It may not display this or other websites correctly.
You should upgrade or use an alternative browser.
You should upgrade or use an alternative browser.
Han Solo in Carbonite: A novice build
- Thread starter QCWolf
- Start date
TrekFan_1701-D
New Member
Great build!! I really want to do one of these some day…how cool would a HIC theater room door be?? Dream, dream, dream
Any place that you put HIC in your house is a good place!Great build!! I really want to do one of these some day…how cool would a HIC theater room door be?? Dream, dream, dream
I made some progress this weekend on the side panels. After everything is said and done, I've done 7 out of 8 now with only the Hero panel remaining to be completed. I started by spraying the greeblies from the Zenix kit. The 3D printed nature of the material made an interesting texture as the paint dried. I did ZERO prep work on the individual parts. I didn't sand or fill them and I painted them as is. The pieces are amazingly detailed and of very high quality, but on a few pieces, there are some very minor indications that they were 3D printed, like the little striations that the printer left behind. In my opinion, it gives the pieces a cool texture and I like it.


Here are the clips. Some of them needed to be heated with a heat gun so I could get the proper shape in order to glue them in place properly. I sprayed them stainless steel and painted the screw heads chrome.

Here are the clips. Some of them needed to be heated with a heat gun so I could get the proper shape in order to glue them in place properly. I sprayed them stainless steel and painted the screw heads chrome.
Last edited:


This is a short video of my electronics test fitting for Panel #2. I used s small bit of speaker grill for the backing. I have seen others use a much more screen accurate transparent plastic backing, but I thought the speaker grill added a heft and durability to the panel. I know it's not screen accurate and it obscures the LEDs a little more than I would like, but ultimately, I really like the result. Thanks again to Warpcell for the amazing LED kit. Great work on that!
Then I made this small support box for the electronics to protect the LEDs and keep it in place. I just cut it out of the same flashing I used for the panel backs. I bent it quickly into shape and used LocTite superglue to hold it in place.

Here are the electronics in place:

Panel #2 done!


Then I made this small support box for the electronics to protect the LEDs and keep it in place. I just cut it out of the same flashing I used for the panel backs. I bent it quickly into shape and used LocTite superglue to hold it in place.
Here are the electronics in place:
Panel #2 done!
Last edited by a moderator:
Those clips are pretty fragile gluing them in. I have to make sure I don't bump them much or they can pop off.
Love the screening material idea for your halftone marks in panel 2! I don't think I can change mine now with stuff screwed/glue in place, but I may try. That's great!
Love the screening material idea for your halftone marks in panel 2! I don't think I can change mine now with stuff screwed/glue in place, but I may try. That's great!
Those clips are pretty fragile gluing them in. I have to make sure I don't bump them much or they can pop off.
Love the screening material idea for your halftone marks in panel 2! I don't think I can change mine now with stuff screwed/glue in place, but I may try. That's great!
They are very fragile. I already knocked one off by accident. I figure that once this thing is installed on the wall that it won't get bumped too much. Fingers crossed!
Well you're lucky! I have the challenge of trying to keep my 4-year old from touching those clips. That should be fun once mine gets displayed in our media room. Luckily during the day the door stays locked.
I toyed with the idea of trimming off the printed screw heads and replacing them with actual screws that go all the way through the clip and into the panel. I'm not sure how far down that rabbit hole I want to go. I'm so close to being finished with this thing that I'm not sure I want to back track now.
So this happened today. I got the panels done and began attaching them. I thought it would look neat if I used large hex cap screws as anchors on the bottom of each panel. I drilled through the backing and secured the screw with a nut on the back side. I used a dab of JB Weld on each upper corner to hold them in place. These things are really on there tight and it would take a hammer blow to knock them loose.


You can see on the top left panel that I added handles. I originally thought that I would add a second electronics package to this panel, but I ultimately decided against it for a couple of reasons. First, I couldn't justify the cost of a second light kit. Second, I couldn't decide which block I wanted. That panel is shown in ESB without lights in one scene and with them in another so I decided to compromise and add the handles to make that panel stand out a bit more.

That's when I got crazy. I liked the added splash of red from the decals so much that I decided to add my own greeblies to the panel. I have a bunch of these little red dots called "LRBs" (Little Red Buttons). They are/ were used back in the days of 3/4 inch video tape cassettes. These "U-matic" tapes didn't have a "record tab" that you could push or pop to keep the tape from being recorded over or erased, so they had these LRBs that you would pop into a hole on the side of the tape to let you know that it had been recorded on.

I added one to each panel because I thought it looked cool.


Completely non-canon and not screen accurate, but as I said before, this is mine and I'm making it for me!
You can see on the top left panel that I added handles. I originally thought that I would add a second electronics package to this panel, but I ultimately decided against it for a couple of reasons. First, I couldn't justify the cost of a second light kit. Second, I couldn't decide which block I wanted. That panel is shown in ESB without lights in one scene and with them in another so I decided to compromise and add the handles to make that panel stand out a bit more.
That's when I got crazy. I liked the added splash of red from the decals so much that I decided to add my own greeblies to the panel. I have a bunch of these little red dots called "LRBs" (Little Red Buttons). They are/ were used back in the days of 3/4 inch video tape cassettes. These "U-matic" tapes didn't have a "record tab" that you could push or pop to keep the tape from being recorded over or erased, so they had these LRBs that you would pop into a hole on the side of the tape to let you know that it had been recorded on.
I added one to each panel because I thought it looked cool.
Completely non-canon and not screen accurate, but as I said before, this is mine and I'm making it for me!
Last edited:
Looks great!
i remember using scotch tape to cover over the holes. That way I could record over when someone popped the tabs out.
-Eric
Thanks!
We still have a bunch of old archival footage at my office that is still on 3/4 inch tape. I feel old every time I look at those things.
Last edited:
...Completely non-canon and not screen accurate, but as I said before, this is mine and I'm making it for me!
That's the best part of these personal builds. Fantastic!
That's not feeling 'old' ... it's called 'seasoned' . . . or as Indy would say : 'It's not the years, ... it's the milage, honey!' :lol
Chaim
I like that. I'm gonna use that from now on.
That's the best part of these personal builds. Fantastic!
Thanks. I have a box of old WWII radio parts left over from another project and there are some very interesting bits in there. I am tempted to add a thing or two here and there.
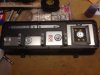
I got some quality time with Han this week. I finally got to the step that I have been most nervous about: the Hero Panel. I didn't want it to be permanently attached and I wanted to be able to easily access it if I needed to so I used rare earth magnets to hold it in place. I used this technique for both panel #1 and #2. I counter-sunk the magnets in the wood.


Then I glued some magnets to the panel:


I painted the circuit boards a dark shade of blue and then glued them in place. Thanks again to Modeljag for the great kit!


I used LED holders from All Electronics to hold the LEDs in place. Everything fit inside the panel nicely without too much adjustment.


Then I glued some magnets to the panel:
I painted the circuit boards a dark shade of blue and then glued them in place. Thanks again to Modeljag for the great kit!
I used LED holders from All Electronics to hold the LEDs in place. Everything fit inside the panel nicely without too much adjustment.
Attachments
Last edited:
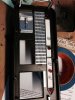
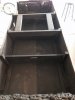
Then it was time to flip him over and work on the insides. I painted the inside flat black and began running A/C to power all the lights.


You can see here that I have added a mounting support frame to accommodate the flat panel TV mount that I will use to hang him on the wall.

I had some leftover bolts from when I built my kids' playhouse and I used them here to secure the mounting brackets to the wood. The whole structure only weighs around 100 pounds and the TV mount I bought is rated to 165, so I'm assuming I'll be OK as long as I drill into the wall studs.


I added an interior power strip to power everything. I'm running power to both hero panels as well as some LED strip lights to provide a rear glow against the wall once it's hung.
I got some cheap LEDs from Amazon, stuck them on and lit them up. Voila!

You can see here that I have added a mounting support frame to accommodate the flat panel TV mount that I will use to hang him on the wall.
I had some leftover bolts from when I built my kids' playhouse and I used them here to secure the mounting brackets to the wood. The whole structure only weighs around 100 pounds and the TV mount I bought is rated to 165, so I'm assuming I'll be OK as long as I drill into the wall studs.
I added an interior power strip to power everything. I'm running power to both hero panels as well as some LED strip lights to provide a rear glow against the wall once it's hung.
I got some cheap LEDs from Amazon, stuck them on and lit them up. Voila!
Attachments
Last edited:
Fuzzual
Sr Member
Completely non-canon and not screen accurate, but as I said before, this is mine and I'm making it for me!
I am so unbelievably glad to hear you say this. I have been deliberating for weeks of "customizing" my panels with a little personal touch. The idea of not going screen accurate is not for everyone, but I truly love the creative process of adding/changing/etc. Love that there are more out there doing it.
Your build is coming along amazingly. Just LOVE IT!!!!!
Similar threads
- Replies
- 8
- Views
- 904
- Replies
- 3
- Views
- 559
- Replies
- 43
- Views
- 5,772
- Replies
- 15
- Views
- 1,025
- Replies
- 13
- Views
- 1,568