You are using an out of date browser. It may not display this or other websites correctly.
You should upgrade or use an alternative browser.
You should upgrade or use an alternative browser.
Wolverine all day baby! Jackets, belts, claws, oh my.
- Thread starter Bowelrock
- Start date
BoozeBeGood
Sr Member
Gotcha thatd explain it!
Do you guys think the jacket makes an appearance in the new movie? No appearances yet in the spy photos.
Solider
Well-Known Member
I sent a PM to Superdrool a few months back with questions on the belt. I never got a response. I ended up making my own belt by purchasing 2 distressed brown leather belts, a bottle of deglazer, 2 brown and one black leather dyes, some leather rivets, and a pair of leather scissors.
Solider
Well-Known Member
Do you guys think the jacket makes an appearance in the new movie? No appearances yet in the spy photos.
I hope not, so I will not have to spend more money on jackets. However, I hope so because I can never have too many jackets...... I need to make more money.
Solider
Well-Known Member
Like the back side of this one.[

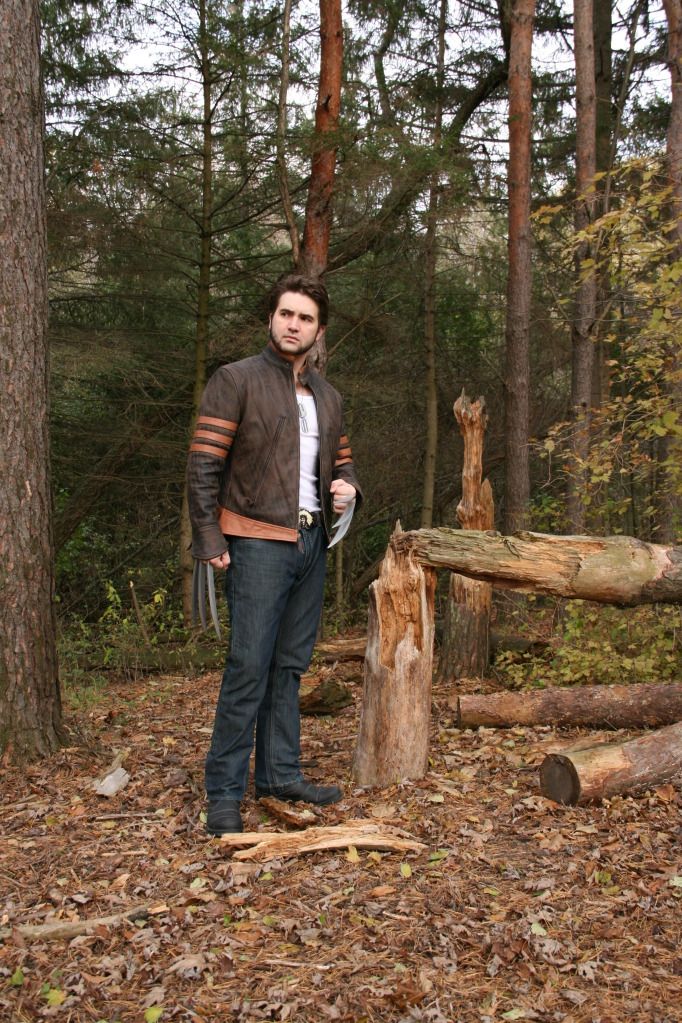
This jacket looked amazing. I had considered it for a long time before I purchased the jacket from wolverinejacket.com . My issues with the Logans Closte jackets were how they fit the model. They looked to have to much extra room in the arms, shoulder areas, and waist. If they would have fit their model better I would have considered it more. Also the collar of the XO jackets looks a little off to me. Lastly is the price. After you add the distressing its around 6 - 7 hundred dollars. BUt, If I had lots of extra money I would probably have ordered one.
I also considered the X1 jacket. But I decided on the XO one due to a few things. First, I did not like how the X! jackets arm stripes fall over your elbows when you bend your arms. I also prefer the stripes to not go around the arm completely. Furthermore, I like the extra dealing of adding the tan to the neck end and the back shoulder pleats.
The XO jacket seems to reflect Wolverines costume in ways. The 3 arm bands represent the 3 black pointed stripes on Wolv's side in the yellow outfit and the back pleats represent the black shoulder pointed stripes. The XO jacket also got the most on screen time and has the most Notoriety. On a plus side the XO jacket is smiler to the X1 jacket in a lot of ways too.
I have worn my jacket every day since I got it. I live in WI and it's cold out. The $350 was well worth it. I have 6 other leather jackets, and this Wolverine jacket seems like it will last a really long time. My oldest leather jacket is over 7 years and it looks close to new and I feel that this Wolverine jacket will last longer then that based on the quality of it. You can easily go with the Heron, or Logan's Closet jackets, but don't overlook the one at Wolverinejacket.com .
antman84
Well-Known Member
I sent a PM to Superdrool a few months back with questions on the belt. I never got a response. I ended up making my own belt by purchasing 2 distressed brown leather belts, a bottle of deglazer, 2 brown and one black leather dyes, some leather rivets, and a pair of leather scissors.
Any chance of some pics would be interested in trying this
")
antman84
Well-Known Member
Do you guys think the jacket makes an appearance in the new movie? No appearances yet in the spy photos.
I may have something comicbookmovie.com posted set the storyboards for a scene in it looks like wolverine could be wearing a leather jacket
It's a long shot but a hope
InLikeFlynn
Active Member
I believe Wade Egan makes a nice version. http://www.wadeegan.comIs there anybody that make the belts at a good price?
Solider: That's a nice outfit you've got there, and a good find on the tank tops. Glad you're happy with your jacket. I've got the Logan's Closet X0 and there doesn't seem to be any of the extra room that you mentioned, at least not on mine.
I sent a PM to Superdrool a few months back with questions on the belt. I never got a response. I ended up making my own belt by purchasing 2 distressed brown leather belts, a bottle of deglazer, 2 brown and one black leather dyes, some leather rivets, and a pair of leather scissors.
Any chance of some pics would be interested in trying this
I would also like some more info on this. Do you have a build thread or would you be willing to post your process?
Solider
Well-Known Member
I believe Wade Egan makes a nice version. http://www.wadeegan.com
Solider: That's a nice outfit you've got there, and a good find on the tank tops. Glad you're happy with your jacket. I've got the Logan's Closet X0 and there doesn't seem to be any of the extra room that you mentioned, at least not on mine.
Sweet! How is the color? Is it that gray looking color or more brown? I'm happy it fits you well. I hope the guys that make the jacket read this. The guy the have modeling the jacket looks really awesome, a great Wolverine lookalike. However, the jacket he wears doesn't seem to fit him %100.
My wife already thinks I'm crazy for spending $350 on a jacket when I have 6 other leather jackets in my closet lol. I want to be the most accurate I can be. I love you guys and your dedication to this stuff
Now to keep working out until the Comic Con in April so I can fill out the role of wolverine better.Solider
Well-Known Member
Any chance of some pics would be interested in trying this
I have to get to college, but when I get back I can take picks of the tools and supplies I used along with some tips. Also the belt pics too.
After making it I found out that I could have done it 2 different ways. One is a lot easier and cheep, the other is fully custom. You will not believe how easy it can be. I will post the 2 prepossesses when I get back. I'm fully confident you will be able to make one without any experience
Last edited:
IFA
Sr Member
Anyone here know of a way to contact superdrool? I love my watch band he made for me (wear it every day) and was wanting to get a belt from him but I know he hasn't logged on in quite a while. I did PM him
Or is there another belt maker out there I'm unaware of?
Magnoli Clothers do the Wolverine belts, all models :thumbsup
antman84
Well-Known Member
I have to get to college, but when I get back I can take picks of the tools and supplies I used along with some tips. Also the belt pics too.
After making it I found out that I could have done it 2 different ways. One is a lot easier and cheep, the other is fully custom. You will not believe how easy it can be. I will post the 2 prepossesses when I get back. I'm fully confident you will be able to make one without any experience
Sounds great I'm looking forward to reading it.
The magnoli leather belt does look great
Guys,
I need your help. I've been emailing Jorge for weeks now to no avail. He takes forever to reply and when he does, we talk at cross purposes!
Can you help?
I've decided on a X-1 and he told me there was the old X-1 fashion jacket at $189.
He then said there was a redesigned biker version (curved sleeves, issues with shoulders and waist sorted out) for $350.
When I asked if the $189 had been redesigned too I got the reply: "is correct the $189 jacket is one with the Heron logo and white background and the pattern is the old version, if you want this jacket with the new pattern the price is $250 (fashion leather)".
Now I took that as Jorge saying the $250 is the fashion version of the redesigned $350 biker jacket - but my fear was that he really did mean a new pattern (new design/colour scheme etc - which I don't want) so I asked him for clarification.
To which his reply was: "I have two kinds of jackets $ 189 USD and 350 USD, $250 USD is a jacket specially made for you. The 350 USD jacket is made with the new pattern".
The frustrating thing is this answer doesn't answer my question: what exactly is the $250 version? If it's with the redesigns to the shoulders/sleeves & waist then I'm on board. Have any of you guys more info?
Also, I am wondering about shelling out extra for the biker version. I am NOT a rider so started off with the fashion in mind but I've seen a lot of complaints about thickness and it's good for fancy dress and I don't want to be let down. Then again, as I don't ride, and just want a jacket to wear I don't want anything too thick and restrictive (which I fear the biker version will be). Again, any feedback?
Solider
Well-Known Member
For a custom Wolverine belt strap.
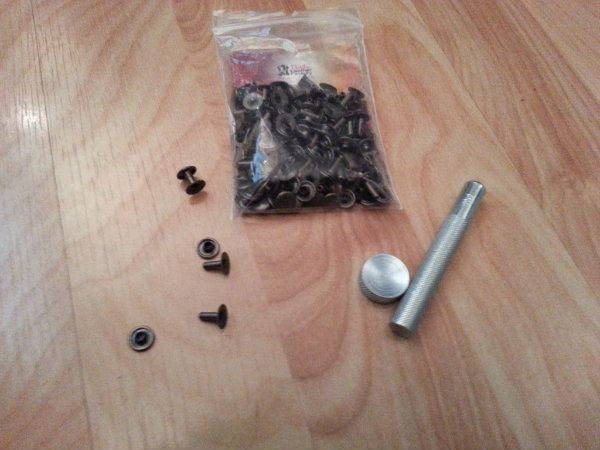
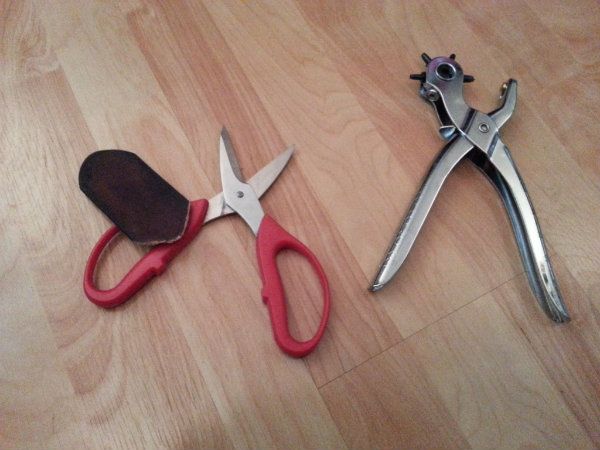
First go to a shopping mall or a store where you can find 1 distressed brown leather belt with a permanently attached buckle (usually less expensive)(also you want to find one that has the buckle sewed is not riveted or snapped because you want to use your rivets so they all match). . Get one in the max size available, much longer then your waist. This should run about $20 - $30.
You will need leather rivets, and rivet set tool, leather scissors, a leather hole punchers, and ether a small amount of matching dark brown lather dye or 1 black and 1 brown sharpie marker. This should be around $30 read below to get the length for you approximately.
Next you cut the buckle off the belt as close as you can to the buckle. Nest measure and cut off 2 pieces about 3and 1 half to 4 inches long. If cutting that much off will make the belt to short only cut one piece off and cut the other piece off the other end after the hole, usually the end with the pre-punched holes has around 4 inches between the last hole and the tip.
Then you dye or color in the end of the cut edge. Thread the end through your Wolverine Indian head buckle, belt strap bar and pinch the pieces together living enough room on the back for the rivets to hold the 2 together. . Then as close as you can get to the end of the belt to pound the rivets together without hitting the buckle on the front , hold folded over pieces of the belt strap the you threaded through the buckle tight and punch 2 holes for the rivets and rivet the belt. (you hammer the rivets using the set tool) Now the buckle is permanently attached to the end of the belt.
Now shape the 2 pieces of belt you cut to look like the extra pieces attached to the Wolverine belt with the leather scissors. Dye or color in the cut edges when you get them right.
Now place the belt on yourself using the jeans you want to wear. If possible try and get it so you use the first hole on the strap so there are no visible belt holes. (You will tuck the end of the belt under the buckle under the strap, not over the strap) looking down, line up one of the shaped pieces to your left so it falls on the corner of you hip where the Wolverine belt piece should go. Mark the location with your bodies bend in mind. Do the same for the back piece at the back corner of your right hip. With the belt off punch the first hole through both the belt and the piece together and rivet them. Then, with the correct bend to the belt (matching your waist bend) punch and rivet the rest of the piece to the strap. 3 rivets at each end of the shaped pieces. Do the same on the back pieces.
Punch a hole to latch the buckle to if needed. If the other end of the belt is too long cut away and dye or color the cut edge in. Remember to leave enough belt so you can add hole incase you gain weight.
Now you just made a movie quality custom belt to your exact waist measurements for around $60 or less.
(I bought 2 belts when one would have done it. And they were not identical so I had to try and dye them to match. I spent a lot more then I should have). I might make a second belt now that I have stream lined the process and already have to tools. All I need to do is find the perfect belt for cheep somewhere.
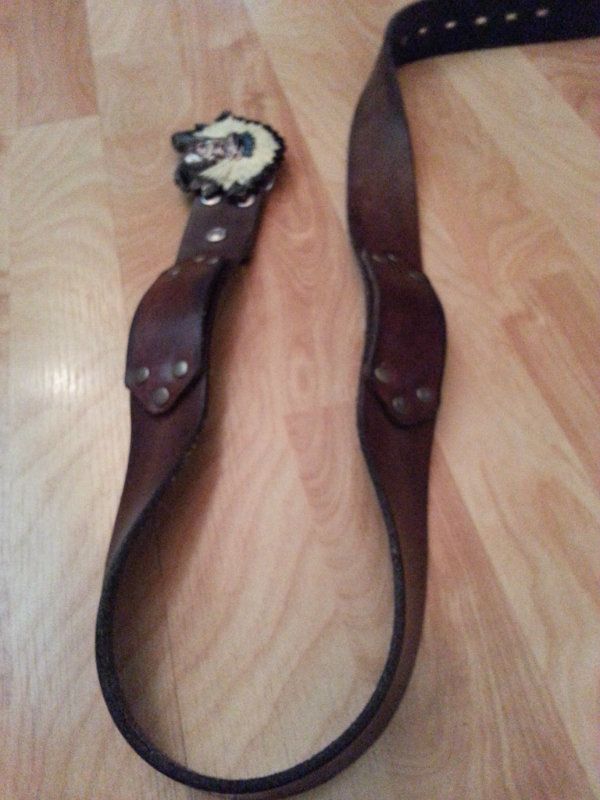
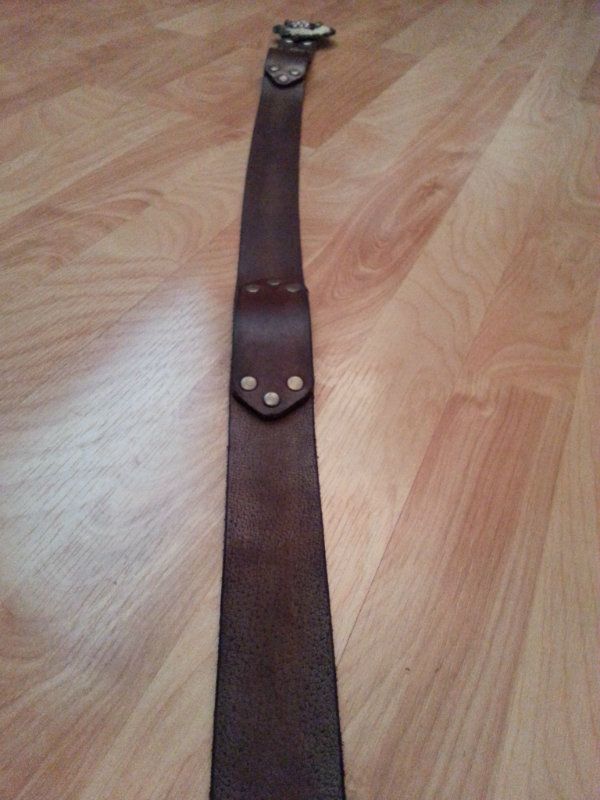
And this is the prototype belt. The rivets don't match the snaps so I'm going to use this method to make the perfect one next. Also the 2 detail pieces on this prototype are to long I think. Plus there are three snaps and I only want 2 rivets at the end by the buckle. But here is my first belt.
First go to a shopping mall or a store where you can find 1 distressed brown leather belt with a permanently attached buckle (usually less expensive)(also you want to find one that has the buckle sewed is not riveted or snapped because you want to use your rivets so they all match). . Get one in the max size available, much longer then your waist. This should run about $20 - $30.
You will need leather rivets, and rivet set tool, leather scissors, a leather hole punchers, and ether a small amount of matching dark brown lather dye or 1 black and 1 brown sharpie marker. This should be around $30 read below to get the length for you approximately.
Next you cut the buckle off the belt as close as you can to the buckle. Nest measure and cut off 2 pieces about 3and 1 half to 4 inches long. If cutting that much off will make the belt to short only cut one piece off and cut the other piece off the other end after the hole, usually the end with the pre-punched holes has around 4 inches between the last hole and the tip.
Then you dye or color in the end of the cut edge. Thread the end through your Wolverine Indian head buckle, belt strap bar and pinch the pieces together living enough room on the back for the rivets to hold the 2 together. . Then as close as you can get to the end of the belt to pound the rivets together without hitting the buckle on the front , hold folded over pieces of the belt strap the you threaded through the buckle tight and punch 2 holes for the rivets and rivet the belt. (you hammer the rivets using the set tool) Now the buckle is permanently attached to the end of the belt.
Now shape the 2 pieces of belt you cut to look like the extra pieces attached to the Wolverine belt with the leather scissors. Dye or color in the cut edges when you get them right.
Now place the belt on yourself using the jeans you want to wear. If possible try and get it so you use the first hole on the strap so there are no visible belt holes. (You will tuck the end of the belt under the buckle under the strap, not over the strap) looking down, line up one of the shaped pieces to your left so it falls on the corner of you hip where the Wolverine belt piece should go. Mark the location with your bodies bend in mind. Do the same for the back piece at the back corner of your right hip. With the belt off punch the first hole through both the belt and the piece together and rivet them. Then, with the correct bend to the belt (matching your waist bend) punch and rivet the rest of the piece to the strap. 3 rivets at each end of the shaped pieces. Do the same on the back pieces.
Punch a hole to latch the buckle to if needed. If the other end of the belt is too long cut away and dye or color the cut edge in. Remember to leave enough belt so you can add hole incase you gain weight.
Now you just made a movie quality custom belt to your exact waist measurements for around $60 or less.
(I bought 2 belts when one would have done it. And they were not identical so I had to try and dye them to match. I spent a lot more then I should have). I might make a second belt now that I have stream lined the process and already have to tools. All I need to do is find the perfect belt for cheep somewhere.
And this is the prototype belt. The rivets don't match the snaps so I'm going to use this method to make the perfect one next. Also the 2 detail pieces on this prototype are to long I think. Plus there are three snaps and I only want 2 rivets at the end by the buckle. But here is my first belt.
Solider
Well-Known Member
Guys,
I need your help. I've been emailing Jorge for weeks now to no avail. He takes forever to reply and when he does, we talk at cross purposes!
Can you help?
I've decided on a X-1 and he told me there was the old X-1 fashion jacket at $189.
He then said there was a redesigned biker version (curved sleeves, issues with shoulders and waist sorted out) for $350.
When I asked if the $189 had been redesigned too I got the reply: "is correct the $189 jacket is one with the Heron logo and white background and the pattern is the old version, if you want this jacket with the new pattern the price is $250 (fashion leather)".
Now I took that as Jorge saying the $250 is the fashion version of the redesigned $350 biker jacket - but my fear was that he really did mean a new pattern (new design/colour scheme etc - which I don't want) so I asked him for clarification.
To which his reply was: "I have two kinds of jackets $ 189 USD and 350 USD, $250 USD is a jacket specially made for you. The 350 USD jacket is made with the new pattern".
The frustrating thing is this answer doesn't answer my question: what exactly is the $250 version? If it's with the redesigns to the shoulders/sleeves & waist then I'm on board. Have any of you guys more info?
Also, I am wondering about shelling out extra for the biker version. I am NOT a rider so started off with the fashion in mind but I've seen a lot of complaints about thickness and it's good for fancy dress and I don't want to be let down. Then again, as I don't ride, and just want a jacket to wear I don't want anything too thick and restrictive (which I fear the biker version will be). Again, any feedback?
The Jacket I got seems just as thick as a bicker jacket but it is designed like a fashion one for it's fit. The thiner ones don't look right for Wolverine. I had purchased a thin fashion version from Soul Revolver and returned it because of this, Well and that jacket did not fit me ether, to short in the shoulders. Thats when I ordered the jacket from Wolverinejacket.com. I like the fact that for $25 more you can alter the measurements so you get a jacket that fits you right. But, right now they just have the XO jacket not X1.
I am a bit of a clothing nut. I have a lot of jackets and cloths. I have quite a few heavier and lighter leather jackets from Wilson's Leather. In studding the movies Wolverine looks to have the heavier jackets. They look more manly. I wear my XO jacket everyday. it works with almost everything I wear.
Also use the code "I know Solider" and get $15 off you order at www.wolverinejacket.com
Last edited:
Yeah, that is pretty much the process I planed on using but I was more interested in what you said about buying the deglazer and using the leather dye. Did you just use the dye for the edges or did you do some work on the belt itself. Also what is the deglazer for?
Comedian03
Well-Known Member
Guys,
I need your help. I've been emailing Jorge for weeks now to no avail. He takes forever to reply and when he does, we talk at cross purposes!
Can you help?
I've decided on a X-1 and he told me there was the old X-1 fashion jacket at $189.
He then said there was a redesigned biker version (curved sleeves, issues with shoulders and waist sorted out) for $350.
When I asked if the $189 had been redesigned too I got the reply: "is correct the $189 jacket is one with the Heron logo and white background and the pattern is the old version, if you want this jacket with the new pattern the price is $250 (fashion leather)".
Now I took that as Jorge saying the $250 is the fashion version of the redesigned $350 biker jacket - but my fear was that he really did mean a new pattern (new design/colour scheme etc - which I don't want) so I asked him for clarification.
To which his reply was: "I have two kinds of jackets $ 189 USD and 350 USD, $250 USD is a jacket specially made for you. The 350 USD jacket is made with the new pattern".
The frustrating thing is this answer doesn't answer my question: what exactly is the $250 version? If it's with the redesigns to the shoulders/sleeves & waist then I'm on board. Have any of you guys more info?
Also, I am wondering about shelling out extra for the biker version. I am NOT a rider so started off with the fashion in mind but I've seen a lot of complaints about thickness and it's good for fancy dress and I don't want to be let down. Then again, as I don't ride, and just want a jacket to wear I don't want anything too thick and restrictive (which I fear the biker version will be). Again, any feedback?
What I'm getting out of that is that you can buy the old Heron X-1 for $189, which would be the jacket I have and posted pictures of on the last page. Or you can buy the new version which has their new pattern, and a thicker leather for $350. Now from what I understand, for $250, you get the new pattern, but with the thin leather like their original X-1 has.
I find it kind of interesting the Jorge said it comes with the curved sleeves, I thought this was something they were going to get rid of? The X-1 isn't supposed to have the curved sleeves like the X-2, the sleeves on the X-1 should be straight if you want it to be screen accurate.
Similar threads
- Replies
- 17
- Views
- 3,675
- Replies
- 7
- Views
- 1,313