You are using an out of date browser. It may not display this or other websites correctly.
You should upgrade or use an alternative browser.
You should upgrade or use an alternative browser.
TPM VD Yoda Lightsaber Prop
- Thread starter seven
- Start date
Hi everyone,
I'm a long time lurker here. Never really posted anything. It seems that there're a lot of interest on the Yoda saber. Now I would like to ask you a question:
What would be the interest here for a high quality functional reproduction Yoda saber?
Me and my partner have very high quality design and fabrication capability(CAD, CNC, 3D print) and we're very happy to make a run of highly accurate Yoda Praco/Bolsey reproduction hilts based on VD design, not the movie CGI version, The hilt I'm talking about will include an engineered internal chassis which allows for direct drop in of a 1" OD TCSS blade, Plector Labs NB/PC/CF sound boards and two Li-Ion batteries. So it will light up bright and hum loudly.
The idea is to make a 99.9% VD accurate hilt kit. The basic kit comes with:
The future plan is to make an upgraded master kit which will have all above, PLUS a custom designed CNC crystal chamber with a small natural green crystal point. A very nicely designed and engineered blade plug is also planned.
Another question is: What would be the acceptable price for all of you Yoda fans? The basic kit and the master kit?
Last, I'm new to this prop thing. I have to ask about the copyright issue. I'm just a SW fan as you guys. My partner and I don't want to violate any LML film rights. We have an idea and would like to share out. We just haven't seen a fully functional Yoda saber with all electronics and a crystal chamber because the hilt is so small. VD design is copy righted. So we can't really make those hilts and sell them. We would be ruining our own lives if we do that. However, our passion runs deep. Finding a Praco or Bolsey is increasingly hard to a point that we just want to make a perfect and functional reproduction. Both of us are industrial designers, we all have our day job and family lives. Although we have design and manufacturing capability, we want to do this right and do it legally.
We always wondered how Parks sabers and other saber makers can use LML designs and sell their replicas under different names without getting calls from LML lawyers. We think it's still somewhat risky.
We may only build those high quality VD hilts for ourselves as a personal hobby. Copyright infringement sounds too scary to us. The other idea we have is only making internal kits and make them available to the Yoda fans like aftermarket car parts. So they can DIY and retro fit in a Praco/Bolsey flashgun and make Yoda proud") The problem is eventually all Pracos and Bolseys will run out on ebay, then what?
The problem is eventually all Pracos and Bolseys will run out on ebay, then what?
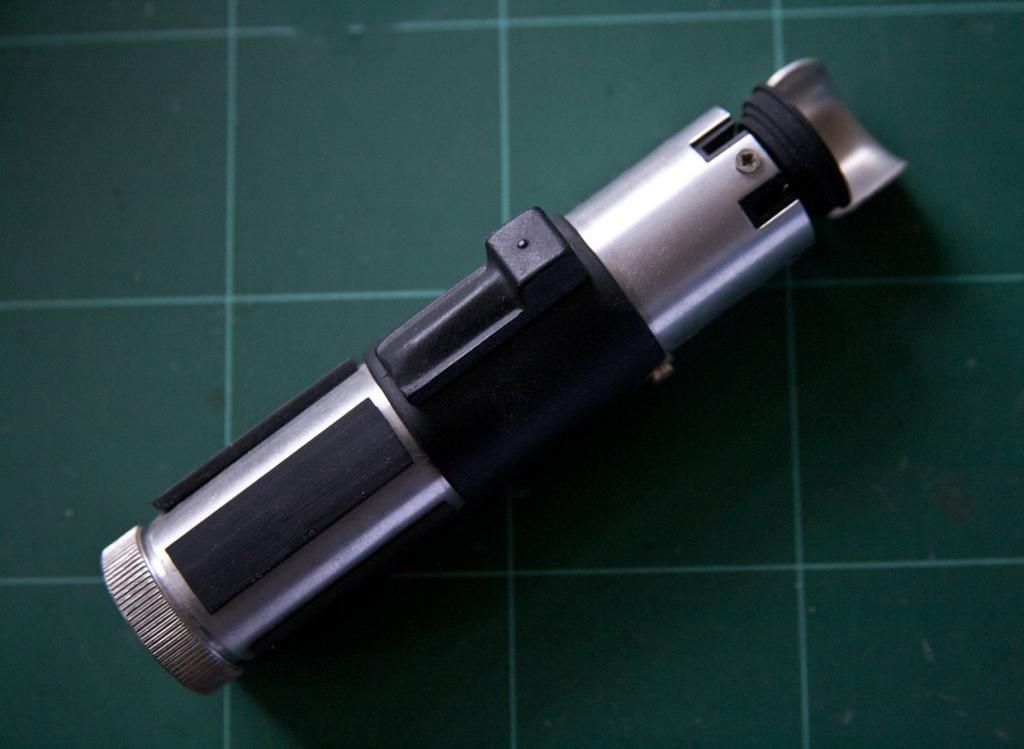
Attached is a prototype fully custom crystal chamber internal chassis we're developing for Luke ANH/ESB Graflex hilt. If we decide to do Yoda hilt without getting sued by LML, it would be in similar quality and detail. This Graflex ANH/ESB prototype is all metal which is very pricy. Only the master kit will have a full metal chassis, the basic kit will have mixed medium(metal blade holder/heat sink with nylon battery/speaker chassis. The nylon/ploycarbon/plastic chassis is actually more shock absorbing than a full metal chassis if you want to duel with it.
Any questions, suggestions, vapor ware comments, legal warnings are very very welcome. This is what my post is all about.
Thank you guys. Really appreciate your passion! Love you guys


I'm a long time lurker here. Never really posted anything. It seems that there're a lot of interest on the Yoda saber. Now I would like to ask you a question:
What would be the interest here for a high quality functional reproduction Yoda saber?
Me and my partner have very high quality design and fabrication capability(CAD, CNC, 3D print) and we're very happy to make a run of highly accurate Yoda Praco/Bolsey reproduction hilts based on VD design, not the movie CGI version, The hilt I'm talking about will include an engineered internal chassis which allows for direct drop in of a 1" OD TCSS blade, Plector Labs NB/PC/CF sound boards and two Li-Ion batteries. So it will light up bright and hum loudly.
The idea is to make a 99.9% VD accurate hilt kit. The basic kit comes with:
- A stainless steel or machined 6061 aluminum body to match the exact dimension of a Praco/Bolsey
- A CNC blade holder integrated with a power LED heat sink. The blade holder allows for a 26~28" blade with 1~1.5" insertion. It seems 26~28" is the right length for Yoda. Just like the sound board, speaker, battery, the blade is not a part of hilt hit. You get to choose whatever blade you like, thin wall, thick wall, round tip, bullet tip and whatnot.
- A molded hard plastic/nylon mid band with an integrated activation box which has two hidden tactile buttons on the top. One for blade power on, the other for aux. Switches are pre-wired. However, you need to solder wire ends to whatever sound board you choose.
- There will be no kill key so you never loose it, but it has a kill switch. The switch will be most likely the metal knob where the mid band notch is. It acts like a gun safety toggle switch. You switch it on, the hilt boots up and in the stand by mode. You press the blade power on tactile switch on the activation box, it lights up and hums.
- A CAD designed and molded chassis which has slots and sockets for two Li-Ion batteries, 2W speaker and a NB/PC soundboard. CF soundboard is a possibility too. It comes wiring channels for a clean look.
- A CNC rear cap to the exact dimension of a Praco with a tapped screw hole at the center to allow speaker sound. The edge will be knurled
- All the other greeblies such as emitter shroud, bolts and nuts, soft or hard rubber grips.
- Precise fit with bolts/screw assembly.
- Absolutely no super/gorilla glue.
The future plan is to make an upgraded master kit which will have all above, PLUS a custom designed CNC crystal chamber with a small natural green crystal point. A very nicely designed and engineered blade plug is also planned.
Another question is: What would be the acceptable price for all of you Yoda fans? The basic kit and the master kit?
Last, I'm new to this prop thing. I have to ask about the copyright issue. I'm just a SW fan as you guys. My partner and I don't want to violate any LML film rights. We have an idea and would like to share out. We just haven't seen a fully functional Yoda saber with all electronics and a crystal chamber because the hilt is so small. VD design is copy righted. So we can't really make those hilts and sell them. We would be ruining our own lives if we do that. However, our passion runs deep. Finding a Praco or Bolsey is increasingly hard to a point that we just want to make a perfect and functional reproduction. Both of us are industrial designers, we all have our day job and family lives. Although we have design and manufacturing capability, we want to do this right and do it legally.
We always wondered how Parks sabers and other saber makers can use LML designs and sell their replicas under different names without getting calls from LML lawyers. We think it's still somewhat risky.
We may only build those high quality VD hilts for ourselves as a personal hobby. Copyright infringement sounds too scary to us. The other idea we have is only making internal kits and make them available to the Yoda fans like aftermarket car parts. So they can DIY and retro fit in a Praco/Bolsey flashgun and make Yoda proud
The problem is eventually all Pracos and Bolseys will run out on ebay, then what? Attached is a prototype fully custom crystal chamber internal chassis we're developing for Luke ANH/ESB Graflex hilt. If we decide to do Yoda hilt without getting sued by LML, it would be in similar quality and detail. This Graflex ANH/ESB prototype is all metal which is very pricy. Only the master kit will have a full metal chassis, the basic kit will have mixed medium(metal blade holder/heat sink with nylon battery/speaker chassis. The nylon/ploycarbon/plastic chassis is actually more shock absorbing than a full metal chassis if you want to duel with it.
Any questions, suggestions, vapor ware comments, legal warnings are very very welcome. This is what my post is all about.
Thank you guys. Really appreciate your passion! Love you guys
<div class='quotetop'>(cayman shen @ Aug 4 2006, 06:27 PM) [snapback]1294210[/snapback]</div>
I agree. It seems like such an easy little flash unit to make compared to the graflex or MPP. It would doubly be nice if parts where made so those whom have a Bosley
I do love me a yoda saber (which is odd, since I hate that he even had one in the prequels)...
I'll be following the response with interest, but I couldn't even say a fair price...
I feel the same way. The frog doesn't need a saber. Since he can fire up lightening bolts against Dooku and moving things 1000 times bigger than himself, swinging a lights aber is actually pretty lame. However, I just like the fact that it's a flashgun based hilt. It's classic style matches perfectly with all the other flashgun based sabers from the classic trilogy. I don't really care about all the other hilts from prequels.
Now back to the original topic. We're going to make a couple prototypes first and share with you guys. Now a pressing question before we start CAD design is how much difference is between a Praco and Bolsey? My partner was only able to get a Bolsey B2 for $15 on ebay 1 year ago. That's the only piece of hardware where we can get measurements from. That is not enough, I think. We want to get the measurements very precise. We have the Darthsaber Yoda blueprint. Are the dimensions on the print as accurate as they can be?
Visually, aside from the end cap and the one screw near the shroud, they seem to be mirrors of each other. I've never had a praco to compare next to my Bolsey though, so I can't say that for sure. I do know I used the blueprints from the visual dictionary to make my saber, and the measurements matched.
Sym-Cha
Master Member
Hi there,
Great idea ... next to several Bolsey Flash guns I have a Praco ... however it came without the emitter shroud ... but with a black yet correct endcap ... so it seems there are at least two different types of Praco out there. Indeed the Bolsey is a mirror image of the Praco ... and in my case I don't have the 'kill key' nob on my Praco either and the additional slider gap in the clamp ... though I do have the correct brass screw.
So if I were to built my all real parts Yoda lightsaber it would have to be a hybrid between the Bolsey 2 and my Praco. Mind you we all are still looking for a correct activation box that came from a model car kit ... I have a replica on one of my Bolsey 2 Yoda sabers :
As for your other questions regarding copyright infringement of Lucasfilm Ltd. ... I would not worry to much about that if you keep the endprice reasonable ... for a fully functional lightsaber with crystal I'd say $250 - $400 and you could always offer kits for those who like to tinker with electronics themselfs and like you said there are many sabersmiths out there who do make excellent runs and have not been bothered. Since it's not your dayjob either ... I'd say go ahead and show us some works in progress of your protoype.
Chaim
Great idea ... next to several Bolsey Flash guns I have a Praco ... however it came without the emitter shroud ... but with a black yet correct endcap ... so it seems there are at least two different types of Praco out there. Indeed the Bolsey is a mirror image of the Praco ... and in my case I don't have the 'kill key' nob on my Praco either and the additional slider gap in the clamp ... though I do have the correct brass screw.
So if I were to built my all real parts Yoda lightsaber it would have to be a hybrid between the Bolsey 2 and my Praco. Mind you we all are still looking for a correct activation box that came from a model car kit ... I have a replica on one of my Bolsey 2 Yoda sabers :

As for your other questions regarding copyright infringement of Lucasfilm Ltd. ... I would not worry to much about that if you keep the endprice reasonable ... for a fully functional lightsaber with crystal I'd say $250 - $400 and you could always offer kits for those who like to tinker with electronics themselfs and like you said there are many sabersmiths out there who do make excellent runs and have not been bothered. Since it's not your dayjob either ... I'd say go ahead and show us some works in progress of your protoype.
Chaim
A little update. We're doing 3D drawings at the moment. An internal layout for the Padawan version is attached. It seems there's plenty room to be creative. The Master version will be crowded, but we're not worrying too much about it now.
Here're comes some thoughts in regarding to the actual control layout of the hilt. We're designing a functional saber, not a "kit bashing" static prop. So a lot of human factors are taking into account here. For one, the kill switch(note: it's a switch, not a key). Like all our other sabers, there's no kill key, we hate loose parts. A kill switch is the main power button like a safety on a handgun. The best main power button position is the reflector dish bracket metal stop. On the original flash(both Praco and Bolsey), it's a metal stud/rivet.
So here's the question about this main power switch. Where should it be placed? On the left side or right side? The original VD hilt has this rivot stop on the right side because it's based on a Praco flash. The Bolsey flash has it on the left side. From ergonomic stand point for a right hand user, this switch is better placed on the left side as Bolsey. It feels more natural to use your right thumb to push that tight toggle switch to power on the saber(in standby mode). It's very much like that small oval sliding button on the Graflex flash. So I'm curious if people here want to be just like the prop or user friendliness takes more priority. To me, it's the later since it's a functional saber. All the controls have to feel right in the hand when you're using it. Some other details will vary from the original VD prop such as the square cut out will be rounded to conform to this main power switch so it looks more refined.
Any comments are very welcome. Prototyping will start very soon after we're done with 3D drawings. Will share the 3D drawings when it's all done.
Thanks everyone.
Sym-Cha
Master Member
Somehow looking at that 'kill switch' screw on my Bolsey ... it would make a lot more sense to use the square cut-out in the clamp, not rounded as in your sketch, and reverse the motion of on/off by 180º ... so when you pull the switch towards you the lightsaber is on and thus the kill switch ends up in it's original static place as on the Bolsey/Praco ... and either side is fine. Question will you also be making a kit version to be added onto and into a real vintage flashgun?
Chaim
Chaim
I agree with Chaim on the square... not sure about the on off position. I kind of like the idea of the off position putting the switch in the same position as my current bolsey flash... which by default of having no blade is currently in the "off" position.
As for the kit, Yeah both options would be good... building the guts onto a bolsey or praco would be cool
As for the kit, Yeah both options would be good... building the guts onto a bolsey or praco would be cool
I think we're only going to make the full kit for now(both Padawan and Master versions), not a retro fit kit for vintage flashes.
Reasons:
1. To design a retro-fit kit that works for both left and right side main power switch is a hassle. It also increases the development and tooling cost. Essentially we have to offer two versions. One for Bolsey, and one for Praco.
2. The end cap is also a speaker holder which plugs into the hilt with a 3.5mm jack. This is our very smart design. Easy access to all ports with no wires exposed. This part is fully machined. To retro-fit, you will need to make a "jack receiving" port base with machined holes for 3.5mm, SD card, charge and R.I.C.E. ports. It will need to be tapped too. A lot of machining there. So this part you most likely will not be able to use your vintage end cap.
3. The activation box, mid band and main power switch requires precise alignment with the hilt body openings. Those openings are not really rounded holes. Most likely will be milled shapes. To mill and drill on a rounded tube is hard. You only get one shot to make it right on a hard to find Praco flash.
4. If we were to offer a retro-fit kit, the cost would not be much lower than the full kit. Most of the design and engineering goes into developing the internal chassis and the control band. The body is just a tube with machined holes. If you try to retro-fit, the only thing you will end up using from a vintage flash would be the body tube. All other parts would be from us. So you might as well just get the whole kit. Should you choose to use the vintage tube to mod our full kit, that is really up to you. People always find creative ways to retro-fit a lot of things. That's the fun part of this hobby.
5. This saber is most likely not as popular as other full size sabers. So it doesn't make a lot of sense for us to invest that much into R&D to develop various kits(full or retro-fit), but only selling a handful of units. People who want retro-kits most likely will not get the full kit, vice-versa. It's not that we can't design those various kits. It just doesn't make a lot of sense from financial stand point This is an indie project which we just want to have some fun in our spare time, but not taking a big financial lost on developing the product.
Here's an early schematic sketch for the internal layouts of both versions. The design has evolved a little bit since. The blade will be a 3/4" blade, not a 1". 1" will not fit in this hilt.
Last edited:
A preliminary 3D design for the chassis. This design is only for 3D print test piece. As matter of fact, this chassis is being printed as I'm writing this message.
Facts:
1. The entire chassis for the Padawan version will be metal. The front gray part is the LED holder/heat sink. The design is not nearly final. It will look cool. This heat sink will be made out of brass. The power capsule part(green section after the gray heatsink on 3D) will be CNC 6061-T6 aluminum with anodized black finish for isolation. So the gold yellow with matt black overall tone. How nice!
2. The removable back port base(purple) will also be a CNC piece. All ports locations are provided.
3. The blade holder and end cap(speaker holder) are not show on the 3D sketch.
4. The cut-outs on the power capsule will have decorative details to add another layer of visual design and to hide the not so attractive Li-ion packs and sound board.
Again this 3D design is not nearly final. Only for 3D print prototyping purpose.
Will keep updating once the 3D print piece is done.
Last edited:
3D print chassis is done except for the heat sink part. This is just a lay out model to verify the placement of the Li-Ion packs and sound board. The surface details are subject to change. The final chassis will be CNC aluminum anodized in black.
BTW, it's a PL CF V6.5 board in there.


BTW, it's a PL CF V6.5 board in there.
Last edited:
Complete core assembly drawings. Some facts:
1. It will come with two shrouds. One attached to the blade plug for FX light up display hilt. One attached to the blade holder for the complete show off when the blade is attached. User supplies his/her own 3/4 blade. The reason for two shrouds is to have a very strong blade attaching mechanism. The hilt is so small. The only logical way to mount the shroud is on either blade plug or the blade holder.
2. The 5 holes on the Lambo wheel will have diamond cut shinny surfaces to refract the light coming from the power LED. The rest of the surface will be hard anodized in black.
3. User gets to supply their own LED Engine lamp and 8 degree lens.
4. User gets to choose to push or pull to turn on/off the main power switch. There's a 3 gate switch behind the latching switch. You can set it how ever you like.
5. The saber core can be completely slide out for an epic reveal.
Last edited:
Both Luke ESB and Obi ANH are near completion with spinning crystal chamber. It's driven by a propriety watch quality(shock resistant) micro gear box at 42RPM. Probably the first in the saber building world. Couple a of couple unique features:
1. Graflex brass pins are the actual charging ports for the saber since we killed "kill key". The square power cord holes on top of the Graflex will be used as a voltage checker port. So all ports on the Graflex will be actually functional instead of being decorations in many other Graflex sabers we've seen. We modified TCSS Graflex blade adapter by adding nylon isolation sleeve around the brass pin and milled out the wiring channels for those pins.
2. 13 pin board on the clamp will be the activation switch just like in the movie. A lever under the board will trigger a micro switch to light up the blade. The Obi ANH already has the bubble strip as the actual activation switch.
Now testing on different LED strip blade set up to make it super bright. The goal is to see if the blade can look like it's lighted up, not just a polytube, read this carefully: in DAYLIGHT. Different strips with 10mm LEDs and 3W luxeon LEDs are being tested. The 3W LED strip can reach over 1500LUX, it will make a difference in the broad daylight. However it will fry the sound board and Li-Ion within a couple of minutes. We've been talking to Erv Plecter to see if he can design his upcoming CF LS V7 board to take more current.
Luke ESB:
https://www.youtube.com/watch?v=gOkIw7s1D4I
Obi ANH:
https://www.youtube.com/watch?v=VzUib4gfaRk
you've got your little brasss plate under the pins reversed. Should be under the pin closest to the emitter
thanks for point that out! Yes, we noticed. That's the only way to make those brass pins functional. The brass plate is the wiring lead. Let us revisit it later see if we can run the wire from the other pin. The client doesn't seem to care about this minor detail, LOL. Thanks anyway!
Similar threads
- Replies
- 0
- Views
- 135
- Replies
- 6
- Views
- 374
- Replies
- 3
- Views
- 556