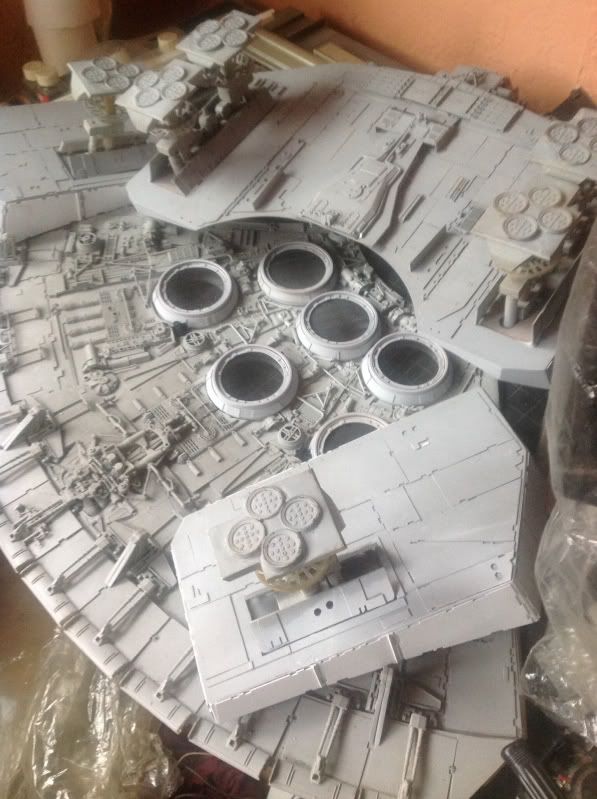
SW – ANH (5 Foot) - Studio Scale Millennium Falcon Build

Ok...just one more detail before we publish the blueprint revisions in a few days.


A simplified radar base and dish model:

MF_radarDish_001.jpg

MF_radarDish_002.jpg

MF_radarDish_003.jpg

MF_radarDish_004.jpg


Cheers,

Andre, Joshua and Stu
 
Last edited:
Andre do yo have Power SubD-Nurbs plug-in for modo?

Hey, DSP -

As part of the blueprint release, we do plan to share a STEP surface/solid hybrid model for those that want a 3D reference for machining or printing. Andre and I have been going back and forth between Modo and SolidWorks over the past several months.

Cheers,
J.
 
Just found this thread. I'm gobsmacked, speechless, stunned, and WAY past my bedtime. I saw the 5' MF many years ago at the Smithsonian when the SW exhibit was there. I returned many times, but I didn't get any pictures. I can't wait to see the results of your efforts. I would never have dreamed of attempting a 5' MF, but now... who knows?
 
I got a quick observation. For years everyone has been coming up with blueprints and plans based on one assumption and no matter how much detail you go into, nothing ever quite looks 100% accurate. There's always something a little off but no one seems to know exactly what. For example, there was a big debate awhile back about the toe-in problem of the mandibles. But I don't believe that anyone actually has solved the "not quite right" problem. Everyone seems to have gotten close, but no. My observation is that everyone seems to assume the main saucer section is completely round circle. I would like to propose this... what if the main saucer section itself isn't perfectly round and is in fact more ellipicle in nature. Seeing as everything that has been done is based on that assuption, it may actually solve a bunch of fitting problems. Just thought I would throw that into the pool.
 
I bet it isn't totally symmetrical both horizontally and vertically. Nothing hand finished in a rush is. The same reason i asked a few posts back what anomalies the boys found with the solve. Hopefully they didn't cheat and make it all symmetrical :devil
The Slave 1 is really wonky and because its basically all compound curves you can't see it from just photos.
 
Ok , ok!!. I guess we all have our own opinions & theories here on just how the Falcon was built, how wonky she is etc... . I'm still in the mindset of building her in subsections, such as Faustas has achieved with great success & really is a means to an end in knowing final measures etc... . I mean if all the donors fit as they should on any particular section, then job done!. Having a blueprint on hand such as Andre's & Joshua's is also a godsend as you can layup parts/sections & check fit. I'm utilising both methods here to achieve a result, the result being a Falcon replica that will look like the actual miniature, no, not 100%, but close enough for me. It is very hard to determine all the quirks & wonkyness of her, without actually building her, its a double edged sword here!. A lot of the measures come from me actually laying up the donor parts on some sections for the guys & actual area's I have built. The key here is kit parts are the key, wonkyness will present itself in building & laying up parts as much as possible on a 1/1 blueprint, even if said blueprint/s are off somewhat!. I can't thank the guys enough for their help & generosity, our Falcon's will truly be a collaborative effort.
Stu
 
I think Stu's way is probably the best way. Take a little bit from both. Its essencial IMHO to have the greeblies. But it sure wont hurt to have a set of comprehensive blueprints to help guide you as well. Im about to start the base construction,and I'm sweating bullets!i wish I had a set when I started!
 
Last edited:
Who was arguing the point not to use Kit parts or there importance? My wallet certainly isn't with all the kit's Ive purchases recently .
The point being brought up was what anomalies the solve found, Those little differences that subconsciously at least make all the difference when looking at the model and that can't be picked up by laying kit parts down or looking at photos. Of course to make the ultimate replica you need both.

Rob
 
Having worked with the scan data for half a year now, I have to say I'm impressed with the original studio piece's grace and symmetry.

The most significant anomaly we found were the that the access pits on the mandibles are in very different locations from port side to starboard.

We address this in the prints.

Here are some of the insignificant ones that we ignore:

Then engine deck is rotated about 0.3-0.5 degrees counter clockwise.

The armor that hangs off the perimeters, hangs off more toward the back than the front by about 1/16".

The armor delineation line between plates is not as concentric as you think.

The domes are nearly spherical, but may have sagged a bit over time. We see about a 1/64" flattening between the perimeter and the gun platforms.

The cockpit tube does not point directly to the middle of the dome and is slanted in all axis (we actually capture this, but its nuance is really hard to describe, ymmv).

The cockpit tube also splays out a bit toward the end bevel. Not much, 1/32" tops, but a bit. This could be just the way the armor sits though.

I don't think this model is nearly as wonky as Slave I. From what I can tell, it's pretty tight.

Hope this helps.

Joshua
 
Great stuff and great work you chaps have put into her.
Love all the little details found and can't wait to see the results. :thumbsup
 
I think Stu's way is probably the best way. Take a little bit from both. Its essencial IMHO to have the greeblies. But it sure wont hurt to have a set of comprehensive blueprints to help guide you as well. Im about to start the base construction,and I'm sweating bullets!i wish I had a set when I started!http://i57.photobucket.com/albums/g224/faustus100/db1e653fbd6e5450edb202b5c9b56e52_zpsc80f2746.jpg
WOW is this your 5 footer , there is so much spoken of the larger model, these are stunning , please more more, how many hours into these
 
With the Falcon being such a wonky thing to build, it crossed my mind that it would take 2 builds to be fairly accurate overall. I mean build one to find out all the quirks, not applying the donor parts though, just placing dry to check fit, so ending up with a naked Falcon so to speak & then transffering all this knowledge onto the second build!. Costly & time consuming for sure, but at least the 'bugs' would have presented themselves & worked out to have the second build a pretty impressive model.
Thoughts?
 
It doesn't have to be expensive. The domes would be tricky, but you could make the test buck out of foamcore and poster board.

I think Andre has talked about doing that.

The domes could just be radial ribs. Not even skinned...
 
This thread is more than 3 years old.

Your message may be considered spam for the following reasons:

  1. This thread hasn't been active in some time. A new post in this thread might not contribute constructively to this discussion after so long.
If you wish to reply despite these issues, check the box below before replying.
Be aware that malicious compliance may result in more severe penalties.
Back
Top