Revell / Zvezda 1 / "2700"(4000) Star Destroyer with correct proportions

Rulebreaker

New Member
Hello everyone,

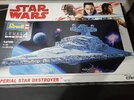
this is the second time i'm buying this kit. first i bought it 6 years ago when it was new, i never finished it, but i hated the wrong angle and how squished everything is/was.

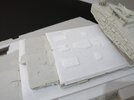
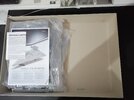
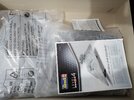
After all those years Revell, since it is a Revell rebox, still has the same paper cardboard layout
but they improved the packaging, this time all corners of the hull were in tact, last time(6 years ago) the corners of the hull were unprotected and borken off or dented
also they changed tho color of the material from light grey, to this dark blue/grey/gray ish - maybe to enforce people to paint it :unsure:

My "work" will be picture heavy and i will try to show what/how i was doing it

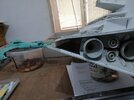
in all those years i tried working on it and improving "the thing" and when trying to remove glued("welded") parts i cut my finger half trough, today, 6monts later i still cant open bottles...

i try to make the pictures external, so the loading should be minimal

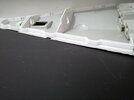
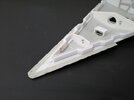
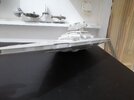
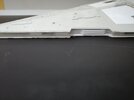
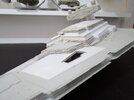
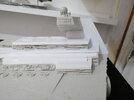
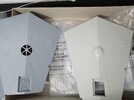
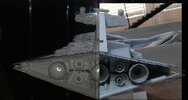
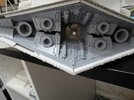
enough talking this is the current state of the first version, where i had to stop...
allbncbl.jpg


most important changes
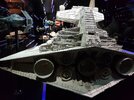
* the superstructre is placed to much rearward, it needs to be moved forward by about +4mm(realising after correcting the spine, that the hull was "short")
* the trench will be / was doubled, but also moved inside, so it doesnt look "fat or to tall"
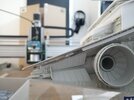
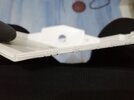
* the spine angle and propotions is/was/were totaly wrong
* the bridge has/had a wrong angle
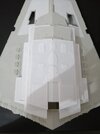
* the superstructre is/was squished, the main structure is now ~30% taller, the side structure is +30% taller, the top is around +50% taller, the "pentagon" roof needs to be taller for anh and esb (for r1 its good)
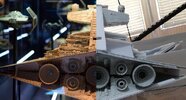
* hangar(s) need correct sized hangar doors, so the shuttle(23m docking mode(wings up)) fits trough it

all learned will be done on the second version.

because working alot on the roof, i named the parts like this
namesaiil2.jpg

* main structure and roof
* top structure and roof
* front structure and roof
* left/right side structure and roof
* left/right small structure and roof
* forward "pentagon" structure and roof
* tri(angle) structure and roof
* spine
* bridge

Why i bought it, it was on sale on ama***e at christmas down to 72 bucks, and this time even further, down to 50 bucks, i think it wont get any cheaper than this

have fun reading and maybe learning something (new)
regards dave
 
Last edited:
thumbnails work in the preview, but not when posting :unsure:

lets try the attach files thing
 

Attachments

  • 1.jpg
    1.jpg
    2.5 MB · Views: 168
  • 2.jpg
    2.jpg
    2.3 MB · Views: 145
  • 3.jpg
    3.jpg
    2.1 MB · Views: 156
  • 4.jpg
    4.jpg
    2.2 MB · Views: 150
  • 5.jpg
    5.jpg
    2.3 MB · Views: 145
  • 6.jpg
    6.jpg
    2.5 MB · Views: 148
  • 7.jpg
    7.jpg
    2.6 MB · Views: 147
  • 8.jpg
    8.jpg
    2.6 MB · Views: 148
  • 9.jpg
    9.jpg
    2.3 MB · Views: 160
  • 10.jpg
    10.jpg
    2.3 MB · Views: 163
Last edited:
Awesome work! This would also be on my wish list to tackle one day, the squished super structure also bugs me lol great work, can't wait to see more
 
i made pictures of the new boxing
the usual paper stuff, 6 years ago everyting was just thrown into cardboard, this time everything is packed in packs
the hull is in a bag in a bag, the inside bag is not an air pad, but it has knobs.
as usual the box is twice as big
and i made a comparison to the new "material" used, its much darker, then on the picture, its a kind of mix of revells color "mausgrau" RAL 7005 and "panzergrau" RAL 7024, its dark gray/grey with a tint of blue
 

Attachments

  • 5.jpg
    5.jpg
    2.3 MB · Views: 135
  • 4.jpg
    4.jpg
    2.5 MB · Views: 118
  • 3.jpg
    3.jpg
    3 MB · Views: 103
  • 2.jpg
    2.jpg
    2.9 MB · Views: 112
  • 1.jpg
    1.jpg
    3.4 MB · Views: 126
i made pictures of the new boxing
the usual paper stuff, 6 years ago everyting was just thrown into cardboard, this time everything is packed in packs
the hull is in a bag in a bag, the inside bag is not an air pad, but it has knobs.
as usual the box is twice as big
and i made a comparison to the new "material" used, its much darker, then on the picture, its a kind of mix of revells color "mausgrau" RAL 7005 and "panzergrau" RAL 7024, its dark gray/grey with a tint of blue

well nice but the space between the upper and lower shell is way too big

Screenshot 2023-09-08 at 23-53-17 Star Wars Identities Display in France Star Destroyer AVENGE...png
Screenshot 2023-09-08 at 23-54-38 Star Wars Identities Display in France Star Destroyer AVENGE...png
Screenshot 2023-09-08 at 23-55-58 Star Wars Identities Display in France Star Destroyer AVENGE...png
 
Current State
IMG_20240225_082951.jpg

Not my best cut
IMG_20240225_083026.jpg


I bought some black and white styrene, some evergreen stuff
IMG_20240225_083653.jpg

also a cutting mat and a crazy sharp knife
IMG_20240225_084029.jpg


I saw this old "revell mini" and bought the only one they had
IMG_20240225_083439.jpg

The flight deck looks a "little" to big
IMG_20240225_083536.jpg

But the guns can be used, i think its to small to be printed even for a resin printer
IMG_20240225_083603.jpg
 
Last edited:
Updated the last pictures, changed image host, but when previewing the thumbnail links work, but when posting, they dont work anymore
so i am directly useing the side insert picture thing - problem is, that the pictures are loaded, if you want to see them or not.
clickable thumbnail would be better, so u can load the picture u would like to see, to safe some internet data volume.
 
Last edited:
Because of the weight of the super structure, the weight squishes down on the hull too. Which in turn bends the hull upward and creating that "way to big" trench. So there is the need of unsquishing it, by making the engine block bigger.
Following pic should help understand the idea.
squish.png


I inserted a 3mm thick styrene on the top hull, wich looks better, but would need a correct chamfer/bevel to look good.
IMG_20240228_103249.jpg

Also you can see all the way to the front, that there i no contact from the upper hull to the trench.
IMG_20240228_103345.jpg


So i started looking closer to the studio scale pics.
17991328_10154309627541581_9074735387376740884_o.jpg

And the Zvezda/Revel is missing the inner flaps, i made em each sheet out of 0,75mm thick styrene. it was a realy slow process of measuring, cutting, try to fit, measure and cut again, till it looks good...
IMG_20240228_103125.jpg

After a while i started to make a 3D file and print it out. I even ended up at version six, one side was always off, so i ended up cutting it in one position and aligning them.
IMG_20240301_135955.jpg
IMG_20240302_152720.jpg

After printing they need some cleaning up and they are good

Finished with all four
IMG_20240303_145020.jpg


looks good, when comapring to the rear view of the studio scale u can still see same wrong spots, on the right side, both bottom and top flaps are equal long, but on the left side, the upper is longer and the bottom flap is shorter.
17991328_10154309627541581_9074735387376740884_o.jpg

also a problem is, that it looks like the engine bells(of zvezda/revell) are to big, to show the details of the left and right bell on top and bottom. I think i mentioned "last year" that the superstructure looks good, but it sits a little to much rear. so my thinking was to move the whole super structure forward by 5mm or now to increase the rear hull by 5mm, and then i could move the enginge block furter and additionaly to the flapps need to cut 3mm thick beveled styrene. pic wich helps understanding
unblock.png


One big probelm i noticed, is that the zvezda/revell engine block is not parralel to the hull, in my honor opinion(imho) this needs to be corected. There are flaps but the hinges for them are cut off by the enigne block not being parallel and sticking out to much.
IMG_20240303_145109.jpg


Finaly i tried to make a picture side by side, still not the best angle/distance but it works.
both v2.jpg

* the Flaps should be smaller, i orientated on the zvezda/revell flaps, but they should be much thiner, looks like 0.15mm per sheet revel/zvezda and i used 0.75mm
* the Engine Bells should be 10% smaller
* the emergency(smaller) Engines should be 10% bigger
* and the 3mm styrene should be beveled and used to rais the hull to the corect proportions
* the hinges for the flaps should be bigger
* Spine is good, but the waste hole should sit a little higher
 

Attachments

  • both v2.jpg
    both v2.jpg
    188.3 KB · Views: 40
  • both.jpg
    both.jpg
    368.4 KB · Views: 43
  • IMG_20240228_103345.jpg
    IMG_20240228_103345.jpg
    2.5 MB · Views: 44
  • isdback.jpg
    isdback.jpg
    161.9 KB · Views: 47
  • IMG_20240303_105008.jpg
    IMG_20240303_105008.jpg
    2.7 MB · Views: 39
  • IMG_20240303_155205.jpg
    IMG_20240303_155205.jpg
    2.9 MB · Views: 42
  • IMG_20240303_145109.jpg
    IMG_20240303_145109.jpg
    2.8 MB · Views: 36
  • IMG_20240303_111319.jpg
    IMG_20240303_111319.jpg
    1.7 MB · Views: 45
Last edited:
While i was experementing with the "flaps" i came across the Outland Tie Fighter is currently on sale on amazon(europe), only 15 bucks.
I also ordered some "E14 Light bulbs.
outland tie.jpg

10 bulps In one package, for only 11 bucks? No Resin printer can beat this price! I bought them, because i found a picture, that shows that they are actualy not "spherical" but more "coneical"
cone.jpg

Side by side comparison of bulb vs revell/zvezda, they are a little thick, but till i find something better, they will do the job.
comp 2.jpg
orig vs short.jpg

The diameter is just a little smaller.

comparison "installed", for easier install, the bulbs could also be screwed in
both.jpg

I tried to find a picture of the studio scale, but i couldn't find one showing this perspective. But as you can see, the light bulb has more space for the details under and above the engine bell.
side both.jpg
 
When I first laid eyes of WEST END GAMES Interdictor…I thought it would make for a sleeker ISD replacement without the spheres—a pre-FIRST ORDER design.

A stock Revell might be good for that with a new bridge.

We never saw a kit of the very smooth ISD from Rebels with the taller tower.
 

Your message may be considered spam for the following reasons:

If you wish to reply despite these issues, check the box below before replying.
Be aware that malicious compliance may result in more severe penalties.
Back
Top