Pee-Wee's Big Adventure Bike

The sizes are pretty close. I had both versions for a while. The correct siren housing is about 1/2" wider but the tiger head is just slightly bigger.
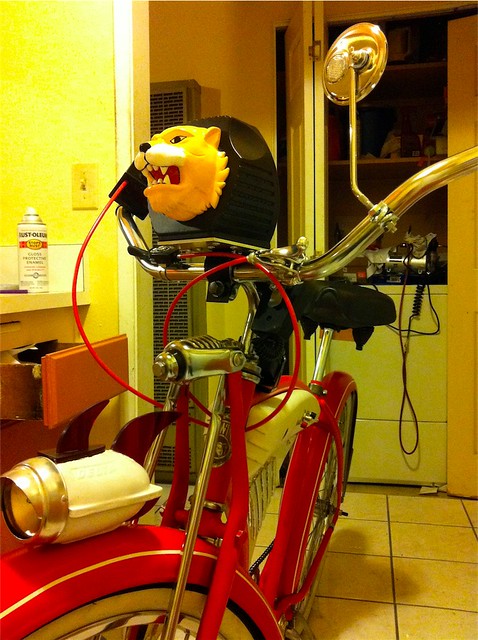
 
I believe that Abe cast this one off of the larger, harder to find version. But he could tell you more about it than I could. I'm almost dont with it now. Painting the mounting bracket black right now. I got the rear decals on and flat cleared the whole panel, and the speaker is mounted inside too. Once that's done all that's left is to do the radar bubble.
 
if thats the case mine must be way bigger, not that it really matters to me as i was never going for a full one dead accurate replica..keep a eye on it once you ride it, i had mine locked up at a restaurant once and watched a guy from a distance scoping my bike then reach over and touch the teeth..so ya watch out for tiger touchers.
 
The casting if off the correct siren like in the movie, which is larger. Though the siren does not originally come with a Microphone, so you have to wire it in. I also recreated the correct mounting brackets for the microphone to the handlebar.
The tiger head is the same size as the smaller housing with the tiger, though the sculpt is done to match the movie sculpt not just close the jewel hole. We compared the tiger and seemed to look like the same mold, we just didn't cast in the rubber ring as it is not rotocast like the real thing so the ring wouldn't be flexible enough to pop in.

I also suggested to Ryan to reinforce the inside of the housing with clear epoxy, though the base bracket has like 12 screws and an inner base plate also.
 
Aaaaand, the siren is done. It was all pretty easy, especially since Abe supplied all of the brackets, screws, nuts, and washers for mounting. He even made a replacement clip for the microphone so it can hang off the handlebars. Again, thanks to Abe, and to Ed for their hard work on the siren kit. I have to say, before it never really felt like a Pee-wee bike. It felt like a cool old cruiser, but now it's a replica. I'm pretty excited, lol.

6854089989_0925e6cf48_z.jpg

6854553085_2874ebd864_z.jpg

6854553053_7be522e66d_z.jpg
 
Rudd, close ups of my siren, never seen a real one before the Ohio museum and built mine from foam fiberglass and bondo, also never had really good pictures of the backside so i just winged it..bought a siren and placed the guts inside. took me a week or so to make with some trial and error.. although not exactly correct nobody ever seems to notice..they ask how i got it and then say wait? you built this? id love to have one of Abes sirens to replace it at some point in the future though. also need to find a way to hide the glue ring around the acrylic..was thinking maybe a black pinstripe?
 
no lights, i didnt even know it lit up until i believe Abe mentioned it..does have a working mic and siren though..but like i mentioned before we the only ones who really know that detail..i could have a tiger with buck teeth and a clown hat and 95 percent of people who wouldnt notice the differance.
 
Just about done with the paint removal on my frame. The aircraft paint stripper made a big difference. I'm still having a hard time getting in the small spaces. Any advice or will it make a difference once it's primed.

I also picked up a Mickey bell for $10.00. It has some corosion on the back but overall it's in good shape.
 

Attachments

  • Before.JPG
    Before.JPG
    2.3 MB · Views: 101
Good find on the bell. Aircraft paint stripper works great, you can get it at autozone. Do you plan to paint or to powder coat?

Not sure. This is my first time working with bikes. What do you guys recommend. I read through the threads and it looks like a lot of people used good old spray paint. Check out these couple spots I could not get off. Do you think this will affect the paint job. Also I have a little bit of surface rust after I cleaned off the aircraft stipper with water. Any thougts.

Thanks
 
Light sanding will take care of that. Make sure you dry it thoroughly. Powder coat is stronger, professionally painted will look the best, spray paint will look the most accurate.
 
The drawback with powder coating is that you'll need to find matching paint for the fiberglass components like the saddlebags since those parts can't be powder coated. Spray paint will probably be your best bet for ease, cost and accuracy. I'm not sure where you're located but you may have problems with spraying paint in cold weather. It tends to get splotchy and takes forever to dry.
 
get yourself a couple red scotch brite pads and scuff the entire thing down..wipe it down with thinner to remove any oils (you can do this before the intitial scuffing also) spray it with filler primer, when dry scuff down again ..wipe down one more time and spray bomb it with your choice of rustoleum paint..i used the color sunrise red but your choice. it takes a good day for the paint to dry also.
 
Thanks guys. I appreciate the help and suggestions. I decided to use the spray paint that way I can match up the bags easier. Plus it will be more fun doing it myself. All of the info on this thread is very helpful. You guys are very creative and it's great we have a site like this to share ideas. Thanks again!
 

Your message may be considered spam for the following reasons:

If you wish to reply despite these issues, check the box below before replying.
Be aware that malicious compliance may result in more severe penalties.
Back
Top