Hi everybody.
I can start of by introducing myself since this is my first ever post on this forum, Name's Henrik, Resident of Gothenburg, Sweden.
As my daytime-job I work as a Design engineer for a car company.
Enough about that though, and onto the build at hand...
I ordered a Bubbleship some time ago from Randy Cooper and the time has now come for me to put it together and consequently, start a build-thread(To keep up the motivation).
Step one for me was to put all the resin-parts in a soap-filled bath overnight, after which I started to plan out my build.
(I see a lot of sanding in my immediate future...)


Since I am a sucker for details, I decided to drill out the barrels out of the main-guns and replace them with aluminum tubing.

I also tried out some paint(Gun metal) and added some detail. I am not overly pleased with the result though, and will try some more matt paint.

Since I did not really like the shape of the padding for the seats(Too thick and uneven in shape), and I saw a problem in getting the white glossy parts looking good, I decided to remove the padding on the part itself and to later put on my own after I paint the part white(Again, a lot of sanding to come).


I had some issues with the fit of some of the parts. I had in the back of my mind heard someone talking about putting parts in hot water and reshape the parts somewhat. I decided to give it a try and lo and behold, it worked miracles. Pictures show before and after.


That is about as far as I've gotten. I'll update from time to time. I leave a picture of what the desk looks like at the moment")

I can start of by introducing myself since this is my first ever post on this forum, Name's Henrik, Resident of Gothenburg, Sweden.
As my daytime-job I work as a Design engineer for a car company.
Enough about that though, and onto the build at hand...
I ordered a Bubbleship some time ago from Randy Cooper and the time has now come for me to put it together and consequently, start a build-thread(To keep up the motivation).
Step one for me was to put all the resin-parts in a soap-filled bath overnight, after which I started to plan out my build.
(I see a lot of sanding in my immediate future...)
Since I am a sucker for details, I decided to drill out the barrels out of the main-guns and replace them with aluminum tubing.
I also tried out some paint(Gun metal) and added some detail. I am not overly pleased with the result though, and will try some more matt paint.
Since I did not really like the shape of the padding for the seats(Too thick and uneven in shape), and I saw a problem in getting the white glossy parts looking good, I decided to remove the padding on the part itself and to later put on my own after I paint the part white(Again, a lot of sanding to come).
I had some issues with the fit of some of the parts. I had in the back of my mind heard someone talking about putting parts in hot water and reshape the parts somewhat. I decided to give it a try and lo and behold, it worked miracles. Pictures show before and after.
That is about as far as I've gotten. I'll update from time to time. I leave a picture of what the desk looks like at the moment
Attachments
-
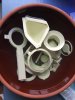 Foto 2016-08-31 07 35 48.jpg769.7 KB · Views: 382
 -
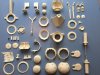 Foto 2016-08-31 08 01 58.jpg1.8 MB · Views: 400
 -
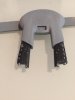 Foto 2016-09-06 18 21 28.jpg699.5 KB · Views: 387
 -
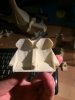 Foto 2016-09-05 19 47 36.jpg792.8 KB · Views: 319
 -
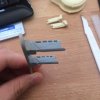 Foto 2016-09-03 10 53 16.jpg525.9 KB · Views: 355
 -
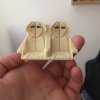 Foto 2016-09-02 18 24 10.jpg497 KB · Views: 407
 -
 Foto 2016-09-01 17 23 48.jpg546 KB · Views: 357
 -
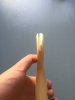 Foto 2016-08-31 17 14 14.jpg605.9 KB · Views: 375