Randy Cooper Hammerhead Corvette cruiser *WIP*

Muzza

Sr Member
With all the 3D printing I have been doing lately it is time to take it easy and knock out a resin kit for a little fun.
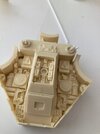
In my stash I had one of Randy Coopers Hammerhead Corvette ships, and having a few days off work with the flu I decided to start cleaning up the parts for the ship.
It was less than one hour and my wife could not believe I had it almost assembled sitting on the kitchen work top.

e.jpg

This is a easy kit to light as well only one in the cockpit and 4 for the engines. I have seen VoodooFX has a lighting kit for it I might just have to have a look into it.
 
Here is a tip for all those people how have not worked with resin kits.
Some kits will come with parts all molded together.
The best way of removing the parts to work with dust free is to drop the sheet into a dish and add some boiling water onto it.

a.jpgb.jpgc.jpgd.jpg

When the resin is warm through and is malleable just use a pair if scissors and cut out the parts. No mess no dust.
f.jpg

You will need to sand the backs off the part you can use some 80 grit water proof paper, using water when sanding will reduce the dust as well.
 
Never have built a resin kit before, but, if I ever end up doing so, I'll have to remember this cool sounding trick.
Love the stuff I've learned here.
Probably more useful stuff than all those years at school.
 
thats actually a really useful tip - thanks mate. Don't you get concerned that the parts go out of shape though?
You can use hot water to get it back into shape the parts I have cut out are flat so it is easy you just put a piece of cloth and place a weight on it to flatten it. Resin does have a memory and usually will form back to its original shape.
 
Here is another tip when building a resin kit.
There will come a time and all suppliers do it even the best with huge industrial machines to safe guard there final product from air bubbles in the resin.
Here is a easy way to fill in the holes with out using any putty and clean up is so easy.

here a part they have a few holes that I have identified.
x.jpg
Next get a drill and a piece of styrene rod the same size, I have used 2.5mm
xxx.jpg

Next drill out the air bubbles with the drill, you don't have to make it very deep just 2 to 3mm
xx.jpg zzzzz.jpg

Then get the styrene rod dip the end into some super glue then push the rod into the hole.
xxxx.jpg zzzzzz.jpg

Using your nippers cut the styrene rod just proud of the part by 2-3mm


Leave it for about 10 minutes so the glue fully dry's then using you exacto knife trim the styrene down flush with the resin piece.
You can finish it up with a sanding stick.

zzzzzzz.jpg zzzz.jpgzzz.jpg

You will find this much easier that trying to fill the hole with putty. Plus if you don't get to sand the styrene don it will just add to the detail of the kit. It is better to have raised part than a hole.
 

Attachments

  • xxxxxx.jpg
    xxxxxx.jpg
    447.2 KB · Views: 200
I know it has been a long time between drinks but I have got the base for the Hammer Head to a point I can work out mounting the model to it.
I will have to add a shaft/tube to mount the model onto, plus I need to run the wiring for the lights through the base and up the mounting tube.

Base 3.jpg
I am not sure if this is how the plaque will end up. I slightly weathered some of the edges of the red but I still might attack it with the air brush.
It will depend on how clean I make the Corvette look.
 
One of these days, Randy needs to invest in a vacuum chamber for his resin pouring... His models are so beautiful, but I am hesitant to buy them because of the amount of bubbles I see in the parts.

Your base looks really nice! I love the look of the weathered red phoenix!
 
One of these days, Randy needs to invest in a vacuum chamber for his resin pouring... His models are so beautiful, but I am hesitant to buy them because of the amount of bubbles I see in the parts.

Your base looks really nice! I love the look of the weathered red phoenix!
Randy dose pressure cast his resin so that does reduce the amount of bubbles in the resin.

Thank you for your comments on the base.
 
I have drilled the base for the electrical socket.
Base 5.jpg

I have drilled through the aluminum pipe as well to feed the wire up to the model.
This has been made easy as the aluminum pipe is open at the bottom of the base allowing the wire to pushed from the bottom up to the model.

Base 6.jpg
 
You will need to glue these parts together.
Ass 4.jpg
Then you will need to drill a hole through the part only if you are going to light up the cockpit.
Ass 3.jpg
Dry fit the part to the ship and fit the cockpit parts you will see what seams will need attention as most of them are covered by other detailed parts.
 
Glue these sections together, align the top ring so the circumferences mate together. Hold together with clamps and elastic bands. the fit is good and not a lot of pressure will be required. I used a gel Super glue but a epoxy glue will be fine if you would like more time lining the two halves.
Ass 1.jpg

I also added this top piece that covers the tom seam.
Ass 2.jpg

You will need to test fit the front section of the ship to the body part. You will need to sand back the round part at the top so it reduces the gap as shown.
Ass 5.jpg
 
When fitting the front part to the rear engine section you may need to do a little modifications so it fit in nicely.

First you will need to open the nock on the ring that locates into the engine section. Plus there might be a little extra material on the cross as marked that may need a small sanding back.
z4.jpg

A little sanding in the center if the tube section mainly on the thicker side and test fit, I used a drum sander on my Dremel for this.
z2.jpg

Dry fit the the two parts together so the fit is tight together. The arrow show the two parts tight.
I them glued it with 5 min apoxi and used the clamps to hold into place. Make sure that the center section of the ship is straight/level before the glue sets.
z5.jpg
 
Last edited:

Your message may be considered spam for the following reasons:

If you wish to reply despite these issues, check the box below before replying.
Be aware that malicious compliance may result in more severe penalties.
Back
Top