Nerf Gun Props? YES!

Just with a perfect paint job childish toys become dangerous weapons.

It's an odd thing looking in from the outside, I guess. I find it a ton of fun, even if it's becoming enough work to not be a "do it when I feel like it" kind of gig :) I am honored to be doing the commission work though and my gas tank is just tickled about things, hehe.
 
Love this thread and have been wanting to do some stuff like this for a while. Should have some time next week for a couple of projects.
Noeland, could you describe how you covered the filler caps on your Thunderstrike and Tornado Strike water clips?
 
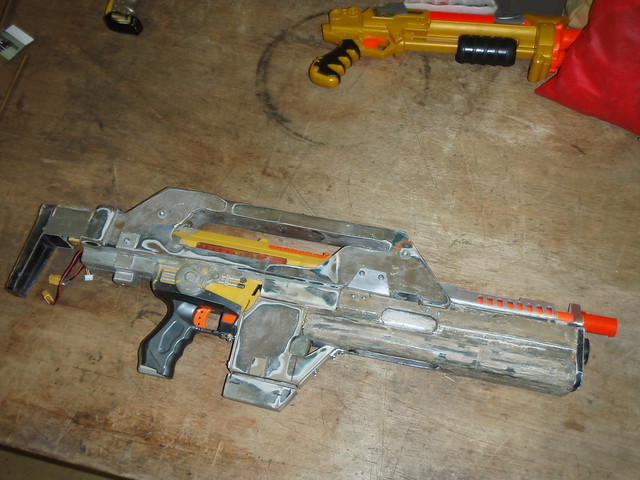
I have been working on a M41-A Pulse rifle from a Stampede:

5865805908_5083433b52_z.jpg


Aliens M41a Pulse Rifle (from a Nerf Stampede!)
 
Painting my Nerf Stampede keeps getting pushed further off into the future because I keep finding new parts to put on order.

I dismantled the Stampede the other day and found that Nerf has 4 extra switches in place, that I removed, to keep you from firing the gun without a clip and/or while the door to clear a jam is open. While I see the "safety" risk in removing these, I'm going to try and use a couple of these to get an ammo counter working. I ordered a QKit countdown board and a green 4 digit LED display. They should be here sometime next week...

Here is a pic of the Stampede's guts with one of those safety switches tapped off and 2 more removed from their locations. When this pic was take, there is still the second clip detection switch installed...

View attachment 57666
 
All these posts have got me in the Nerfing mood in the last few weeks. I've done a few simple mods and paintjobs so far (I'll post that stuff later), but my biggest project so far has been to tackle re-working the Nerf Rebel Blaster. Unlike many of the other Nerf guns, this one was never meant to be taken apart (as several sections are glued together). I've posted several pics of my progress in the following album on Photobucket.

http://s33.photobucket.com/albums/d70/aestivalis_in_irvine/Nerf Blasters/

I've seen various mods for this gun online, but every one has totally butchered the cosmetics, so my focus was to make it shoot and still look good doing so.

The first step was getting the frame apart by removing the scope and splitting the front and rear portions. The scope had to be removed because the front and rear portions are glued on, and also because there are some hidden screws underneath the fake scopemount bracket knobs (which are also glued in place - so taking the scope off completely and re-mounting it later seemed the easiest solution). Since the rear end cap of the frame was glued on, I had to split it with a hobby knife (my hand isn't quite steady enough to try it with a dremel saw...). I then separated the front portion of the frame behind the orange tip, so it will still hold the barrel fairly well. I added some screw holes and threaded standoffs in the rear portion so it will go back together and not be loose or sloppy, and since there really is no place to add screws to the front portion, I added a slip-fit aluminum ring to hold it together.

After cleaning up various details on the main frame, I made a bracket to re-mount the scope that would go inside and be virtually undetectable (except for the two screws on the left side of the frame holding it in place). Unfortunaely, the electronic function of the scope light was lost in the doing, but I may go back and see if it can also be re-worked sometime in the future; right now, I just wanted to get this thing shooting! Dimensions for the scope mounting bracket available upon request (pretty sure I saved my sketch...).

I removed the air restrictor and added a brass barrel, and to increase spring tension, I made a small aluminum spacer that goes behind the spring. I also added a second o-ring of the same size to the plunger (not pictured), since there is room enough in that groove for two.

I think I'll begin masking and painting this thing up pretty soon...
 
Thanks to advice here, I checked out local goodwill clearance outlet.. no luck on nerf guns there, but the regular store coughed up a slightly scrached maverick for the lordly sum of a buck 50! I popped some of the orange whistlers that came in the clear green Tru Vulcan (For a lightup green lantern construct mod), and it worked perfectly!

There are so many maverick repaints I'll have to look them over to see which one I might lean towards.
 
I've asked this before, but I'll go ahead and ask it again:
What do you guys use to seal your paint jobs once they're done to prevent chipping? Is there a type/brand of clear coat in particular you've had success with?
I know there are some good airbrush products but I don't have access to an airbrush so I was hoping for something in a rattle can (or even something that could be brushed on).
Thanks.
 
Future floor wax (or any floor wax by Johnson and Johnson "Powered by Future") is pretty durable, and brushes on for a smooth tough clear coat. I'm not sure with Nerf mechanics how well that would prevent chipping on moving parts though.

Only downside is it DOES create a VERY glossy coat.. something you might not want.
 
I use "Low Odor" Krylon clear if I am going to do a finish clear coat. This is the kind they sell at Pat Catan's and Michaels and Pearl. This comes in Matte and Glossy, and I use both as needed for whatever finish I'm after.

Krylon: Products: Low Odor Clear Finish

The glossy finish gives a nice "wet" look when it's dried and feels like smooth plastic. Example:

BRasns2.jpg


The grips were finished with glossy clear after being buffed with a dremel. The body of the blaster was finished with the matte after being being painted with Krylon Ultra Flat.

The grips have 3 to 4 coats of clear, the body of the blast just 1 coat.
 
I just picked up two new Sonic clear green mavericks today, and some water toys with clear green wands to use to add a barrel on them. ;)
 
HAY GUYZ!

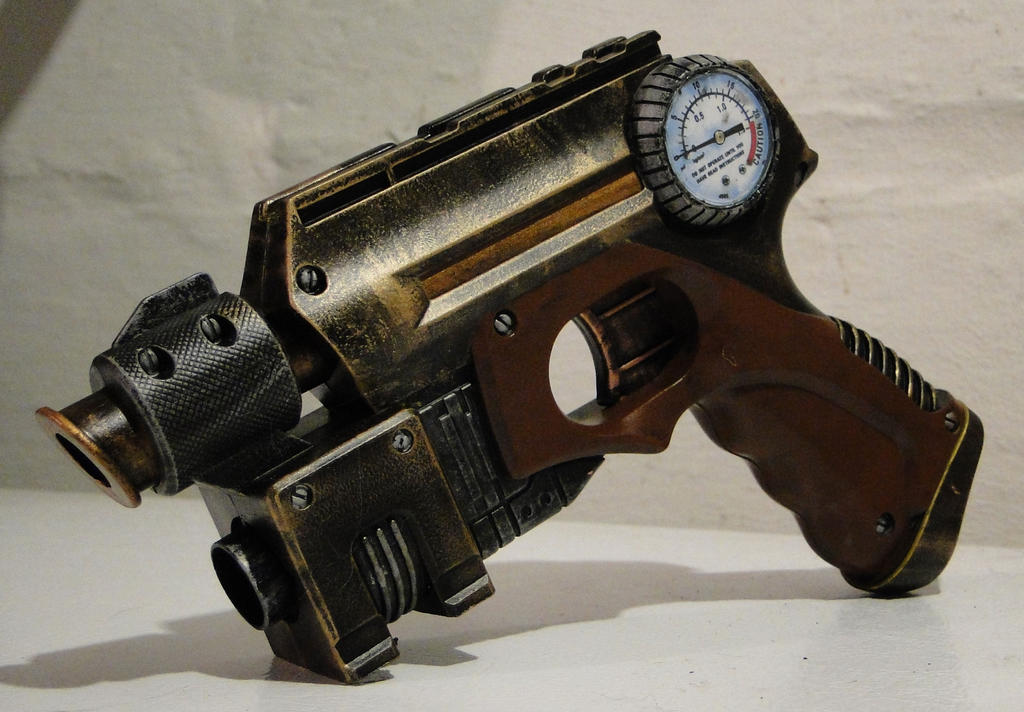
If you feel inspired and want to paint nerf guns but don't want to spend a ton of money, buy the Nerf Nite Finder. They're under 10 bucks, and if you own a Dremel, there's a buttload of paint schemes and modifications you can do to them to achieve a Halo, Steampunk, Sci-fi, or vintage look. I just did one to be used as a theater prop for a steampunk style play. The little circular bit on the Nite Finder is PERFECT for applying any custom made gauge face graphics to make it look like a built in gauge. This one's a steam pressure gauge I found with GIS:
steampunk_theater_prop_pistol2_by_meowymeowmeow-d3koxf6.jpg


Aside from buying the gun, I didn't have to buy any paints or dodads or anything to tack onto it.

Also, can someone tell me how to resize images in replies so I'm not breaking tables with huge pictures? Sorry about that!
 

Your message may be considered spam for the following reasons:

If you wish to reply despite these issues, check the box below before replying.
Be aware that malicious compliance may result in more severe penalties.
Back
Top