My Aliens VP70 kit build

Palantirion

Active Member
I bought this resin kit from Jediguy here on TheRPF, who was very professional. The fitment was really good, so good in fact it led me to spend more time than originally intended due to detailing typically-unseen interior components.

As per my habit, I'll document the build in pics below, over several posts. And if there's anything I failed to cover, or questions about technique don't hesitate to ask.

---DAY 1---
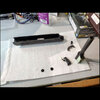
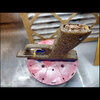
Cleaning. I decided a while ago to make a standalone container system for parts washing. It has it's own bottle containing Simple Green, a toothbrush, various sizes of small containers for various sized parts, and a piece of open-cell foam to use as a drying mat. All this fits into a single Container Store Men's Shoe Box, which I find an ideal modular shop container.
23,08-21, cleaning.jpg


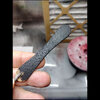
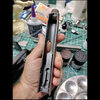
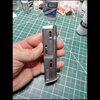
Overall the kit was very well printed. But when it comes to a gun's smooth machined metal surfaces even the tiniest layer lines show up. So two rounds of priming and sanding, just to get close to what I wanted.
23,08-23 (3)sanded again.jpg


I was using Vallejo black surface primer, which is a water based polyurethane. It's not a filler primer, which would have made the job easier but would also have filled in small details and I didn't want that. So lots of sanding.
23,08-23 (4)sanded again.jpg
 
---DAY 2---
MORE priming and sanding.
23,08-24 (4).jpg


Mostly I'm priming now with ghost coats, just enough so I can see what needs to be taken down.
23,08-24 (6).jpg


I painted all the standalone "unpainted steel" parts with Tamiya XF-56. Or at least I think I did. For some reason I didn't take a picture of my materials all together, like I usually do.
23,08-24 (7).jpg


I did, however, have to come up with my own formulation for the elusive Brown Bess. There are, of course, a lot of threads on the topic. But none of them used paints I had on-hand. And since I really like the durability of Tamiya acrylics for this sort of application I figured that was a good reason to make my own formula.

My primary reference was Propstore's photos of a real Aliens VP-70. Not a hero gun, but the pain color should be about the same. I tried to deduce the root color from the weathering, and then went through my paints to find options. These three were the closest. And I did some mixing to test ideas.
23,08-24 (10).jpg


My winning combination is about 35% XF-51 and 65% XF-68. Three test swatches painted on the side of the barrel as I dialed in the ratio. Please note, my percentages are rough estimates, as I was mixing on the fly. But if you start with those two paints you can get super close very easily.
23,08-24 (15).jpg


The barrel itself (of a real VP70) is a not-quite-polished steel. I believe in the movie some of the stunt guns had black barrels. I don't like that, so I airbrushed mine with Molotow Chrome. Step one of two. More on that later...
23,08-24 (17).jpg


The slide, base coated with my Brown Bess mix. But under a weird light refraction so the pic isn't very good.
23,08-24 (19).jpg
 

Attachments

  • 23,08-24 (5).jpg
    23,08-24 (5).jpg
    400.2 KB · Views: 34
---DAY 3---
Turning my focus to the magazine, which fit so nicely into the grip that I couldn't leave it unfinished. Actually about half my build time went into the mag, which pretty much no one will ever see.

In this pic I had just added linear scratches, very softly with sandpaper, to get directional wear on all the surfaces.
23,08-26 (4).jpg


I also made this mag spring out of some scrap wire. It's not actually a spring, just a placeholder to fill space and be visible inside the mag cutouts.
23,08-26 (8).jpg


I also scribed circles onto the trigger to represent the real gun's pin.
23,08-26 (10).jpg


Masked and painted the bare metal parts on the slide.
23,08-26 (12).jpg


23,08-26 (14).jpg
 

Attachments

  • 23,08-27 (6).jpg
    23,08-27 (6).jpg
    424.2 KB · Views: 40
  • 23,08-27 (3).jpg
    23,08-27 (3).jpg
    350 KB · Views: 31
---DAY 4---
Testing texture spray, different distances and pressures. Irritatingly I couldn't get the texture spray spoudastis used in his thread, so I had to settle for some Rustoleum texture spray. Hence the experimentation. This was my winning process, short bursts from about 2' away. What you see here was primed, for visibility.
23,08-27 (3).jpg


Spraying the grip, after a shocking amount of masking.
23,08-27 (6).jpg


Primed, via rattle can for the quick drying time. Because I initially thought I would be airbrushing it with Tamiya's Rubber Black. But then after more examination of the prop gun and real VP70s I realized that the polymer used for the grip/frame wasn't rubber colored but actually black. And fairly shiny, far from a matte finish.
23,08-27 (12).jpg


The perfect color and finish to match that was, oddly, Vallejo's black surface primer. When airbrushed and built up it stays moderately shiny.
23,08-27 (15).jpg


Finished. Looks just like black poly. Oh, wait, it is black poly. Technically.
23,08-27 (19).jpg
 
---DAY 5---
Weathering day. I started by adding scratches to the trigger, like I did to the mag.
23,08-28 (3).jpg


Then I made fine highlights by dry-dragging Molotow Chrome on an old brush. This gave the effect a lot more depth than scratches alone.
23,08-28 (7).jpg


Same to the mag.
23,08-28 (12).jpg


I didn't want my VP70 to look too beat up or over-weathered. Just some minor rust effects. I used Tamiya's hull Red, which is a perfect red-brown for rust on steel. I thinned it and applied it most often as a glaze, carefully, not as a wash. I paid extra attention to any defects that would read as extra wear, and gave them a little more rust.
23,08-28 (17).jpg


A little rust to the pin circle.
23,08-28 (19).jpg


And to the slide lettering. It looked too flat otherwise.
23,08-28 (21).jpg


Same for the sights and rail (I know, it's not a rail). This helped them not read like painted plastic.
23,08-28 (22).jpg


I used Molotow to highlight the extractor.
23,08-28 (25).jpg


A little rust on the slide lock.
23,08-28 (26).jpg


And I'm very happy with how the rust and scratches turned out on the mag's bottom plate.
23,08-28 (31).jpg


I also added slight rust to the mag.
23,08-28 (32).jpg


23,08-28 (34).jpg


Then I rubbed graphite powder on the "chrome" barrel, to dial back it's shine while still keeping it shinier than the other steel on the gun. To me this reads as pretty realistic.
23,08-28 (35).jpg


23,08-28 (37).jpg


As compared to the steel of the front sight. the barrel tip draws the eye.
23,08-28 (41).jpg


Parts, pretty much finished and ready for assembly.
23,08-28 (39).jpg
 

Attachments

  • 23,08-28 (23).jpg
    23,08-28 (23).jpg
    404.9 KB · Views: 38
Last edited:
---DAY 6---
A short day. Assembly of the gun. These photos came out a bit dark, the Brown Bess is lighter in reality.
23,08-29 (1).jpg


Also, this was after a light application and rub-down of Starship Filth (the oil paint color). It gave a more worn look to the gun overall, and slightly darkened some areas.
23,08-29 (2).jpg


23,08-29 (7).jpg


23,08-29 (8).jpg
 
---DAY 7---
Mag day. Remember when I said the mag took about half the time of this build? This is why. One thing led to another and I ended up buying 9mm practice rounds to repaint for the mag. But, and this isn't surprising, they were a little long because of the thicker resin walls of the mag compared to it's real life stamped steel. I had to cut the rounds down by about 1/8", and the easiest way to do that was to convert them into (non-jacketed) semi-wad-cutters. For that I used a knife and this Micro Mark belt sander, with a 1-2-3 block as a makeshift table. No, they don't match very well. But when finished you can only see the top one's nose.
23,08-30 (1).jpg


Then I painted them with neutral gray acrylic from Monument Hobbies.
23,08-30 (3).jpg


And used Starship Filth to weather the cases. The one on the right is weathered.
23,08-30 (4).jpg


Then I gave the "lead" a rub with graphite powder and assembled the mag with the rounds inside.
23,09-01 (1).jpg


23,09-01 (2).jpg


23,09-01 (8).jpg
 

Attachments

  • 23,09-01 (4).jpg
    23,09-01 (4).jpg
    392.8 KB · Views: 39
Thanks guys! I posted a separate thread just for the Brown Bess mix.
 

Your message may be considered spam for the following reasons:

If you wish to reply despite these issues, check the box below before replying.
Be aware that malicious compliance may result in more severe penalties.
Back
Top