mikelbrierly
New Member
As soon as I finished building the LEGO UCS Falcon I knew I needed to build a display that was worthy of this beast. Inspired by the packaging, I figured a cool display would be the landing pad from cloud city.

First thing I did was throw together a little cardboard mockup

The backdrop was a little tricky. I really wanted to use something that Ralph McQuarrie had painted for Bespin, but most of his backgrounds included the falcon or the landing pad itself, so I decided to take some screengrabs from the Battlefront 2 PS4 game's cloud city map. I basically walked out to the landing pad, looked around and took a buttload of screenshots. Then I spliced those together in Photoshop to create a cohesive backdrop.

If anyone wants a higher res version of that just hit me up.
Since I was fairly satisfied with the mockup, I moved on to creating the actual landing pad. I thought about making the whole thing out of Legos for cohesiveness, but the platform would have been way too cost prohibitive and also not very sturdy. So I opted to make the ground and support from some 1/8" and 3/4" plywood.

I scored lines in the floor to replicate the tiles of the landing pad. The holes around the brim will be for some small LEDs.


Initial rough LED test

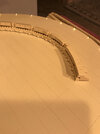
Next up I wanted to have the rim be made of LEGO to match the scene and the model a little more. To do that I used a program called stud.io by BrickLink. It's a 3D software for creating Lego sets.

One of the awesome things about this software is you can import official sets, and use them to set the scale of what you're building. I did that to get the general scale here. Once I was satisfied with the model, I was able to export it and create a parts list using BrickLink and Rebrickable to order said parts.
The only part I couldn't get in the right color was the inside corner piece. I got it in white, and had to create a paint match.
The piece on the right is an official piece, and the left is the paint match.


Next I put together some of the pieces to test how they would align and where the lights would be shining through. The model I created has a single translucent piece for the lights every fourth segment.

I also wanted the display plate to hinge off of the front of the display, so I threw together some pieces to allow a nice angled "museum-looking" title card

Here was the first assembly


And then for the most fun part, the positioning of the minifigures!!


I haven't added in the backdrop yet, but I'm wonding if this display might actually look a little better without it. It could be awesome in the right context, and I may still give it a try, but I'm happy with how it all turned out for now.
The other cool thing is this layout could totally work for the UCS Slave 1 set!

Let me know if you would like any assets or files, or info on getting parts to build your own.
Here is a link to the stud.io file if you want to download it and check it out!
UCS_falcon_cloud_city_landing_pad.io
First thing I did was throw together a little cardboard mockup
The backdrop was a little tricky. I really wanted to use something that Ralph McQuarrie had painted for Bespin, but most of his backgrounds included the falcon or the landing pad itself, so I decided to take some screengrabs from the Battlefront 2 PS4 game's cloud city map. I basically walked out to the landing pad, looked around and took a buttload of screenshots. Then I spliced those together in Photoshop to create a cohesive backdrop.
If anyone wants a higher res version of that just hit me up.
Since I was fairly satisfied with the mockup, I moved on to creating the actual landing pad. I thought about making the whole thing out of Legos for cohesiveness, but the platform would have been way too cost prohibitive and also not very sturdy. So I opted to make the ground and support from some 1/8" and 3/4" plywood.
I scored lines in the floor to replicate the tiles of the landing pad. The holes around the brim will be for some small LEDs.
Initial rough LED test
Next up I wanted to have the rim be made of LEGO to match the scene and the model a little more. To do that I used a program called stud.io by BrickLink. It's a 3D software for creating Lego sets.
One of the awesome things about this software is you can import official sets, and use them to set the scale of what you're building. I did that to get the general scale here. Once I was satisfied with the model, I was able to export it and create a parts list using BrickLink and Rebrickable to order said parts.
The only part I couldn't get in the right color was the inside corner piece. I got it in white, and had to create a paint match.
The piece on the right is an official piece, and the left is the paint match.
Next I put together some of the pieces to test how they would align and where the lights would be shining through. The model I created has a single translucent piece for the lights every fourth segment.
I also wanted the display plate to hinge off of the front of the display, so I threw together some pieces to allow a nice angled "museum-looking" title card
Here was the first assembly
And then for the most fun part, the positioning of the minifigures!!
I haven't added in the backdrop yet, but I'm wonding if this display might actually look a little better without it. It could be awesome in the right context, and I may still give it a try, but I'm happy with how it all turned out for now.
The other cool thing is this layout could totally work for the UCS Slave 1 set!
Let me know if you would like any assets or files, or info on getting parts to build your own.
Here is a link to the stud.io file if you want to download it and check it out!
UCS_falcon_cloud_city_landing_pad.io