First time kit-bashing spaceships

SethS

Master Member
RPF PREMIUM MEMBER
Long story short... I'm an on-strike writer, using my free time to develop some of y own ideas, planning to shoot a sci-fi short. There's some space ships in it, and in talking with my team I realized I don't know anyone who does CG, (that isn't expensive and super pro) and had no idea what it might cost. After watching some YouTube videos I realized that what I DO know with after effects might make it fun and easier to just to practical models, so long as I get a DP that knows how to shoot them.

I've always wanted to kit bash some spaceships together so this seemed like the time. I'm crafty, I've built a few dozen lightsabers and blasters, so I feel like I can do this following the popular tyrone "panelizing/greeblie" method. That said, I also know that no straight-edge can truly help me cut a straight lines and I I am a little numbers dyslexic. To that, I decided that instead of building something from scratch I def want to repurpose something.

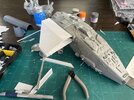
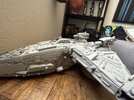
I decided to start with this old Batplane my kid nabbed at a yard sale a decade ago.

IMG_5531.JPG


Bonus points if you know what toy line this is actually a re-use from.

For donor parts, I have a couple Macross Valkyrie fight kits, some Russian Mig weapons packs, and some rabid ship model. I have most of these from when I wanted greenflies for custom blasters. So I set the thing out with pots and stared at it for a few days.
IMG_5536.JPG
IMG_5553.JPG


The main thing I want to be aware of is the scale of the ships in my short are mid-sized. Much bigger than fighters, but not full on capital ships. This one is actually an orbital weapons platform/gunship. So I want it to be tank-y. That in mind, I got started. One lesson for later... this toy is a vinyl-plastic. Very soft, details not sharp. It didn't occur to me that this would make for harder adhesion even with using a chemical welding glue. I gave the whole thing a pretty good sanding, but as I was going a long I realized it def worked better to do large panels with a big surface area to adhere, and add the greebles to that. Greebs put directly onto the body tended to come off.

IMG_5582.JPG
IMG_5583.JPG
IMG_5584.JPG

Trying to be organic. Ended up making that little dock on top. Doubt it will ever show, but it was fun to do. And it inspired me to make a little mini-shuttle. If anything, this inform the scale of things.


IMG_5592.JPG


Also, that back end of toy had stickers on it as thrusters, reminded me of a Star Trek style impulse deck... so I decided to make little engine clusters there. Also, using the Valkyrie space boosters as my main engines might be a bit of a cheat, but they look the part so well.
IMG_5587.JPG


The need for lots of panels make it look super-armored, which, TBH, works for the story. So I'm letting it set and staring at it before hitting it with some primer later.

IMG_5589.JPG
IMG_5593.JPG


Also seeing the lea work is a biiiit sloppy in a lot of spots. I'll send down what I can, but the camera will never be that close to it, so I'm forgiving myself for being a bit missy on my first attempt.
 
Very neat, it’s already looking awesome. I’m definitely looking forward to watching this thread.
 
When kit bashing my first thought is always "Human Scale". If there's a pilot(s) what would that scaled human look like on top of his spaceship?
You have to decide, from the get-go, how big are the details/greeblies on that model. You always have to think about the purpose of piece X in relation to piece Y.
Let me explain: example "Does that intake on the left, and the piping going from it to another greeblie makes it work?"
If it was a real piece of machinery; would that piping be logical in its position on top of the main surface?

It's always problematic to start with fairly low greeblies detailing and to suddenly go left field with a big protruding one. It detracts from the overall look.

I know that it's your first foray into kit bashing...you'll learn as you do. The coat of grey will give you a definite indication about the stance/look of the model. Eager to see your next update(y)(y)
 
Do you have access to a motion-control slider? That way you can do repeatable passes with the camera. I'm assuming you want to move the camera and not the model. There are lots of articles online about it.

In fact, our very own star-art helped build/paint a model for a short Kickstarter film called "C The Movie," on which the filmmakers used a a DitoGear slider to do the MoCo shots. Here's Wired article about it, and here's another article that goes a bit more into the technical parts of shooting the model.

And have fun with it! My dream one day is to reproduce a lot of the model shots from ANH. Just need a 40' track! :lol:

SB

PS: Also, if you need any help, I have lots of After Effects experience. Am a video guy. Sounds like a fun project.

EDIT:

Also, this video from Mike Verta talking about the nonsensical way that starfields were animated in ANH is interesting to study in order to get motion out of a model that's not super kinetic.

EDIT 2: star-art posted images from a magazine detailing the filming of the miniature here: "C" Movie Starship Miniature Effects Model
 
Last edited:
IMO, you've chosen a nice base to build off of. I'm looking forward to seeing it with a some primer, that should help with understand the scale (in relation to its crew). Will you be adding any access-ports, hatches, and/or windows?
 
I would think the block/mini-shuttle might go underneath?

The toy has such smooth lines I might want greebles to match.
I liked the odd symmetry of putting it on top, but realistically you're not wrong.
When kit bashing my first thought is always "Human Scale". If there's a pilot(s) what would that scaled human look like on top of his spaceship?
You have to decide, from the get-go, how big are the details/greeblies on that model. You always have to think about the purpose of piece X in relation to piece Y.
Let me explain: example "Does that intake on the left, and the piping going from it to another greeblie makes it work?"
If it was a real piece of machinery; would that piping be logical in its position on top of the main surface?

It's always problematic to start with fairly low greeblies detailing and to suddenly go left field with a big protruding one. It detracts from the overall look.

I know that it's your first foray into kit bashing...you'll learn as you do. The coat of grey will give you a definite indication about the stance/look of the model. Eager to see your next update(y)(y)
I definitely learned this along the way. I think it changed scale a few times as I went along. The shuttle came toward the end and both aided and ruined things. I think since my story has this thing s a weapons platform/space tank, I'm okay with it being a bit odd and cumbersome... but yeah, you're not wrong.

Currently my thinking is the raised bar on the top is the shoebox set I am looking at to shoot in.

Looking back at all the model spaceships I saw in stories in the 80s as a kid this is definitely more BBC than ILM. :lol:
Excellent project ... have you considered any lighting ... or will you add that in post?

Chaïm
That's definitely beyond my current skill level... but I've been looking at a lot of YouTube videos and am amazed by what some people do with lighting. I just don't know if I have the dexterity for such fine work!

I'll probably cheat some blinky navigation lights on in After Effects,
Do you have access to a motion-control slider? That way you can do repeatable passes with the camera. I'm assuming you want to move the camera and not the model. There are lots of articles online about it.

In fact, our very own star-art helped build/paint a model for a short Kickstarter film called "C The Movie," on which the filmmakers used a a DitoGear slider to do the MoCo shots. Here's Wired article about it, and here's another article that goes a bit more into the technical parts of shooting the model.

And have fun with it! My dream one day is to reproduce a lot of the model shots from ANH. Just need a 40' track! :lol:

SB

PS: Also, if you need any help, I have lots of After Effects experience. Am a video guy. Sounds like a fun project.

EDIT:

Also, this video from Mike Verta talking about the nonsensical way that starfields were animated in ANH is interesting to study in order to get motion out of a model that's not super kinetic.

EDIT 2: star-art posted images from a magazine detailing the filming of the miniature here: "C" Movie Starship Miniature Effects Model
This is all super helpful, thank you! Before I was a writer I was a graphic designer, and did a fair amount of motion graphics, so I have a good understanding of After Effects even if I haven't done this specific type of work. I'll harass you for sure if I have questions.

As for how to shoot, I'm still doing research on lenses and cameras for what I want to do for the rest of the shoot and I haven't found a DP for it yet-- but those are conversations I am doing my homework for now. I forgot to add, I did drill and tap a standard 1/4 20 hole into the bottom of the ship. So, yes-- odds are the ship will be mounted on an arm of some sort in front of a green screen and will move the camera. Low end, a dana dolly or tabletop slider. I really ram only doing few flybys so do a motion control system is probably overkill.
IMO, you've chosen a nice base to build off of. I'm looking forward to seeing it with a some primer, that should help with understand the scale (in relation to its crew). Will you be adding any access-ports, hatches, and/or windows?
Like I said above, I changed my mind a few times about the scale of things... but I think there's details that COULD be hatches. Windows-- probably not, I don't want to have to deal with any sort of internal details this time around. The first thing somebody does in the script is activated an armored shutter so as to explain why we don't see windows from the outside.
 
I did the primer this morning. I have the fronts of the missile boxes and a scotch-built rail gun I haven't added on yet because they need to be painted in pieces before assembly (which honestly I should have done for the engine pods as well.)

IMG_5597.JPG
IMG_5598.JPG
IMG_5602.JPG
IMG_5607.JPG

Overall-- I'm pretty happy. There's some pieces of serene that are a bit to thick I'm going to pop off, and I'm probably over-greebled in some places and under-paneled in others... but overall I like the feel of it. It's got a very tank-y OG Battlestar Galactica vibe to it which I like. I reserve the right to totally change my mind and hate it after doing some camera tests.

I'm putting it on the shelf and staring at it for a few days to see what starts to bother me before getting into the detail paint. I think I want to keep the dirty gray/white ANH/BSG hue colors. I will probably lighten it up a little, do a few details in color, weather it, and maybe add a few decals.

In the meantime, I'm starting in on the second ship. I'm using this old Fisher Price spaceship toy of mine from 1978! This was made at the scale of OG Star Wars figures so poor kids who only got random Star Wars toys could have cool ships too! I actually remember watching Wrath of Khan in second grade, then pretending this thing was capital ship-scaled. Of course, the seat one the action figure really informs the scale, so covering that, and changing the basic silhouette are my first plan. This one is more hard-plastic, so I think the styrene will adhere much better.

IMG_5674.JPG


I
IMG_5676.JPG
If it's not obvious, the center bit pops out to be a color craft, leaving a big round hole in the lower half. First thing I did was cover that hole, then add half an Atlas rocket model body to the bottom. I cut out the "cockpit" seat from its base, gave it a styrene bottom, and moved it out in front. That made for some galactic/Y-Wing vibes for sure. I built up the body and used a lot of strips to crossover into the front section to support it. I didn't get a pick before I sealed it up, but I made a couple gussets inside as well to help hold it together.
IMG_5675.JPG
IMG_5680.JPG
IMG_5682.JPG
I also did. bit of pre-greenling early on just to help redefine the shape.Going to let this sit and set, then sand up the rough spots and clean things up a little before going further. Definitely need to cover as many of the seam-lines of the original toy as possible.
 
SCRATCH built hahaha...

Though if I am being honest, after a few hours breathing Weld-On fumes on the first ship I was definitely loopy. Wore a mask this last time!

Forgot to add-- this Fisher Price ship, in trying so hard to ge some of that Star Wars money actually already has some panelizing and greeble style details!i
 
Last edited:
The balance between empty spaces and "greeblies central" is a mind/eye game for sure. Empty spaces are adding to the look and, if your aim is synchronicity between left/right sides then these could be a great visual design. Too much of a good thing as they say; too much greeblies is sometimes detrimental to the whole look. Eager to see your next update(y)(y)
 
Well sadly, those vinyl plastic batwings just didn't take to the Weld-On. They were just too soft and flimsy for me to be able to sand well without taking part. Everything fell off of them. I decided to retract them as designed, and build replacements. I got super clever building a little jig/frame to slide over where they tuck in.

IMG_5693.JPG
IMG_5695.JPG

I figure there's enough flat space there I can adhere better. The wings will have to be thicker to structurally work-- but again-- space tank!

IMG_5698.JPG
IMG_5741.JPG
IMG_5742.JPG

I added a sloppy crossbar on top to help keep them lifted until everything sets. I'll reshape/cover it once it feels set and sturdy.

As it does that, I finished up greebling the other ship...

IMG_5686.JPG
IMG_5689.JPG
IMG_5687.JPG
IMG_5691.JPG

I need to fix the cock-eyed over-hang, but those windows on the nose are about the right scale... also, I need to use less Weld-On. these pics show I'm out of control with it hahaha. I gave it the first coat (forgot to take pics but you can see it in the BG of the other ship pics. Will give it coat 2 once these new wings are greebled up on ship 1.
 

Attachments

  • IMG_5697.JPG
    IMG_5697.JPG
    2.9 MB · Views: 57
Wow, these both look amazing, you have a very good sense of design, glad you’re not just plunking details all over the place. They’ll be models you can be proud of!
 
I usually use crazy glue or contact cement for my models...careful trying to glue stuff on already painted surfaces. You should sand the surface and get rid of the paint first. It'll give you a headache later on; pieces have a tendency to fall off, taking the paint with them also:(;)
 
Got the new wings greebled up, and have them both painted... Need to do the detail paint and assemble my weapon pods, attach them, then start doing overall weathering and paint details...

IMG_5768.JPG
IMG_5770.JPG
IMG_5772.JPG
IMG_5773.JPG
IMG_5776.JPG
IMG_5779.JPG
IMG_5776.JPG
IMG_5779.JPG
 

Attachments

  • IMG_5780.JPG
    IMG_5780.JPG
    2.7 MB · Views: 45

Your message may be considered spam for the following reasons:

If you wish to reply despite these issues, check the box below before replying.
Be aware that malicious compliance may result in more severe penalties.
Back
Top